Launchpad Tutorial with Ableton Live 10 Lite - Part Six
Creating an EDM Song (continued)
In Part Five we started creating a basic EDM song, and now we'll pick up where we left off and add more to the song.
Up to this point we've been working in the Session view, creating clips and loops to try out different ideas. Now we'll arrange these ideas into a song using the Arrangement view. On your computer keyboard, press Tab to switch to the Arrangement view:
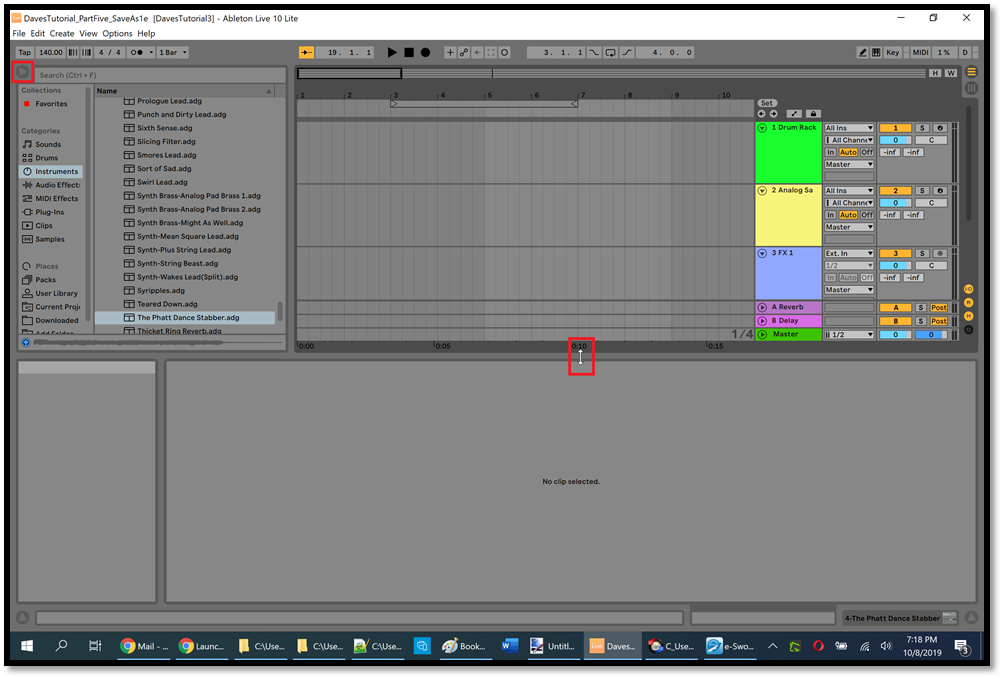
On the right side of the screen you can see the track titles from the Session view, except now the tracks are horizontal. Click the round button at the top left corner of the Ableton Browser (highlighted with a red rectangle in the picture above) to hide the Browser so you can see more of the Arrangement view. Near the center of the picture above, the mouse cursor is highlighted with a red rectangle. Move your mouse cursor to that spot so it changes to an up-and-down arrow, then click and drag downward a bit so you can see more of the Arrangement view:
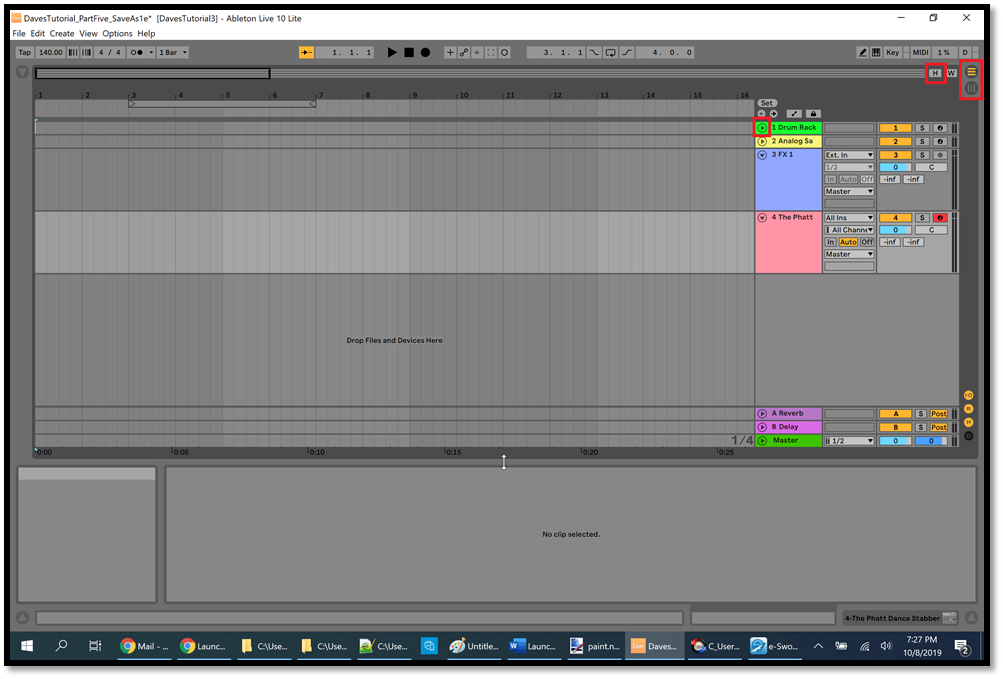
The track titles have a round button with an arrow in it (highlighted with a red rectangle in the Drum Rack track in the picture above). Click that button to minimize or restore the height of the track (tracks 1 and 2 are minimized in the above picture, tracks 3 and 4 are not). Near the top right corner of the screen is an "H" button (highlighted with a red rectangle in the picture above) which will restore the Height of all of the tracks. You can also hold down the Alt key on your computer keyboard and use the scroll wheel on your mouse to adjust the height of whichever track the mouse is hovering over. To the right of the "H" button are 2 round buttons with 3 lines in them. These buttons allow you to switch between Session view and Arrangement view. If you minimized any tracks then click the "H" button to restore the height of all 4 tracks.
Notice that there's no music displayed in the Arrangement view. Press Tab to switch back to the Session view, and we'll record our Session view ideas onto the Arrangement view.
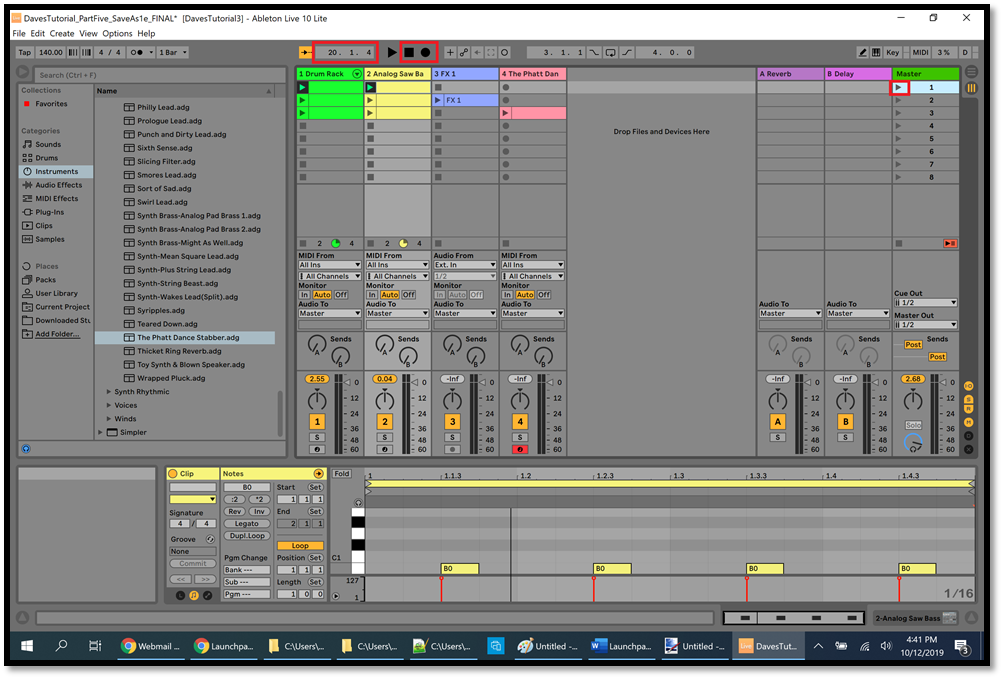
First let's familiarize ourselves with what to do. Near the top center in the picture below we can see the Stop button (the black square) and the Arrangement Record button (the black circle), both of which are highlighted with a red rectangle. To the left of those buttons we can see "20.1.4" (highlighted with a red rectangle). This means that if I click the Arrangement Record button then the music will start recording at the 4th sixteenth note in the 1st beat in bar 20 in the Arrangement view. We want to start recording at 1.1.1, so we can click the 20 and drag the mouse until it reaches 1, and do the same with the 4. However, a quicker way to return to 1.1.1 is to click the Stop button when there's no music playing.
Before recording the song, practice playing the whole thing by following these steps:
-
Click the first clip in track #2 to highlight it so that you can see the yellow icons in the Note Editor (don't launch the clip, just click in the yellow area away from the Play button). In the Note Editor in the picture below, notice the 4 yellow icons at B0. In between the first and second yellow icon there's a vertical black line. That line moves across the Note Editor from left to right while the clip is playing.
-
Click the first Scene Launch button in the Master track (highlighted with a red rectangle in the picture below), and watch that vertical black line in the Note Editor until it reaches the end of the Note Editor (i.e. the end of bar 1). After it loops back to the beginning, click the second Scene Launch button in the Master track.
-
After the second scene starts playing, click the blueish clip in track #3 to highlight it (don't launch it) and watch the vertical black line in the Note Editor. When it's somewhere in bar 4, click the third Scene Launch button. Let the melody play through twice, then click the Stop button (the black square at the top of the screen).
To prepare for recording, click the first Scene Launch button in the Master track, then click the Stop button. The purpose of this is to activate the Play buttons for the first clips in tracks 1 and 2 (as in the above picture). Click the Stop button again to reset to 1.1.1.
To record the song onto the Arrangement view, follow steps 1, 2, and 3 (above). The only difference is that instead of clicking the first Scene Launch button in the Master track in step 2, click the Arrangement Record button (the black circle next to the Stop button at the top of the screen). Do everything else just the way that you practiced it.
If you mess up while recording, simply click the Stop button and then click the Edit menu and click Undo Record. Then try again.
Now you've recorded the song onto the Arrangement view. Press Tab to switch to the Arrangement view, and notice that you have music in all 4 tracks, but the music is grayed out:
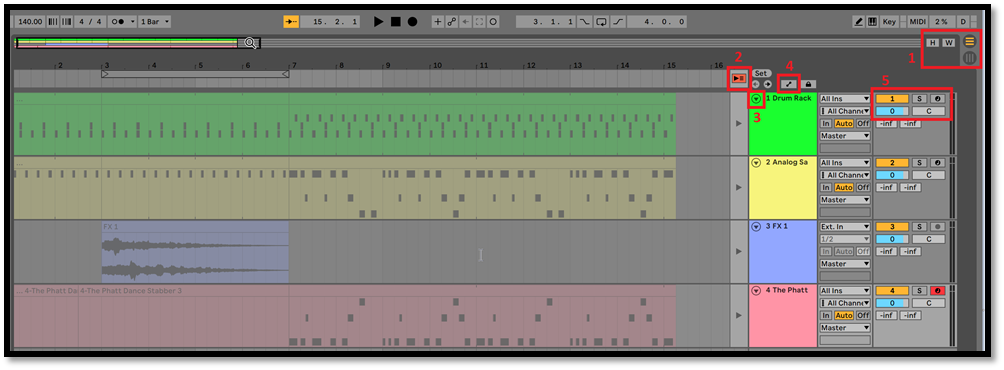
In the above picture, several things are highlighted with red rectangles:
-
At the top right corner of the picture, the "H" button will optimize the height of all of the tracks, and the "W" button will optimize the width of all of the tracks. The 2 round buttons with lines in them will switch between Session view and Arrangement view.
-
The "Back to Arrangement" button is red, indicating that the Arrangement view has been modified by the Session view. Click this button so that the music is no longer grayed out, and then you can begin working on your song in the Arrangement view.
-
Each track has a round button with an arrow in it. This allows you to minimize and restore the height of a track. You can also change the height of a track by hovering the mouse over the track and holding down the Alt key on your computer keyboard and using the scroll wheel on the mouse.
-
This is the Automation Mode button, which we'll use in a few moments.
-
These controls are similar to what we saw in the Session view. Turning off the "1" button will mute this track. Turning on the "S" button will Solo this track (muting the other tracks). To the right of the "S" button is the Arm Recording button, which we used earlier in this tutorial. The blue "0" button is the Track Volume button, which you can change by clicking the button and dragging up or down. The "C" button is the Track Pan button. Click this button and drag up and down to make the sounds come out of the left or right speakers.
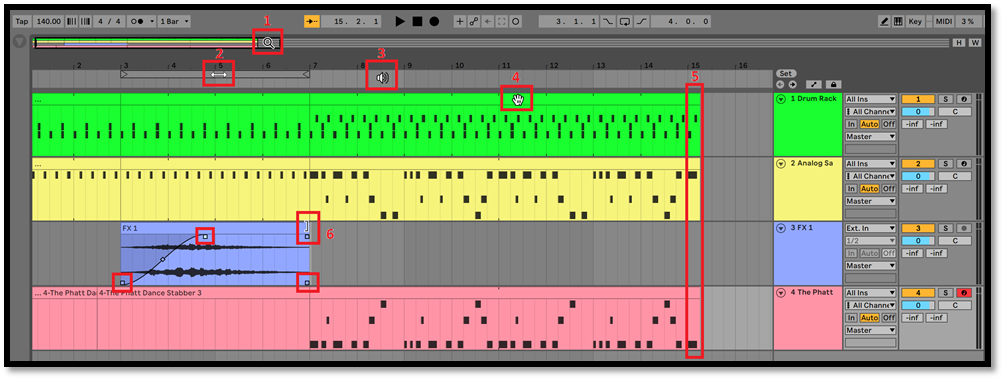
The next picture is a composite which shows what the mouse cursor looks like at several places in the Arrangement view:
-
Starting at the top of the above picture, the mouse cursor looks like a magnifying glass. As we've seen before, when the mouse looks like a magnifying glass then you can click and drag left or right to scroll the music, and you can click and drag up or down to zoom out or in. You can also hold down the Ctrl key on your computer keyboard and use the scroll wheel on your mouse to zoom in or out. You can also press the "=" and "-" keys on your computer keyboard to zoom in or out.
-
When the mouse is over the loop area (the thin horizontal area which stretches from bar 3 to bar 7 in the picture), it changes to a left-and-right arrow. This allows you to click and drag the loop area to any part of the music that you want to loop over and over (so that you can work on a small section of the music, for example). When the mouse is over the loop area and looks like a left-and-right arrow, you can right-click to activate or deactivate the looping, and you can click and drag the loop area to any section of the music that you want to loop. If the loop as activated, then clicking the triangular Play button at the top of the screen will play the section of music in the loop area.
-
When the mouse is just above track #1 and looks like a speaker, if you click the mouse then the music will begin playing at that point. In the above picture, the speaker icon is halfway between bar 8 and bar 9, so if we click at that point then the music will begin playing halfway between bar 8 and bar 9.
-
When you move the mouse just above the notes in a track, it changes to look like a hand. This is the title bar for the clip, and you can right-click in this title bar and click Rename to give the clip a name. Clicking the title bar of a clip will highlight the entire clip. Tracks 1 and 2 both contain 3 clips, which are the 3 clips from the Session view.
-
When I was in the Session view and I recorded the song onto the Arrangement view, I didn't stop recording at the exact right moment, so I have an extra note or two in each track at bar 15. If I want to start playing my song at bar 14, for example, to hear that extra note at the end, I can move my cursor to bar 14 until it looks like a speaker (see point #3 above). Then if I click the mouse, the song will start at bar 14.
-
At the top right corner of the blueish clip in track #3, the mouse cursor looks like a square bracket (]). As we've seen before, when the mouse looks like a square bracket then we can click and drag right or left to lengthen or shorten something. For example, we can lengthen or shorten the loop area (#2 above) when the mouse looks like a square bracket at the left or right side of the loop area.
To get rid of the extra notes at bar 15, I simply need to put the mouse cursor at the top right corner of the last clip in tracks 1 and 2 and 4 until it looks like a square bracket, then click and drag to the left so that each clip ends just before bar 15.
Notice that the music in tracks 1 and 2 and 4 are all just black rectangles, which indicates that these are MIDI tracks. The clip in track #3 is a squiggly line, which indicates that it's an audio track. We can use the square bracket to lengthen or shorten a loop in a MIDI track, but we can't use it to lengthen an audio track. We can only shorten an audio track (or return it to its original length).
Just below the square bracket in the clip in track #3 there's a small square, and there are 3 other small squares which are highlighted with red rectangles in that clip. These are the Fade handles, which only appear when you hover the mouse over an audio clip (MIDI clips don't have Fade handles). Clicking and dragging a Fade handle allows you to fade in or fade out the sound in that clip. In the above picture I clicked the top left Fade handle and dragged it to the right a bit so that the clip will fade in when it's played, just for the picture. We don't actually want this clip to fade in for this song.
To play the music in the Arrangement view, you can place the mouse so that it looks like a speaker (point #3 above) and click at the beginning of bar 1. Or you can click the square Stop button at the top of the screen once or twice to reset back to 1.1.1, then click the triangular Play button to the left of the Stop button. Play the song all the way through, then click the Stop button after the music ends. Notice how much easier it is to play an entire song in the Arrangement view, because you don't need to launch individual clips or scenes.
Play the song again and listen to the melody. It's not very loud compared to the other tracks, so you can try increasing the volume of track #4 by clicking the blue Track Volume (which we saw a moment ago) in track #4 and dragging up. Or you can click the blue Track Volumes for the other tracks and drag down to decrease their volume. Adjusting the volumes like this is part of "mixing" a song to get the elements sounding their best together. It's also a way to prevent "clipping," which is when the volume in the Master track goes into the red (as we saw in Part Four).
Now let's work on the drop, which is where we build the tension and then release the tension. One way to build the tension is to make an element of the song (such as the melody) get higher and higher in pitch. Another way is to make an element (such as the drums) go faster and faster. Another way is use a sound effect which quickly builds and then stops. Another way is to make the sound of part of the song get more and more "trippy." What the heck, let's do all of these.
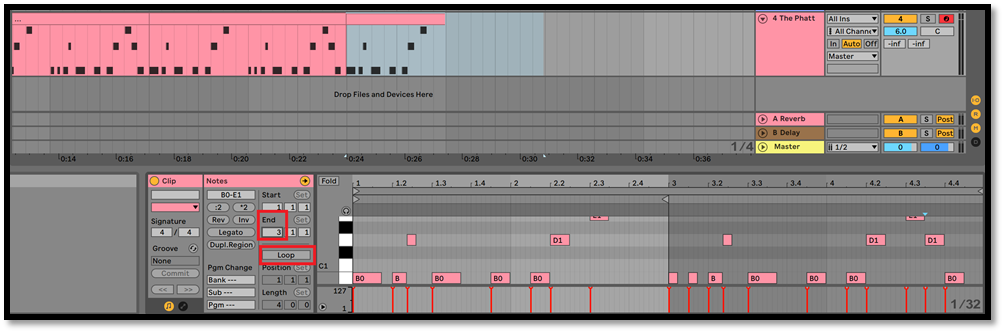
In track #4, click the mouse in the clip title area (see #4 above) somewhere around bar 14, which will highlight the third clip in track #4. This clip extends from bar 7 to bar 15. Click in the center of that clip at bar 11 (not in the clip title area) to set a marker line, which is a vertical line that flashes white and blue, then right-click that same spot and click Split:

Now the third clip as been split into 2 separate clips, as you can see if you click in the clip title area at bar 9 and bar 13. Click in the clip title area at bar 13 in track #4 to highlight the last clip, then press Ctrl+D on your computer keyboard to duplicate the clip.
We only want the first half of this clip, so click in the center of the clip at bar 17 (not in the clip title area) to set a marker line, then right-click that same spot and click Split. Click in the clip title area at bar 18 to highlight the last clip in track #4, then press Delete on your computer keyboard to delete the last clip. Click in the clip title area at bar 16 to highlight the last clip in track #4, and notice that it still contains the icons from the clip that we just deleted (although those icons are grayed out). See the area highlighted with a red rectangle at the bottom of the picture below:
To get rid of those grayed-out icons, right-click anywhere in the last clip in track #4 and click Consolidate. Click in the clip title area at bar 16 in the last clip in track #4 to highlight the clip, then press Ctrl+D to duplicate the clip. Click in the Note Editor at the bottom of the screen to give it the focus, then press Ctrl+A to highlight all of the icons in the Note Editor, then press the up arrow twice to move the icons up 2 notes.
Click in the clip title area at bar 18 in the last clip in track #4 to highlight the clip, then press Ctrl+D to duplicate the clip. Click in the Note Editor at the bottom of the screen to give it the focus, then press Ctrl+A to highlight all of the icons in the Note Editor, then press the up arrow twice to move the icons up 2 notes.
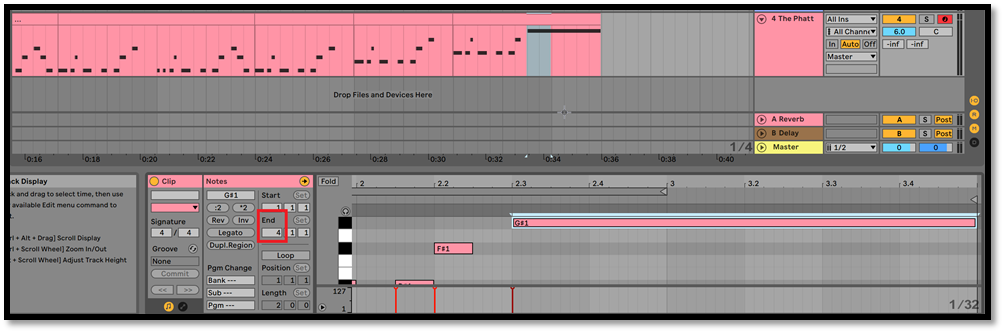
To add a bit more pizazz to our build-up, click anywhere in the last clip in track #4 to see the icons in the Note Editor, then change the End value to 4 and press Enter to extend the length of this clip. Click anywhere in the Note Editor (but not on an icon) to unhighlight the icons, then move the mouse to right side of the very last note so that the mouse cursor changes to a square bracket (]). Click and drag all the way to the right to extend the last note all the way to the end of bar 3. Now you should have this:
To listen to the changes that we just made, move the mouse until it looks like a speaker (see point #3 above) and click at bar 11.
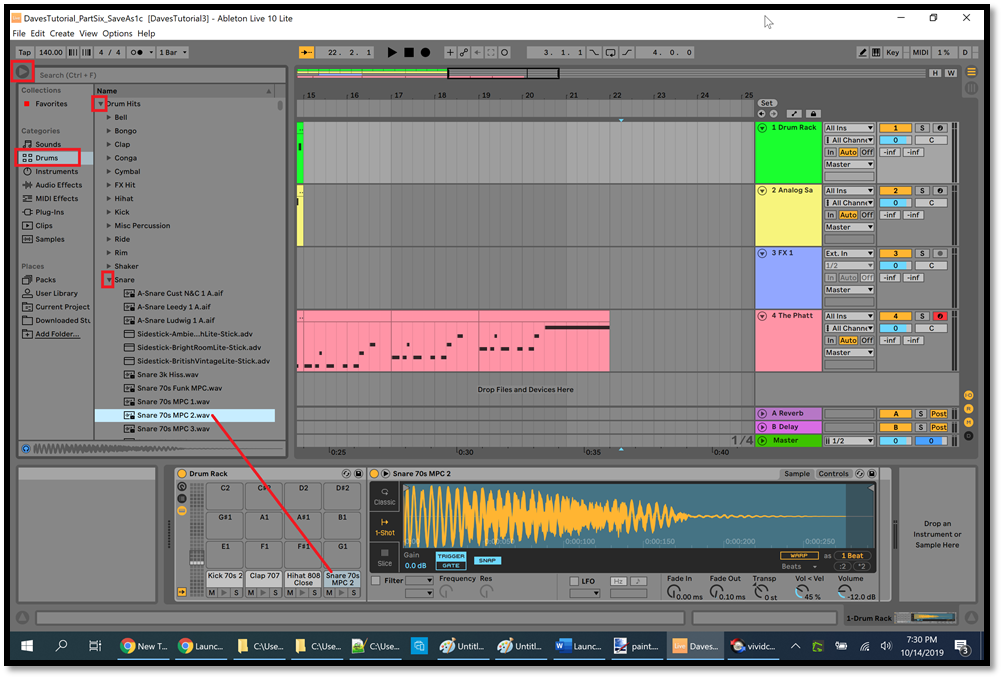
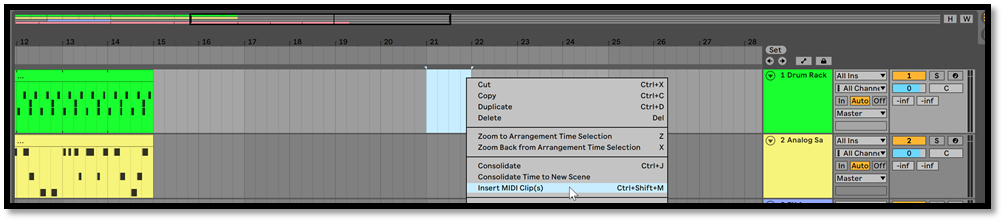
Now let's add a snare drum to our Drum Rack. Press Shift+Tab on your computer keyboard to see the Device view, then click anywhere in track #1 to see the Drum Rack. Click the round button at the top left corner of the Ableton Browser (highlighted with a red rectangle in the picture below) to see the Browser then click Drums on the left side of the Browser, then expand Drum Hits, then expand Snare, then drag "Snare 70s MPC 2" down to the Drum Rack to the right of "Hihat 808 Close":
Click the round button at the top left corner of the Ableton Browser (highlighted with a red rectangle in the picture above) to hide the Browser. In track #1, click and drag from bar 21 to bar 22, then right-click in the area that you just highlighted and click "Insert MIDI Clip(s)":
Add the snare drum icons in the Note Editor:
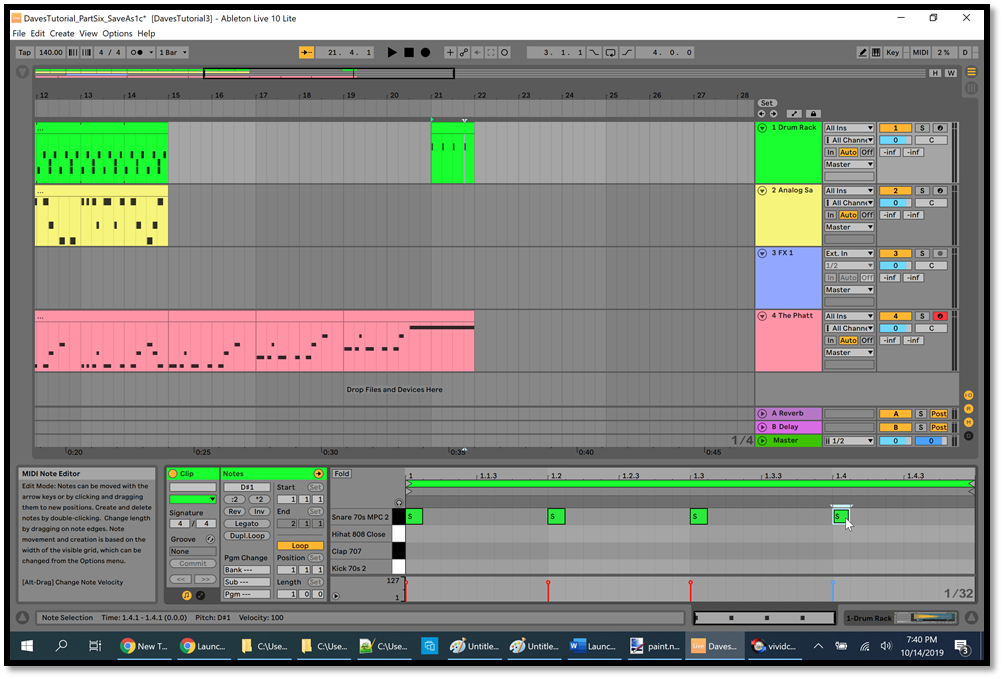
Click in the clip title area in the clip that you just created in track #1, then press Ctrl+D to duplicate it. In the Note Editor for the new clip, add an icon exactly halfway between the existing icons:

Click in the clip title area in the clip that you just created in track #1, then press Ctrl+D to duplicate it. In the Note Editor for the new clip, add an icon exactly halfway between the existing icons. Click in the clip title area in the clip that you just created in track #1, then press Ctrl+D to duplicate it. Now you should have this:
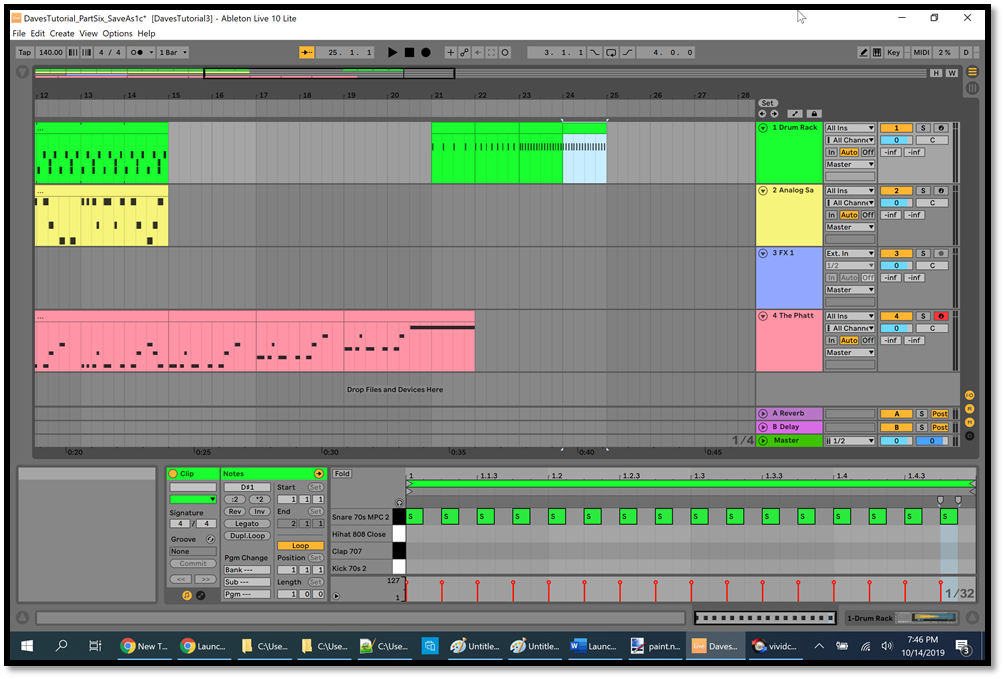
Use the speaker icon (see point #3 above) somewhere around bar 15 (or earlier if you want) to listen to what we've added, and notice that we've built up the tension in 2 different ways.
If you want to move the snare drum clips to the left or right to see how it sounds in different positions, you would need to click in the clip title area of each of the 4 snare clips and move them one at a time. Or you can click in the clip title area for the first snare clip, then hold down the Shift key and click in the clip title area for the fourth snare clip so that all 4 snare clips are highlighted, then right-click in the clip title area of any of the snare clips and click Consolidate. This turns them into a single clip, which you can move left or right with the left or right arrow keys on your computer keyboard.
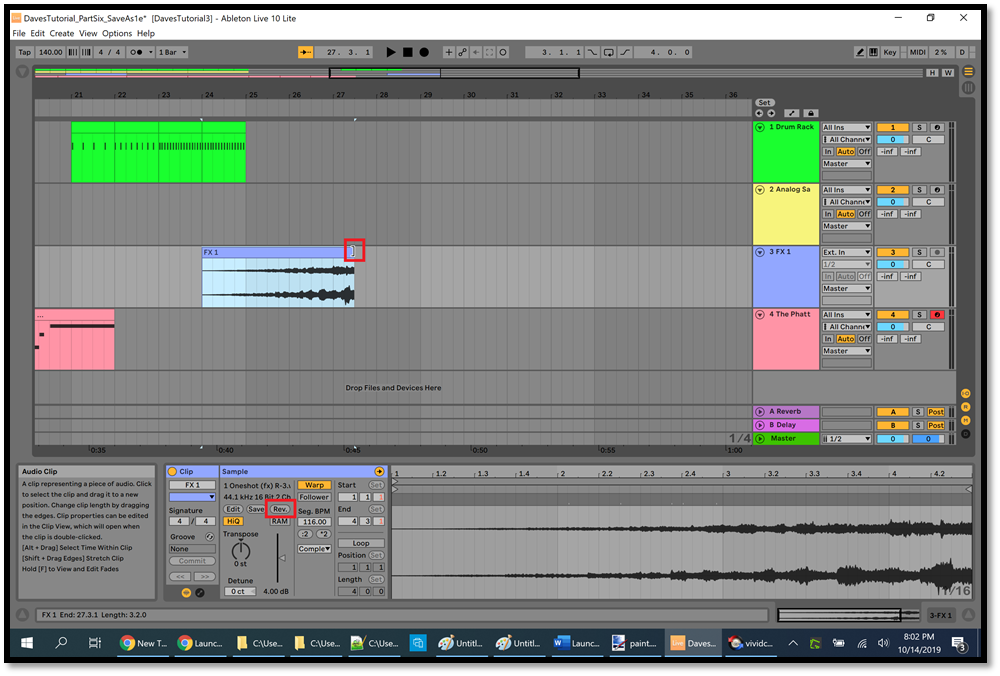
Another method of building up the tension is quite simple. Click in the clip title area for the clip in track #3, then press Ctrl+D to duplicate it. Use the right arrow on your computer keyboard to move the new clip until it begins at bar 24. In the Device view at the bottom of the screen, click the "Rev." button (highlighted with a red rectangle in the picture below) to reverse the clip. Use the speaker icon (see point #3 above) and click at bar 25 to hear how the sound effect builds up, then click the Stop button. At the end of the clip it loses the build-up, so move the mouse to the top right corner of the clip until it looks like a square bracket, then click and drag to the left until the clip ends about halfway between bar 27 and bar 28:
Now the sound effect builds and then abruptly stops, which is what we want. Another way to do this is to use a crashing cymbal sound and reverse it so that it builds up to the crash.
For the fourth method of building up the tension, we'll use something called Automation. Open the Ableton Browser using the round button highlighted with a red rectangle at the top left corner in the picture below, then click Audio Effects in the left side of the Browser, then drag Auto Filter anywhere in track #4:
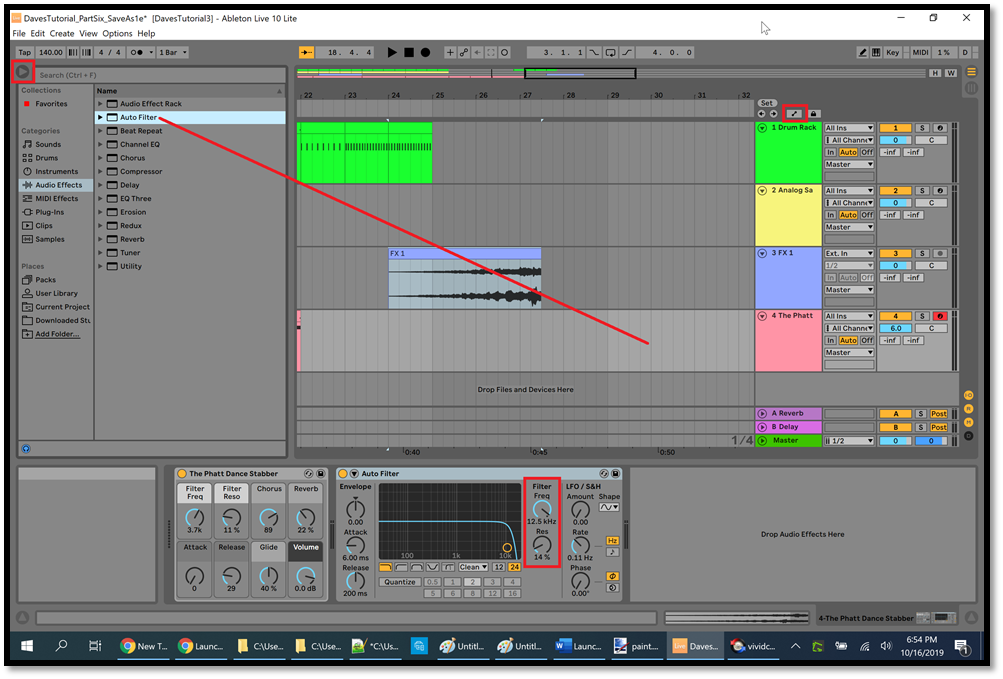
Hide the Ableton Browser again using the round button highlighted with a red rectangle at the top left corner in the picture above. In the Auto Filter, click the "Res." button and drag up until it's at it maximum value. Use the speaker icon (see point #3 above) and click at bar 15 to play the music. Click the "Filter Freq" button in the Auto Filter effect and slowly drag up and down to hear how it changes the sound. We'll automate these 2 buttons as a simple way of adding a "trippy" sound effect to the melody.
In the above picture, the Automation Mode button is highlighted with a red rectangle just above the Drum Rack track. Turn on this button, and you'll see red dotted lines in the MIDI tracks. In track #4, select Auto Filter in the first dropdown, and select Resonance in the second dropdown (highlighted with a red rectangle in the picture below):

Now we can automate the Resonance button in the Auto Filter effect. To do this, click the red line in track #4 at bar 15 to create a breakpoint (highlighted with the bottom left red rectangle in the picture below), then click the red line at bar 17 and drag up as far as it will go (highlighted with the top right red rectangle in the picture below), then release the mouse. Now the Resonance button in the Auto Filter will automatically be increased to its maximum value between bar 15 and bar 17:

In track #4, click the dropdown which says Resonance, then select Frequency. Click the red line at bar 17 to create a breakpoint (highlighted with the left-most red rectangle in the picture below), then click the red line at bar 18 and drag it down to 1.05 kHz (highlighted with the middle red rectangle in the picture below), then click the red line at bar 22 and drag up as far as it will go (highlighted with the right-most red rectangle in the picture below) Now the Filter Freq button in the Auto Filter will automatically be modified between bar 17 and bar 22. Use the speaker icon (point #3 above) and click at bar 15 to hear the "trippy" sound effect that we added as a simple introduction to Automation in Ableton:

Now we've created the build-up to our drop, using all 4 ideas that I mentioned earlier.
Viral Hip Hop, 1-Drums, Drums 3
Retro Grain, Melodic 1, Melodic 3

Part Seven provides links to some videos which will take you further in your journey of becoming a music producer.
Part Seven
Modification History
-
September ===, 2019 - New page.
Dave Root
|