Create Music with Ableton Live 11 on Windows 10/11
Play Music with the Novation Launchpad (Or Other MIDI Devices)
The Complete Beginner's Tutorial for Both
Part One
Introduction
After I bought my Novation Launchpad Pro and installed the Ableton Live software on my laptop, I started watching video tutorials to learn how to use these things. However, it was difficult finding useful videos for a complete beginner.
In this complete beginner's tutorial, I'll show you step-by-step how to get started making music with Ableton Live 11 Lite with Windows 10, building up to some of the more advanced features. This also includes a complete beginner's tutorial for using the Novation Launchpad.
Note: This tutorial has been updated for Ableton Live 11 Lite. Pictures from the Ableton Live 10 Lite version of this tutorial have been retained if they still apply. Other versions of Ableton, such as Live 11 Trial, might not have the same instruments that are shown in my screenshots. Simply pick a different instrument; the goal is to learn the features of Ableton, so it's not a big issue if your songs don't have the exact sounds that are described in this tutorial.
To make the images in this tutorial larger:
Windows: Hold down the Ctrl key and press = several times
Mac: Hold down Command and press = several times
To make the images in this tutorial smaller:
Windows: Hold down the Ctrl key and press - several times
Mac: Hold down Command and press - several times
To restore the normal size:
Windows: Hold down the Ctrl key and press 0
Mac: Hold down Command and press 0
MIDI Devices
Novation Launchpads are MIDI devices, and there are many other MIDI devices out there. "MIDI" stands for "Musical Instrument Digital Interface," which essentially means that when you do something with a MIDI device (like pressing keys or pads) then it sends information to some software on your computer.
MIDI devices don't always have speakers or make sounds. It's the software on your computer which interprets the signals from the MIDI device and generates the sounds.
There's a lot of software out there (called Digital Audio Workstations, or DAWs) which will work with most MIDI devices, but in this tutorial we'll be using Ableton Live 11 Lite because it comes bundled with a number of MIDI devices.
Setup
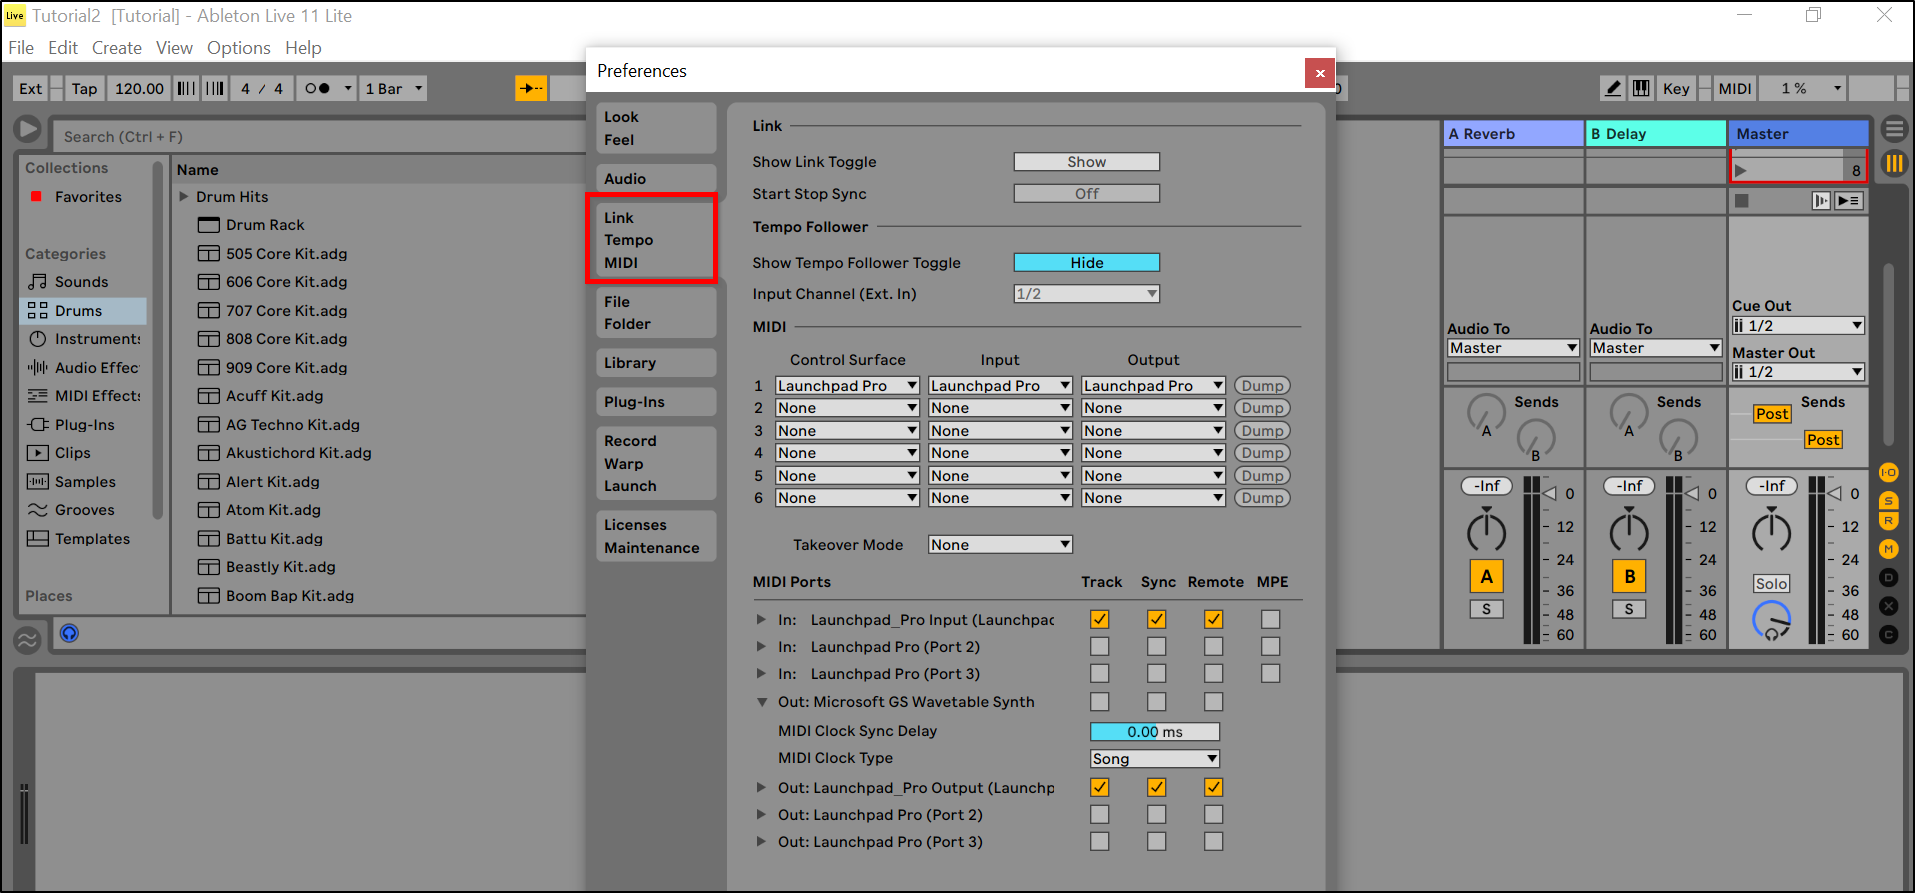
In order to use your Launchpad (or other MIDI device) with Ableton Live 11 Lite, first you need to setup your device. Plug your device into your computer and turn it on. In Ableton, click the Options menu, then click Preferences. In the Preferences window, click the "Link Tempo MIDI" tab (highlighted with a red rectangle in the picture below). Select Launchpad Pro (or your MIDI device) for Control Surface, Input, and Output, as in the picture. Under "MIDI Ports" at the bottom of the Preferences window, turn on Track, Sync, and Remote for your Input and Output Launchpad Pro (or other MIDI device), as in the picture. Then close the Preferences window:
In the View menu, turn off Sends and In/Out. We won't be using these features, and turning them off gives us more room on the screen. You'll need to turn them off each time you open a new Live set or open a saved set. Also, make sure that Info is turned on in the View menu.
Your First Drum Beat
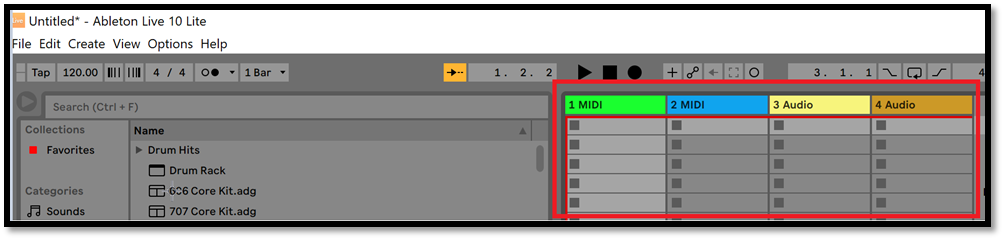
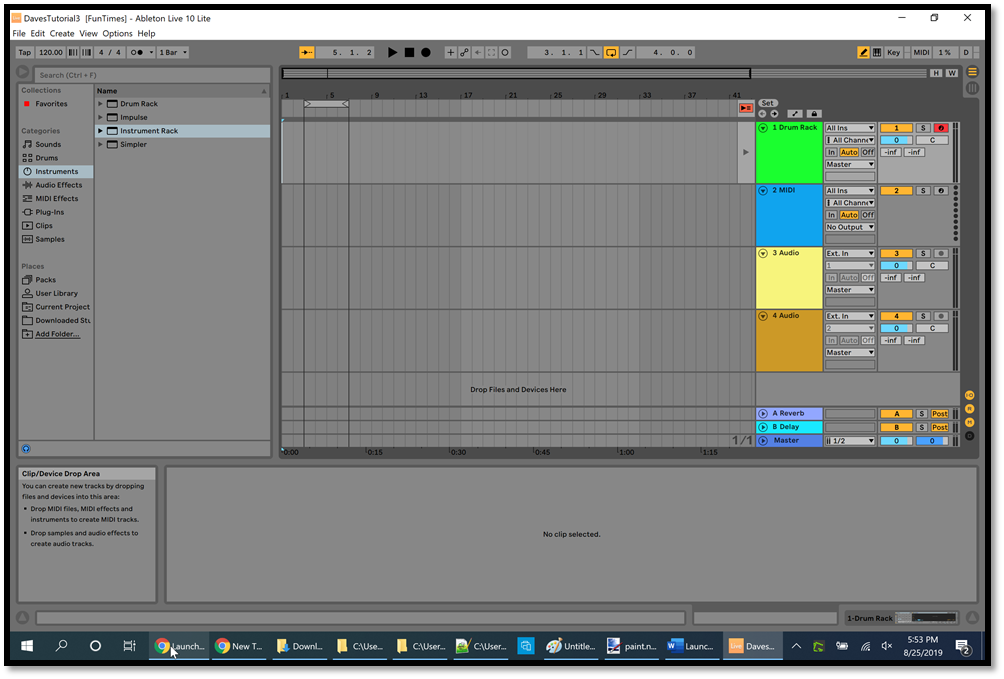
When you run Ableton Live 11 Lite, or when you start a new session by clicking File/New Live Set, it starts you off with 4 columns which are labeled MIDI, MIDI, Audio, and Audio (highlighted with a red rectangle in the picture below). These are called "tracks" or "channels," and the gray rectangles below the track titles are where you can store clips that you can play using your Launchpad (which we'll do in a moment). MIDI tracks are for playing instruments, and Audio tracks are for playing digitally-recorded sounds and samples (because MIDI clips store a different type of information than Audio clips do):
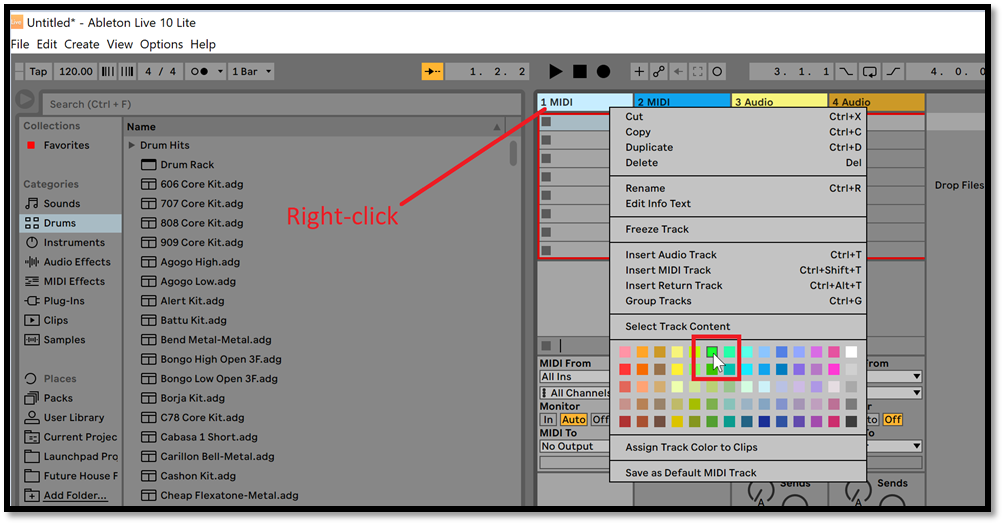
The colors of each track are random when you start a new Live set, but you can change the colors by right-clicking the title bar of each track. My MIDI track in column 1 happens to be green, so right-click the title bar of the first MIDI track and change yours to green as well (highlighted with a red rectangle in the picture below) so it matches mine, to make the tutorial easier to follow. Some people prefer to make all of their drum and percussion tracks one color, and their melody tracks another color, and so on, to organize their workspace. You can also right-click the title bar of a track and change the name of the track to help you stay organized:
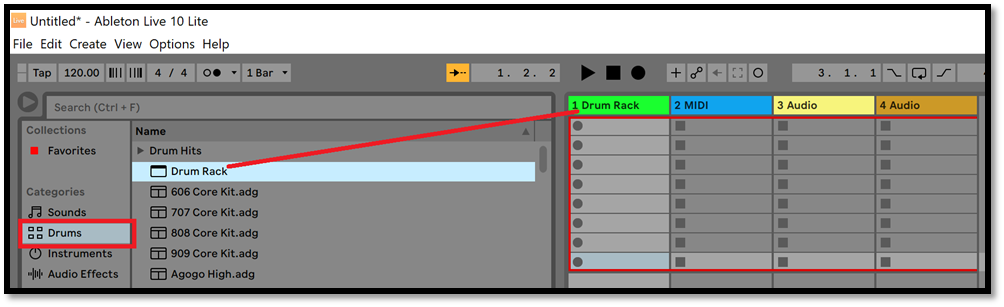
Now we'll add a Drum Rack to our first MIDI track so that we can create some drum beats. Click "Drums" on the left (highlighted with a red rectangle in the picture below), then drag "Drum Rack" onto the title bar of the first MIDI track. The area which contains "Drums" and "Drum "Rack" at the top left of the Ableton screen is called the Browser, because that's where you can browse for instruments and samples and so on:
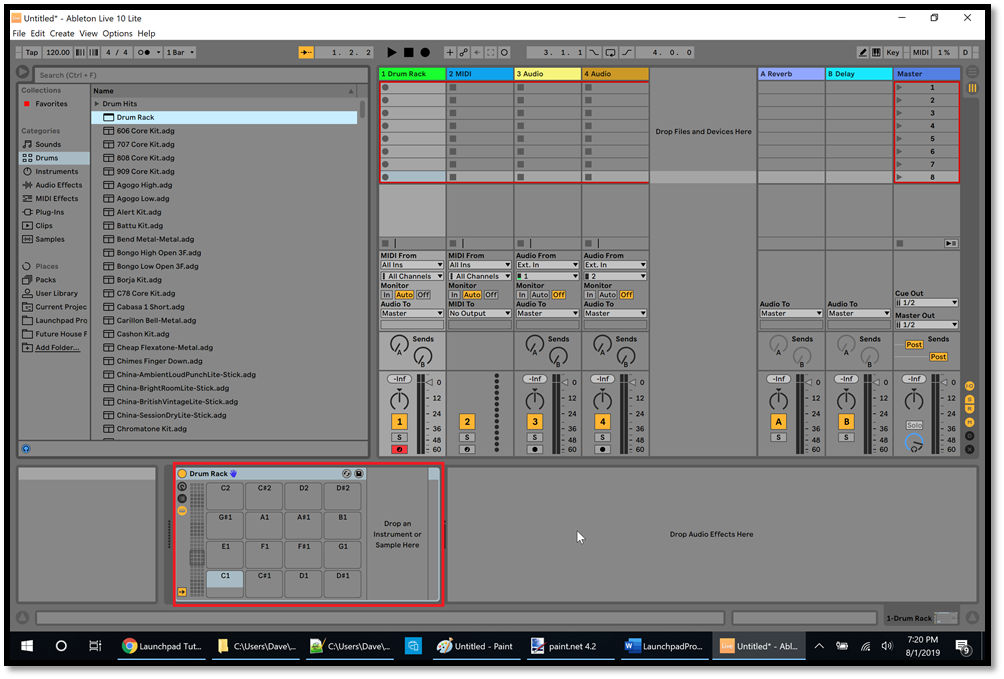
Now you have an empty Drum Rack (at the bottom of the screen, highlighted with a red rectangle in the picture below) for creating your own set of drums:
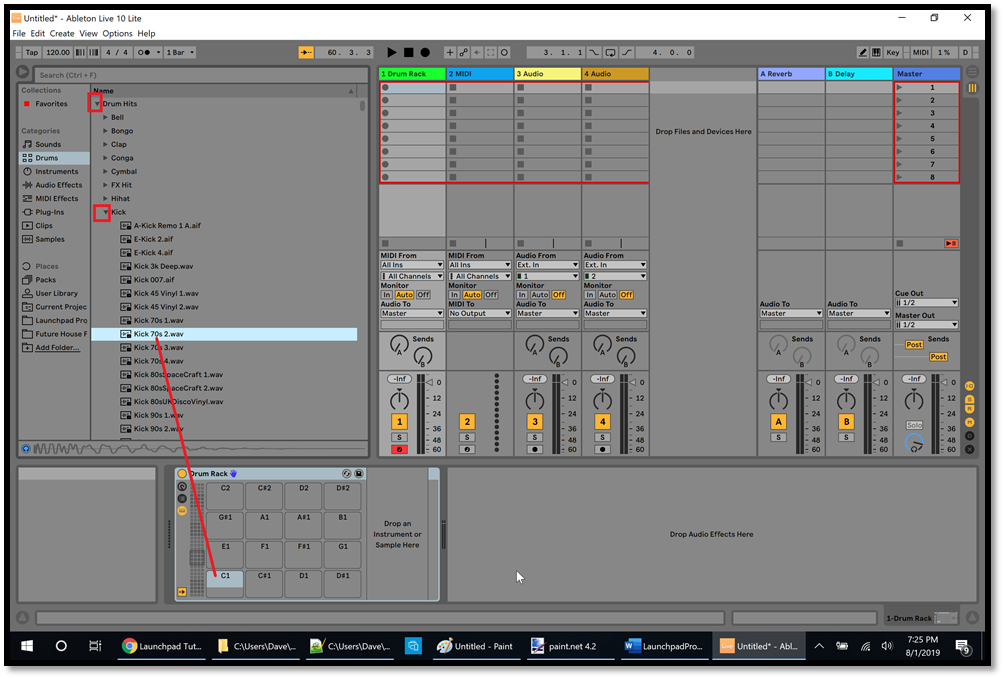
In the Browser area near the top left corner of the Ableton screen, click the arrow icon next to "Drum Hits" (highlighted with a red rectangle in the picture below) to expand it in order to see all of the percussion options, then click the arrow icon next to "Kick" (highlighted with a red rectangle) to expand it in order to see all of the kick drums. Click each kick drum to hear it (or use the up and down arrows on your computer keyboard), and pick the one you like. I prefer "Kick 70s 2" because it's one of the loudest. You can drag a drum sound onto any of the squares in the Drum Rack at the bottom of the screen, and for this tutorial we'll drag "Kick 70s 2" onto the square labeled C1:
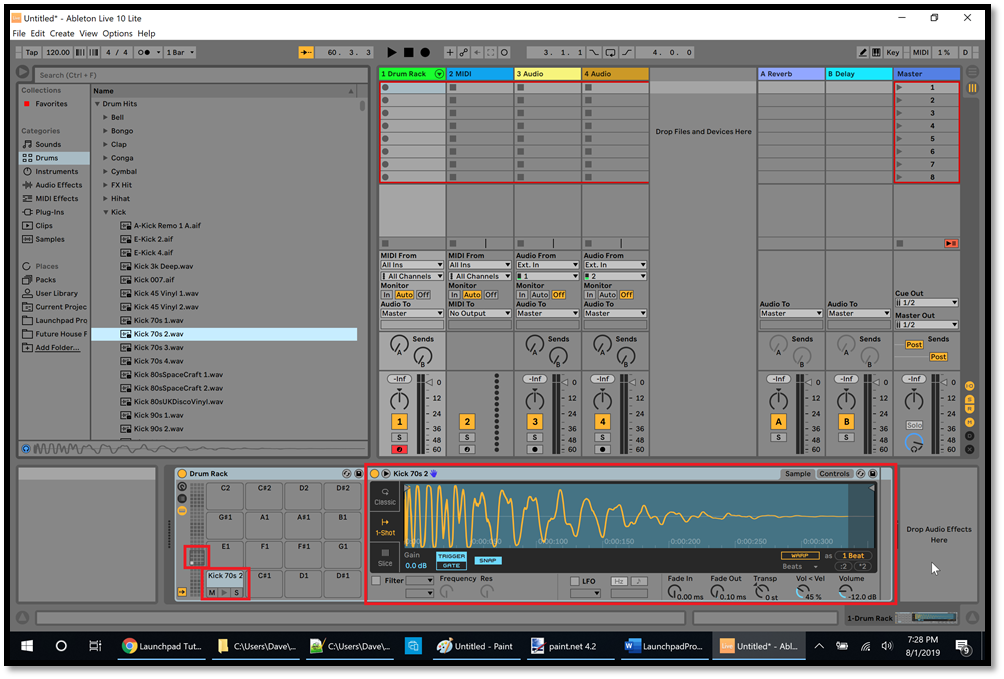
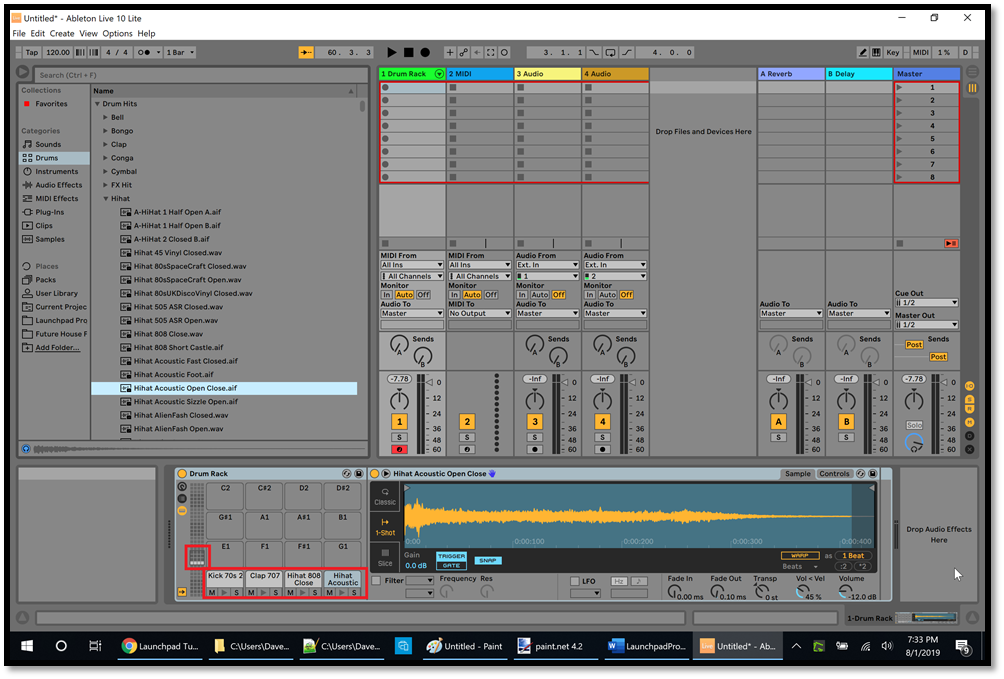
Now you have "Kick 70s 2" in the bottom left slot of the Drum Rack (highlighted with a red rectangle in the picture below). The "M" button under the kick drum will Mute the kick drum when it's playing, and the "Play" button (a triangle) will play the kick sound, and the "S" button will mute all other instruments so that the kick will play Solo. To the right of the Drum Rack is all of the things you can modify for the kick drum (highlighted with a red rectangle in the picture below). To the left of the kick drum there's a tiny white dot in a 4x4 grid (highlighted with a red rectangle in the picture below) which shows where the kick drum is located on the Launchpad:
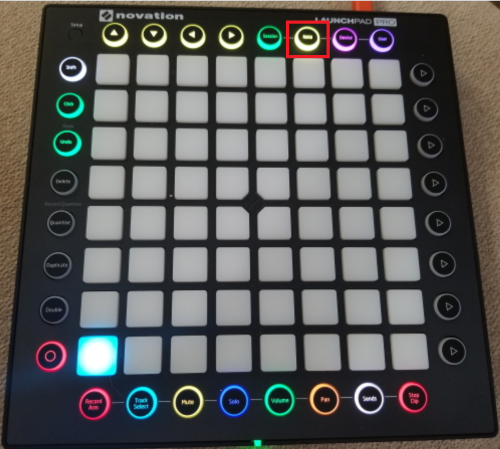
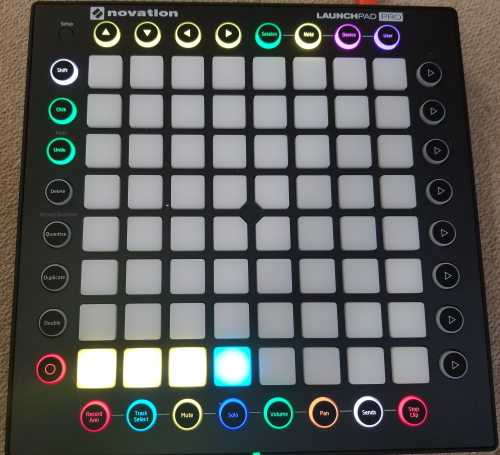
On the Launchpad Pro, the Note button is highlighted with a red rectangle in the picture below. Tap the Note button (wherever it is on your device) and you'll see that the bottom left pad is lit up, which is the kick drum. Tap the lit-up pad to play the kick drum:
For the beat that we're going to create, click the arrow icon next to "Clap" in the Ableton Browser and then drag "Clap 707" to the square next to the kick drum in the Drum Rack. Then click the arrow icon next to "Hihat" and drag "Hihat Closed 808" ("Hihat 808 Close" in Ableton Live 10) next to "Clap 707" in the Drum Rack. Then drag "Hihat Open Close Acoustic" ("Hihat Acoustic Open Close" in Ableton Live 10) next to "Hihat Closed 808." When you're finished, it should look like this:
Your Launchpad now shows 4 pads lit up at the bottom left corner when it's in Note mode (tap the Note button). The blue pad corresponds to the blue square in the Drum Rack in the above picture (which is just the most recently clicked square). You can play the drum sounds by tapping the pads:
Along the top of the Ableton Live 11 Lite screen are a bunch of small buttons. When you hover the mouse over a button, or hover the mouse over other areas of the screen, the panel in the bottom left corner of the screen will tell you what that button or area is for (if the Info option is turned on in the View menu). Click the "Draw Mode Switch" (highlighted with a red rectangle at the top right in the picture below) to turn on Drawing mode so that you can draw the beats instead of tapping them on the Launchpad (which we'll do later). In track #1 at the top of the Ableton screen, double-click the gray rectangle just below the green title bar of the Drum Rack track. This is the first clip slot in track #1, where we'll create our first clip:

After you double-click that clip slot, it will turn the same color as the track (green in our case), and it will display a "Play" button (a triangle) for playing the clip that we're going to create. This will also open up the Note Editor at the bottom right corner of the screen (highlighted with a red rectangle in the picture below):

At the top left corner of the screen it says "4 / 4" and "1 Bar" (highlighted with red rectangles in the picture below). This means that the songs you create will be in 4/4 time (search the Internet to learn what 4/4 time is all about), and the "1 Bar" means that every clip you play will start after 1 bar has finished in the current clip that's playing (we'll learn more about this in a moment). After we make some drum beats, click the Play button for this clip (the triangle) to start playing the clip, and click the black square at the top of the screen to stop playing the clip. You can also press the space bar on your computer keyboard to start and stop the active clip:

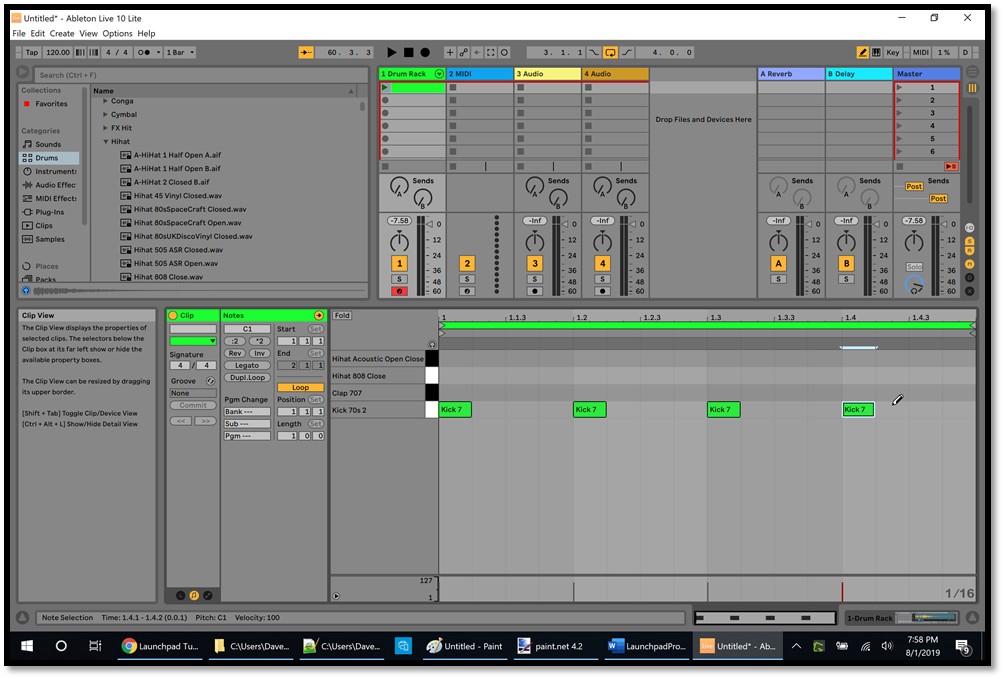
In the Note Editor at the bottom right of the screen, find the kick drum ("Kick 70s 2") and click once at the beginning of each beat to place 4 green kick icons, as in the picture. The first beat in bar 1 is at 1 (see the numbers above the Note Editor), and the second beat is at 1.2, and the third beat is at 1.3, and the fourth beat is at 1.4. When you click in the Note Editor to place a drum icon, the green icon takes up exactly one section or subdivision of the beat (notice that the faint vertical lines in the Note Editor have created 4 subdivisions for each beat). You can also click an existing green kick icon to delete it. Play the clip and then stop the clip using the controls shown in the picture above:
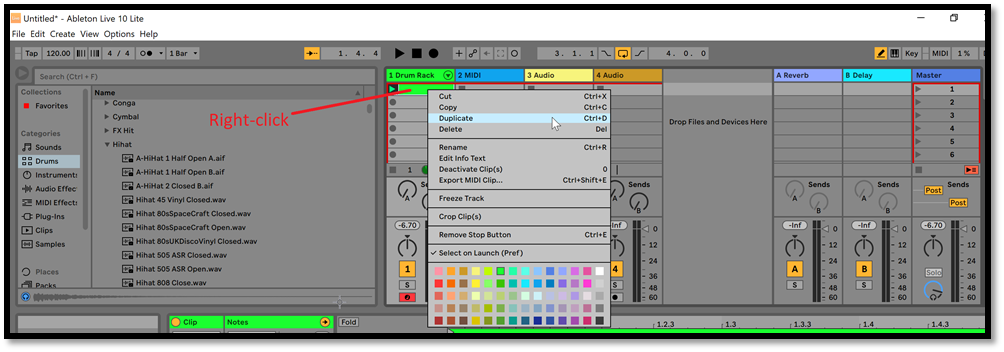
Now we're going to duplicate this clip (to preserve the first clip) and add some more sounds to the second clip. Right-click the clip that you've been working on (the green rectangle under "Drum Rack") and then click Duplicate:
Now you've created a second clip which is an exact duplicate of the first clip, and you're automatically working with the second clip. In the second clip we'll add some more kicks plus some claps (see the Note Editor in the picture below). Click the Play button for the first and second clips in track #1 to listen to the clips. When you start a different clip, it won't begin playing until the beginning of the next bar (i.e. after all 4 beats have played in the current clip). This is because of the "1 Bar" setting at the top left corner of the Ableton screen:
Duplicate the second clip (just like we did for the first clip). Now you're automatically working with the third clip. Click and drag an entire line of "Hihat Closed 808" ("Hihat 808 Close" in Ableton Live 10) in the Note Editor, then click the Play button for the third clip:

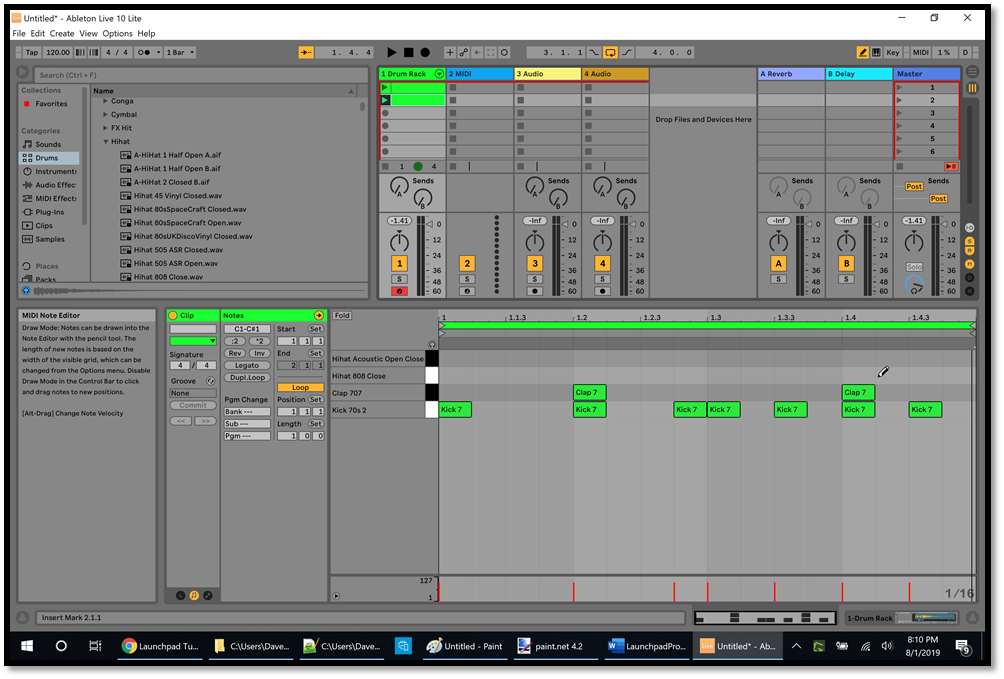
Duplicate the third clip (now you're automatically working with the fourth clip) and then add some "Hihat Open Close Acoustic" ("Hihat Acoustic Open Close" in Ableton Live 10) in the Note Editor, as in the picture below. To change the tempo, click the button at the top left corner of the screen which says "120.00" (highlighted with a red rectangle in the picture below) and type in a new value (such as "100") and press Enter. You can also click "120.00" and hold the left mouse button down and drag your mouse up or down to change the tempo value (i.e. the Beats Per Minute or BPM). If you're listening to a song and you like the tempo of the song, you can click the "Tap" button (to the left of the "120.00" button in the picture below) once for each beat in the song. The tempo value in the "120.00" button will change to the tempo of your clicks, and your drum sounds will use the new tempo:
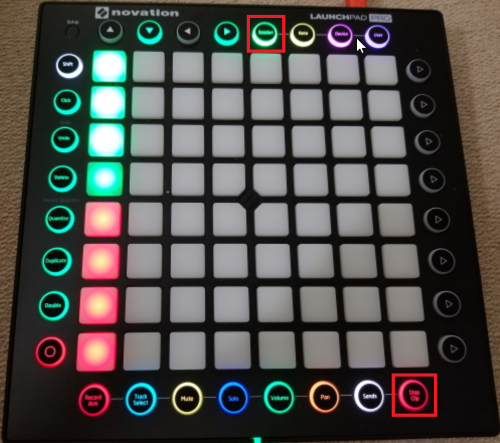
To launch your clips from the Launchpad Pro, tap the Session button (highlighted with a red rectangle at the top of the picture below) and notice that the left-most column of pads is lit up. The top 4 pads are green because our Drum Rack track (track #1) is green, and because we have clips in the top 4 clip slots in this track. We can launch (play) these clips by tapping the top 4 pads in the left-most column of the Launchpad. Notice that only one clip in a track can be played at a time. To stop the clips, tap the "Stop Clip" button on the Launchpad Pro (highlighted with a red rectangle at the bottom of the picture below) and then tap the pad in the bottom row which corresponds to the track you want to stop (in this case, tap the pad at the bottom left because we want to stop track #1). Tap the "Stop Clip" button again to turn it off:
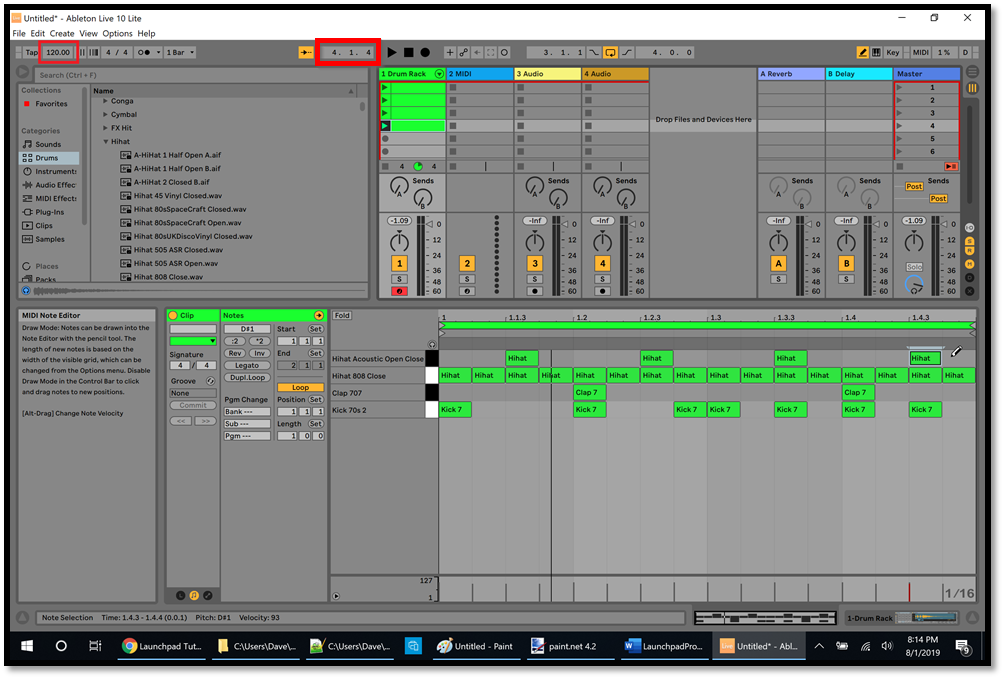
In the screenshot of Ableton above, notice the numbers "4. 1. 4" (highlighted with a red rectangle at the top of the screen). We'll look at them more closely later, but for now just notice that the numbers are changing in Ableton. This means that even though we're not hearing anything, Ableton is still playing. Click the black square to the right of those numbers to stop the playback.
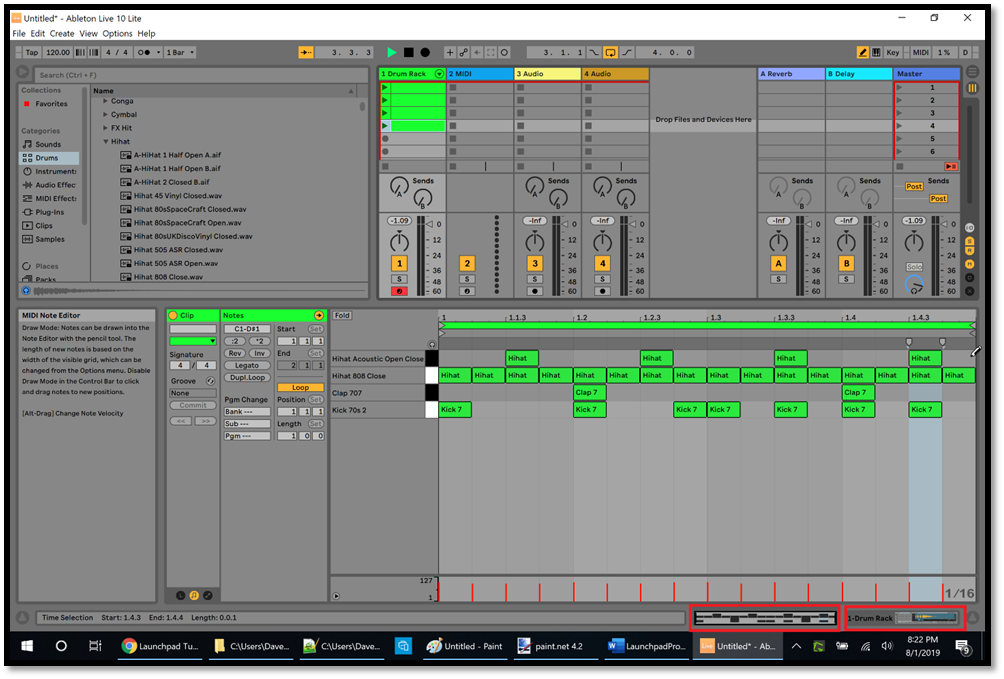
Now we'll add some more percussion to our beat to illustrate some more features. At the bottom right corner of the Ableton screen, notice the two areas highlighted with red rectangles in the picture below. Clicking these two areas will toggle between the Note Editor view and the Device view (in our case the device is a Drum Rack). You can also press Shift+Tab on your computer keyboard to switch between these views:
If your Ableton workspace looks like the picture below, it means that you pressed Tab (not Shift+Tab) and switched to the Arrangement view. We'll look at the Arrangement view in Part Six, but for now press Tab again to switch back to the Session view:
Switch to the Device view (as explained two paragraphs back) to see the Drum Rack at the bottom left part of the screen, and then in the Ableton Browser (at the top left part of the screen) click the arrow icon next to "Wood" to expand the Wood category, then drag "Perc Wood" down until it's above "Kick 70s 2":

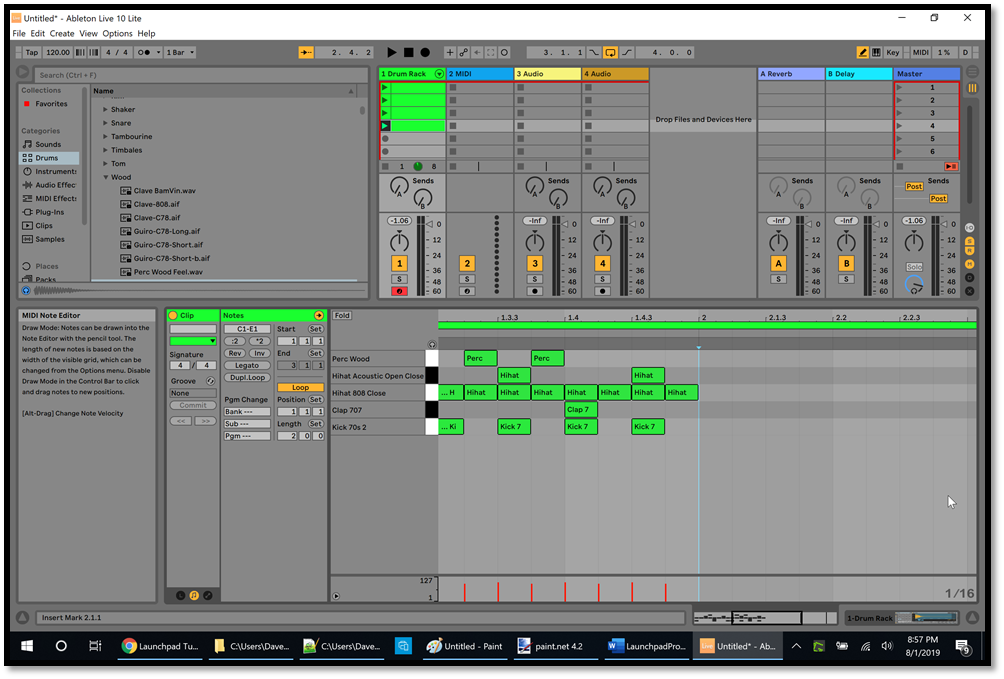
Switch back to the Note Editor view (as explained three paragraphs ago) and draw in some Perc Wood sounds (as in the picture below), then launch the fourth clip:
Now let's extend the drum beat so it lasts for 2 bars. To do this, look at the picture of the Note Editor below and notice the thin horizontal green line above the drum icons. At the far right side of that green line you can see what looks like a square bracket (highlighted with a red rectangle in the picture below), like this: ]. That's my mouse cursor. Place your mouse cursor at the far right side of that horizontal green line until the mouse cursor changes to a square bracket:
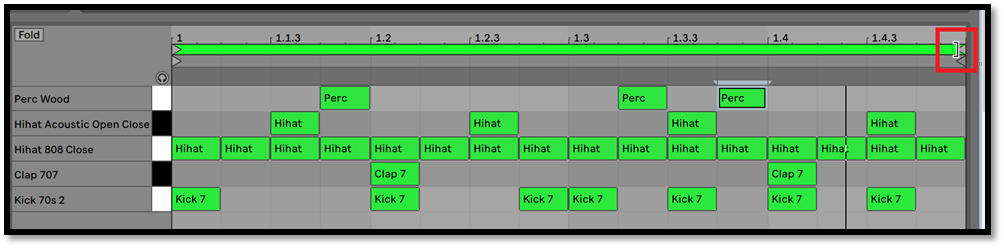
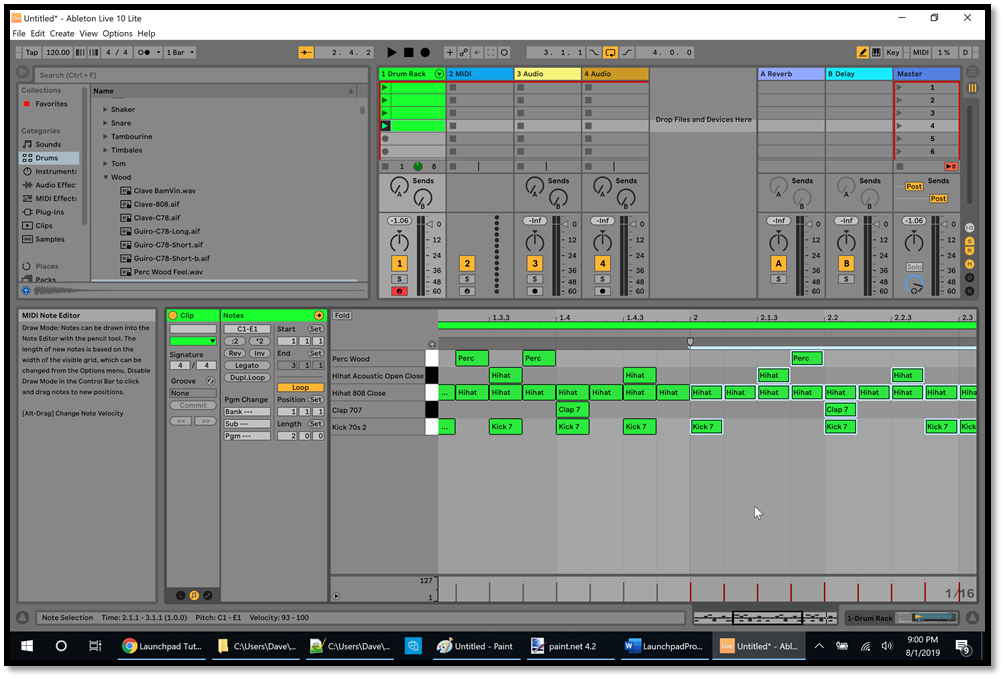
While the mouse cursor looks like a square bracket, click the left mouse button and hold it down, then drag it to the right. Stop dragging when you see "3" just above the horizontal green line, as in the picture below, and release the mouse button. By stopping just before the "3" you have now extended your drum beat to 2 bars.
At the bottom of the picture below, notice the area highlighted with a red rectangle (called the Clip Overview). Half of it shows a thumbnail view of the existing drum beat icons, and the other half doesn't show any drum icons. When you place your mouse over the Clip Overview, the mouse cursor will change to a magnifying glass, and you can click and drag left or right to see different areas of the drum icons in the Note Editor. If the mouse cursor looks like a square bracket in the Clip Overview then you can click and drag left or right to zoom in or out, which makes the icons wider or narrower. While the mouse cursor looks like a magnifying glass in the Clip Overview, you can click and drag the mouse down or up to zoom in or out in the Note Editor. You can also hold down the Ctrl key on your computer keyboard and use the scroll wheel on your mouse to zoom in or out in the Note Editor (if the mouse is hovering over the Note Editor). You can also press the "=" and "-" keys on your computer keyboard to zoom in or out in the Note Editor (first click in the Note Editor so it has the focus).
In the Clip Overview, with the mouse looking like a magnifying glass, click and drag the mouse to the left until you can see the very beginning of the first bar of drum icons. You can also do this by hovering the mouse over the numbers at the top of the Note Editor (which show the subdivisions of the beat) until it looks like a magnifying glass, then click and drag left or right. Another way to scroll the Note Editor is to hold down the Ctrl and Alt keys on your computer keyboard and then click and drag left or right in the Note Editor.
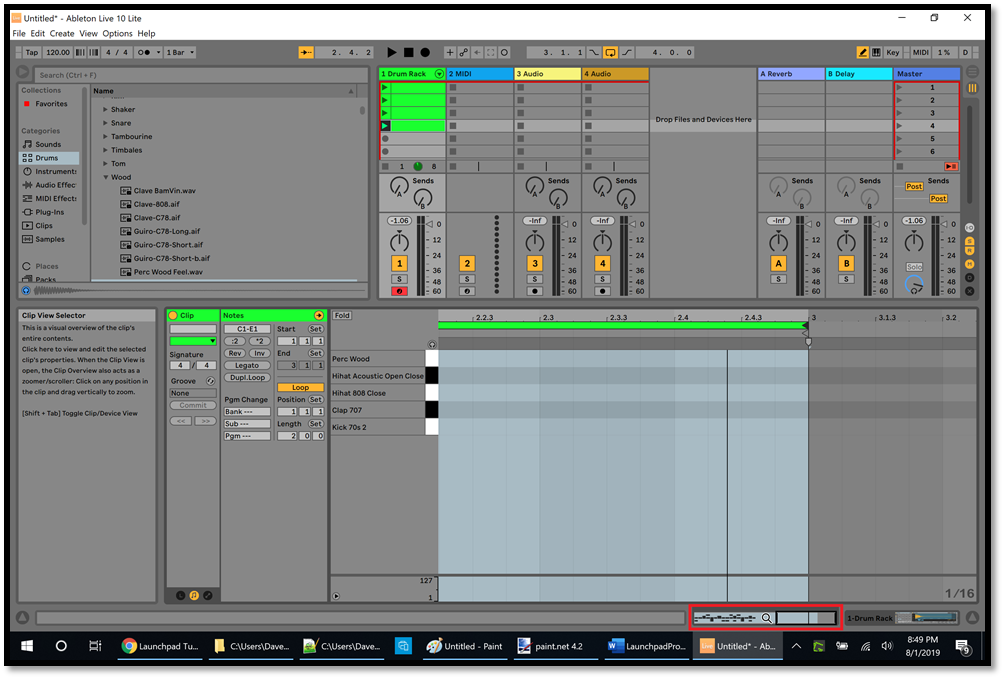
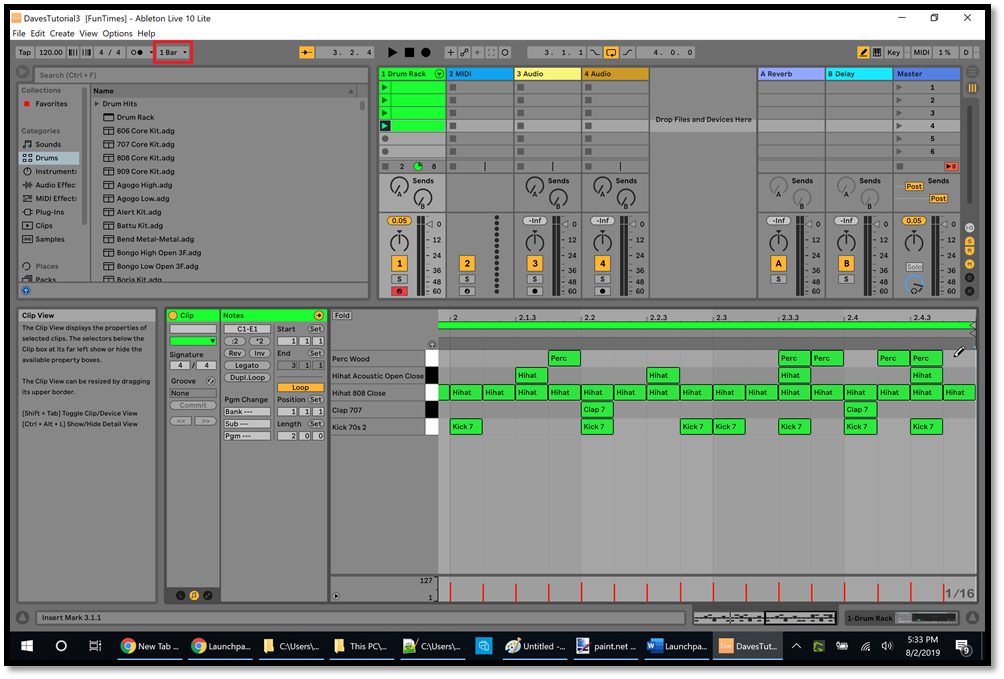
Click in the Note Editor (to give it the focus), then click the Edit menu, then click Select All to highlight all of your existing drum icons (you can also use Ctrl+A to do Select All). In the Edit menu, click Copy to copy all of the highlighted drum icons (or use Ctrl+C). Now scroll to the right in the Note Editor until you can see some of the blank area beyond the existing drum icons, as in the picture below. In the Note Editor, keep your mouse below the drum icons so that the mouse cursor looks like a normal arrow, then click just past the last drum icon to create a vertical line (at the start of bar 2) that alternates between blue and white, as in the picture:
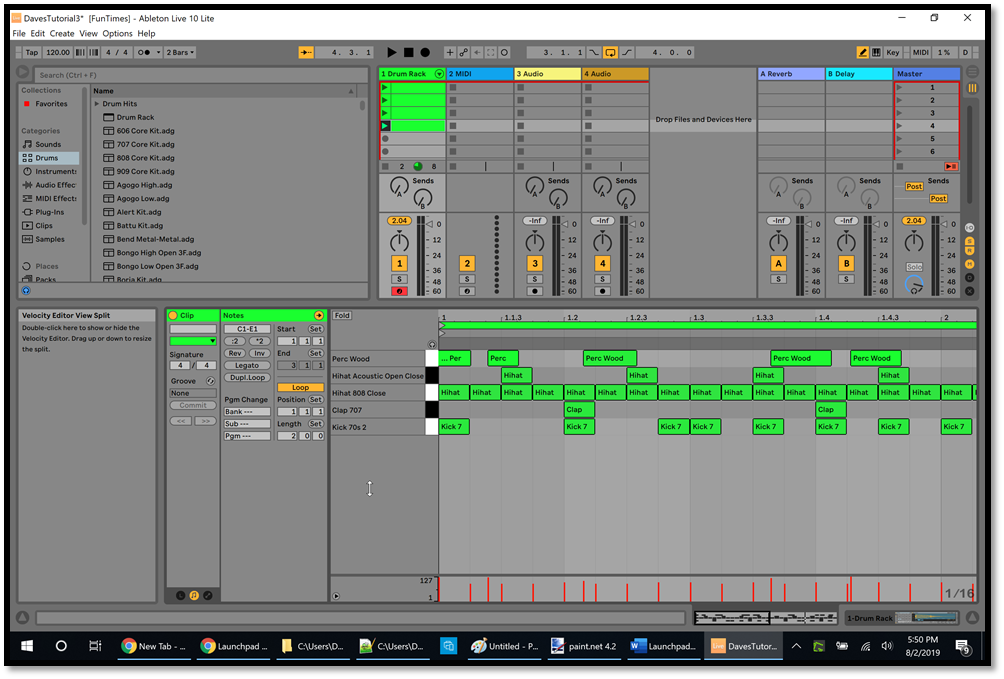
Now click the Edit menu again, and click Paste (or use Ctrl+V). This will duplicate all of the drum icons into bar 2:
Scroll to the end of bar 2, then change the Perc Wood icons to look like the picture below. This gives bar 2 a slightly different sound than bar 1. Now play the fourth clip. Stop the clip, then click the File menu, then click "Save Live Set As," then choose a location and a filename for saving what you've done so far:
Launch the fourth clip again, and immediately launch the third clip. Notice that the third clip starts playing after bar 1 finishes. Bar 2 in the fourth clip didn't get played. This is because at the top left corner of the screen we see "1 Bar" (highlighted with a red rectangle at the top of the above picture). Stop the third clip, then click "1 Bar" and change it to "2 Bars," then launch the fourth clip and immediately launch the third clip. Now the fourth clip plays 2 bars before the third clip begins playing. If you launch the fourth clip again, it won't start playing until 2 bars of the third clip have finished playing.
Now let's delete the Perc Wood sounds by clicking the existing green Perc Wood icons in the Note Editor. Scroll left and right in the Note Editor in order to find and delete all of the Perc Wood icons. Then we'll recreate them by tapping the pads on the Launchpad.
On your Launchpad, tap the Note button to go into Note mode. At the bottom left corner there will be 4 pads lit up in the bottom row, and one pad lit up above the pad in the bottom left corner. These correspond to the drum sounds in your Drum Rack in Ableton. Play the fourth clip by launching it in Ableton, and practice tapping the pad which is lit up above the pad in the bottom left corner of your Launchpad (this is the Perc Wood pad). Practice a few times to get the beat that you want with the Perc Wood sound.
When you're ready to record the Perc Wood sound, tap the Record button on your Launchpad (a red button with a circle on it at the bottom of the buttons on the left side of the Launchpad). This will start the active clip (the fourth clip if that's the last one you played), and it will record your Perc Wood sounds each time you tap the Perc Wood pad. Tap the Perc Wood button on your Launchpad to add the Perc Wood sounds to the clip. When you're finished, tap the Record button again to stop recording, and click the black square at the top of the Ableton screen to stop the clip. Since we're looping for 2 bars, don't record more than 2 bars of Perc Wood sounds. If you record more than 2 bars then you'll start recording over bar 1 again (because Ableton will loop back to the beginning after 2 bars).
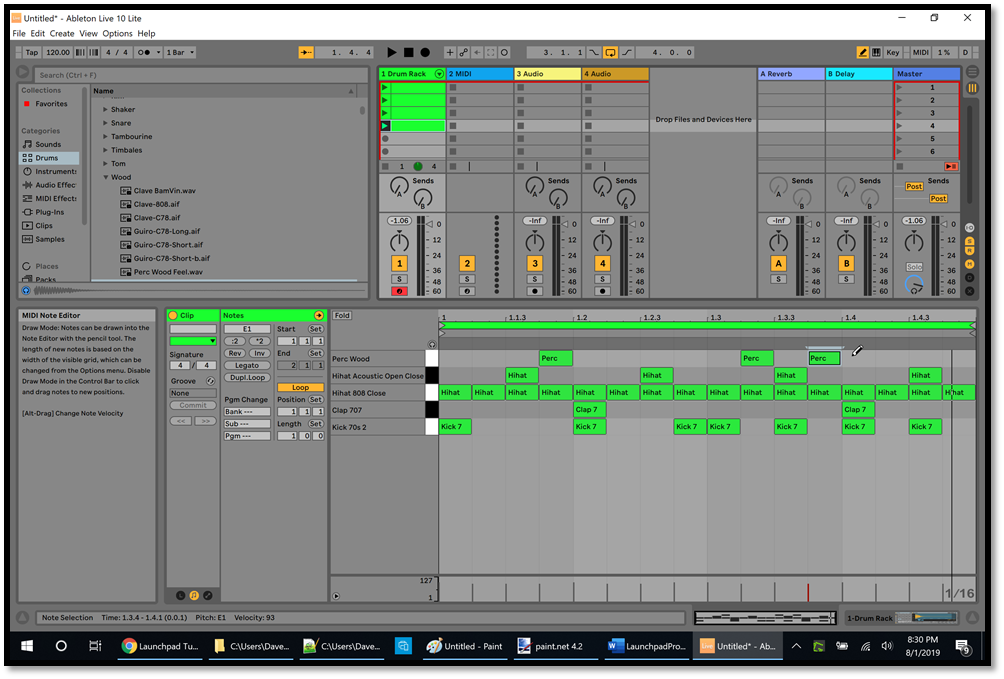
It takes practice to hit the pads at the right time for recording your beat. In the Note Editor in the picture below, notice that some of the Perc Wood icons are off of the beat, and some of them are wider than the other icons that we drew in the Note Editor. This is because my tapping wasn't very precise on the Launchpad:
To move the Perc Wood icons onto the beat, click in the Note Editor (to give it the focus), then click the Edit menu, then click Select All. This will highlight all of the drum icons in the Note Editor. Click the Edit menu again and then click Quantize. This will move the drum icons to the nearest subdivision of the beat (i.e. so that the green icons line up with the faint vertical lines), as in the picture below:

If you're not satisfied with how your Perc Wood beats came out, you can click the Edit menu and then click Undo to delete them. Another idea is to use the green Perc Wood icons which you created through your Launchpad as a guide, and click them one at a time in the Note Editor to delete them, then click again to draw the Perc Wood icons exactly where you want them.
When you tap the pads on your Launchpad to play sounds, if there's a lag or delay before you hear the sound then go to the Help menu in Ableton and click Help View. This will open a Help panel on the right side of the screen. Click "Audio I/O" and follow the instructions to setup your preferences to reduce the lag as much as possible.
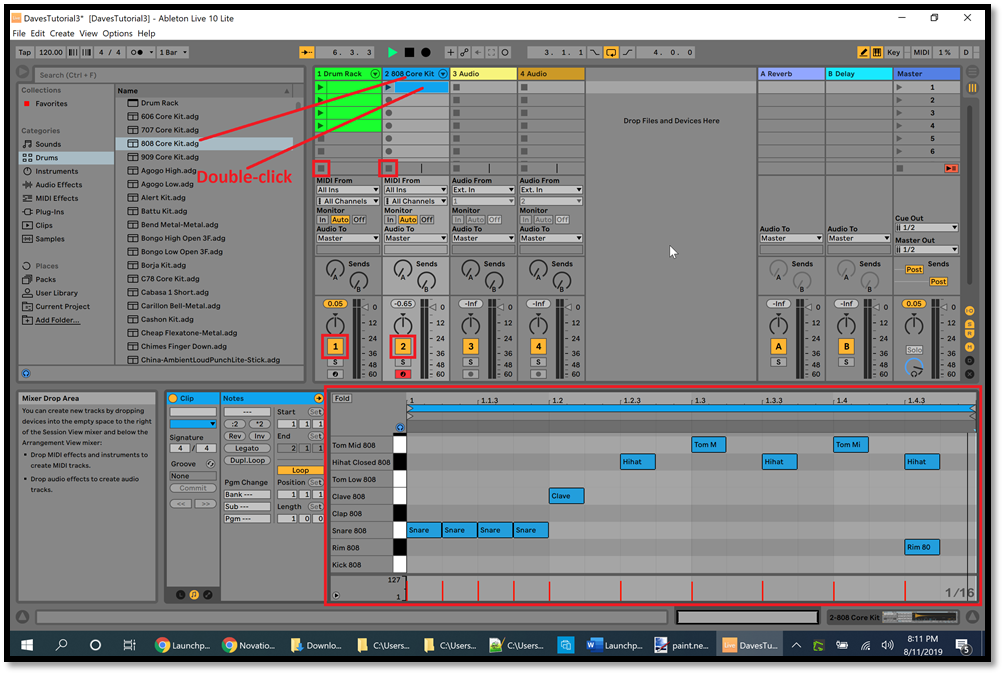
In this tutorial we created our own Drum Rack and added some drum sounds to it. Ableton also has a number of pre-made drum kits that we can use. For example, go to the Browser in Ableton and select Drums on the left, and use the arrow icon next to Drum Hits to close the Drum Hits category, then drag "808 Core Kit" to the title bar of track #2, then double-click the first clip slot in track #2. Now you have a number of different drum sounds in the Note Editor.
Draw some drum icons in the Note Editor. In the picture below, the drum icons are blue because the title bar of my track #2 is blue, and the drum sounds such as "Tom Mid 808" in the picture are for Ableton Live 10 (so you'll see different drum sounds if you're using Ableton Live 11). Play the blue clip that you just created in track #2, and then play different green clips in track #1 (while the blue clip in track #2 is still playing). Notice that any clip in track #1 can play at the same time as the clip in track #2 is playing. You can stop the clips by clicking the square icon under each track (highlighted with a red rectangle in the picture below). Or you can mute either track by turning off the "1" or "2" button (highlighted with red rectangles in the picture below). When you're ready, stop the playback by clicking the black square at the top of the screen (just above track #2):
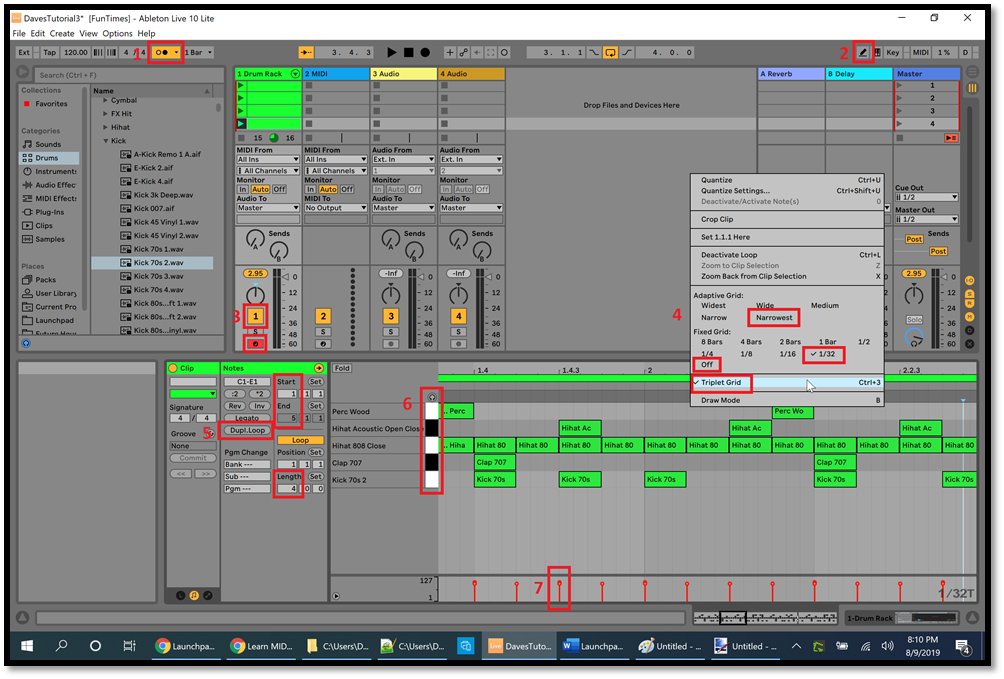
Here are some more features of Ableton to help you create your drum beats (and other music). Refer to the numbers in the picture below.
-
Near the top left corner of the picture, the button highlighted with a red rectangle is the Metronome or click track. Turn this button on and then play one of your clips, and you'll hear the click track. This won't get recorded with your beats, but it can help you tap your Launchpad pads in time with the music. We didn't need the click track when we tapped out our Perc Wood beats because we had the kick drums to give us our beat. The down arrow next to the Metronome button allows you to change some options for the click track.
-
At the top right of the picture, the Draw Mode button is highlighted with a red rectangle. When this button is off, you can click and drag the green icons in the Note Editor to move them slightly left or right so they're just a little off the beat. This can help make your drums sound less robotic and more human. With the Draw Mode button off, you can add or delete drum icons by double-clicking in the Note Editor.
-
Our Drum Rack track is track #1, and notice that the "1" button is turned on by default (highlighted with a red rectangle). Launch one of your clips in track #1, then turn the "1" button off. This will mute track #1, which you might want to do sometimes while other tracks are playing.
Below the "1" button there's a red button (highlighted with a red rectangle). This is the Arm Recording button for track #1, and when it's red then track #1 can receive and record signals from your Launchpad or other MIDI devices. Try launching one of your clips in track #1 and then play some drum sounds using your Launchpad (as we did a moment ago with the Perc Wood sounds). Turn off the Arm Recording button, and now you can't hear anything when you tap the pads on your Launchpad. Click the button to turn it red again, and now track #1 is record-enabled again (i.e. you can hear and record sounds from your Launchpad).
In between the "1" button and the Arm Recording button is an "S" button. Turning on this button in track #1 will mute all other tracks so that track #1 is playing Solo. For example, if we have some bass and chords and melody playing in other tracks, we can turn on the "S" button for track #1 to play a drum solo.
Above the "1" button is the round Track Pan button. Launch a clip in track #1, then click the Track Pan button and drag your mouse up and down (keeping the left mouse button down). This will cause the sounds to come out of the left or right speakers.
To the right of the "1" button is the Track Volume slider for track #1. Launch a clip in track #1, then click and drag this slider up or down to change the volume of track #1.
-
In Ableton (or in the picture above), notice the "1/16" in the bottom right corner of the Note Editor. Look closely at the blue drum icons in the Note Editor in the picture above and see that the width of each icon takes up exactly 1/4 of a beat. Since there are 4 beats per bar, the "1/16" means that Ableton has divided up each bar into 16 subdivisions (4 beats per bar, and 4 subdivisions per beat). As we saw earlier, there are faint vertical lines creating the 16 subdivisions for each bar in the Note Editor.
Right-click in the Note Editor to pop up the small menu shown in the picture below (the menu is slightly different in Ableton Live 11). By default, "1/16" will have a checkmark next to it. By clicking various combinations of the options highlighted with red rectangles in this pop-up menu, you can create more subdivisions per beat. In the picture below, notice that there are now 12 subdivisions per beat, so there are 48 subdivisions for every bar. Each of the green kick and clap and hihat and Perc Wood icons now takes up 3 subdivisions in the picture below. The size of the icons didn't change, but instead there are now more subdivisions for each beat than there were when we created the green drum icons. If we add a snare drum to our Drum Rack and click in the Note Editor to add some snare drum sounds, each green snare drum icon will take up 1 subdivision, so they'll be 1/3 as wide as our existing kicks and claps and so on. This allows us to create faster sounds, such as drum rolls, although it can be a bit tricky finding just the right placement of each snare drum icon to create a nice-sounding drum roll.
-
To the left of the Note Editor there are some useful features in the Notes panel (the Notes and Clip panels are slightly different in Ableton Live 11, but the features are all there).
The Length value (highlighted with a red rectangle at the bottom of the Notes panel) shows how many bars are displayed in the Note Editor. An easy way to add more bars is simply to change the Length number. In the picture I changed the Length to 4, so now I can create 4 bars of drums in the Note Editor.
Above the Length value you can see the Start and End values (highlighted with a red rectangle). The 1 and 5 mean that my drum clip will start at bar 1 and end at bar 5 (i.e. the clip will play 4 bars). Sometimes you might have several bars of music, but you only want to play the first bar or the last bar, or any bars in between, and you can use the Start and End values to specify which bar(s) to play.
The "Dupl. Loop" button (highlighted with a red rectangle, and called "Duplicate" in Ableton Live 11) is a quick way to duplicate everything in the Note Editor. At this point in the tutorial you have 2 bars of drum beats in the fourth clip in track #1. If you click the fourth clip to select it (so you can see its green icons) and click the "Dupl. Loop" button then the fourth clip will have 4 bars of drum beats. In other words, your existing 2 bars of green drum icons will be copied and pasted to create 4 bars of green drum icons.
In the Clip panel to the left of the Notes panel, notice something called Groove. The idea is that selecting a "groove" from the list of grooves will cause your track to sound a bit less robotic by adding slight changes to some of your sounds. I haven't quite figured it out yet because I don't hear much difference, but it's something you might want to learn about and play with.
-
Just to the left of the green drum icons in the Note Editor is the Piano Roll (the black and white buttons highlighted with a red rectangle). Clicking the black and white buttons allows you to play each sound (Perc Wood, Hihat Open Close Acoustic, etc.). Just above the black and white buttons there's a small round button which looks like headphones (in Ableton Live 11 it's just to the left of the first drum sound). When you click this button to turn it blue then you can hear the sounds when you click the black and white buttons.
-
Below the Note Editor you can see some short vertical red lines with a red circle on top (one of them is highlighted with a red rectangle at the bottom of the picture). In Ableton Live 11 these are small circles that are the same color as the track. This area is the Velocity Editor. First, turn off the Draw Mode button at the top right corner of the Ableton screen (highlighted with a red rectangle in the picture below). When you hover your mouse over a red line in the Velocity Editor and move your mouse pointer slowly up and down (without clicking the mouse buttons), you'll see that one of the green drum icons directly above the red line will turn blue. Clicking and dragging a red line up or down makes the red line taller or shorter. The taller the line is, the louder the blue drum sound will be (because it has more velocity), and the brighter the icon will be. If you turn on the Draw Mode button and change the height of a red line then it will increase or decrease the velocity for all of the green icons above that red line (e.g. kick, clap, and hihat). Modifying the velocity of various icons allows you to add some character to your drum sounds. If you keep the left mouse button down when you add an icon in the Note Editor then you can drag up and down to change the velocity of the new note.
Now you know some ways to create drum beats! Try recreating the drum beats of your favorite songs.
In Part Two we'll download some free packs of audio samples, and use the Launchpad to play pre-recorded clips in multiple tracks. But first, click the File menu in Ableton, then click "Save Live Set As," then choose a location and a filename for saving what you've done so far. We're going to come back to this in Part Two and Part Four, so choose a filename that you'll remember.
Part Two
Modification History
-
November 12, 2023 - Changed the title. Added a comment in the Introduction section that some versions of Ableton, such as Live 11 Trial, might not have the same instruments that are shown in my screenshots.
-
July 7, 2023 - Changed the title.
-
December 12, 2021 - Updated the tutorial for Ableton Live 11.
-
October 24, 2019 - Modified the wording to clarify some of the instructions.
-
August 11, 2019 - Added some more features of Ableton (see the last two pictures on this page).
-
August 09, 2019 - Added a section called "Setup."
-
August 01, 2019 - New website.
Dave Root
|