Create Music with Ableton Live 11 on Windows 10/11
Play Music with the Novation Launchpad (Or Other MIDI Devices)
The Complete Beginner's Tutorial for Both
Part Two
Downloading Packs and Importing Them into Ableton
In this section we'll download some free packs and add them to our Ableton workspace.
Go to
Using your Launchpad with Ableton Live Lite
and scroll down and then download the four free packs (Viral Hip Hop, Future House Fusion, Retro Grain, and Hypnotic Energy), then watch the video to learn how to import the packs. We'll be using some of the sounds from these packs throughout this tutorial series.
The video shows more than just downloading and importing music packs, and we'll see some of these other features in this tutorial.
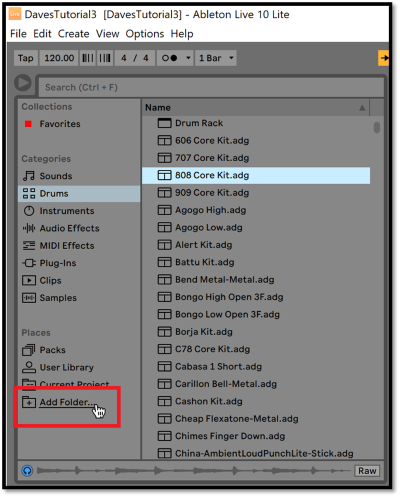
If you followed the video then your packs are in a folder called "Launchpad Projects" on your computer, and here are a couple of options for importing the packs into Ableton. To recap what the video told you to do, in the Browser at the top left of the Ableton screen, click "Add Folder" (highlighted with a red rectangle in the picture below). Remember that you can zoom in your browser by pressing Ctrl+= a few times, and zoom out by pressing Ctrl+- a few times, and restore the normal zoom by pressing Ctrl+0:
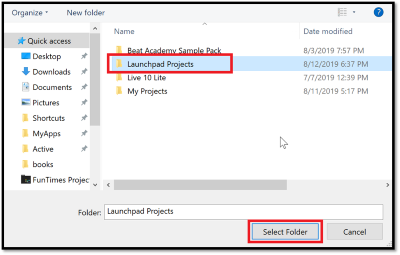
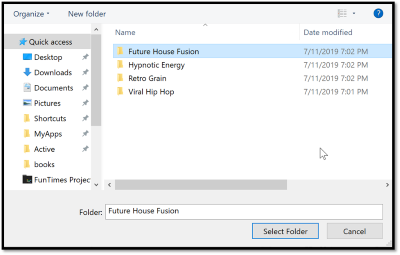
Navigate to your "Launchpad Projects" folder and highlight it, then click "Select Folder":
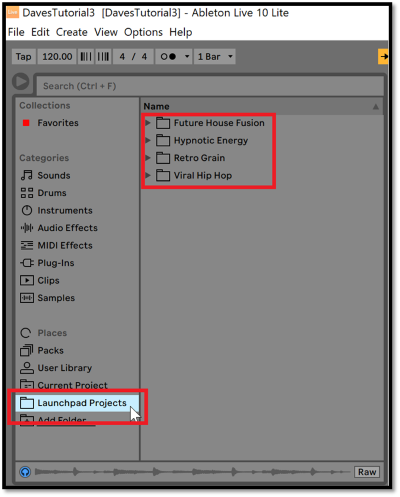
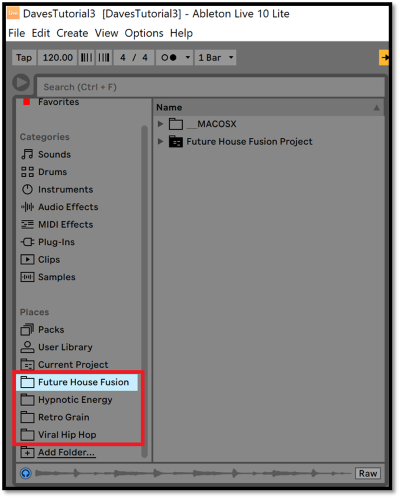
Now your "Launchpad Projects" folder is displayed on the left side of the Browser in Ableton, and when you click "Launchpad Projects" then the four packs will be displayed on the right side of the Browser in Ableton. This is one option for importing your downloaded packs:
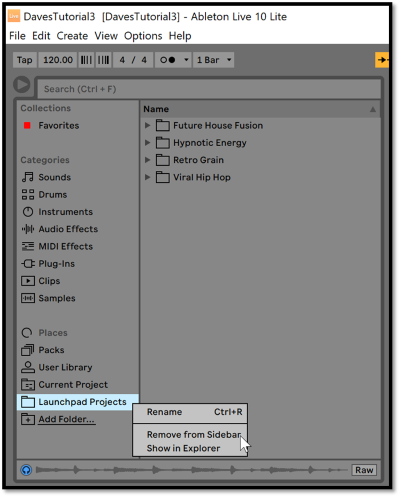
To try the other option, right-click "Launchpad Projects" and then click "Remove from Sidebar." This will remove the "Launchpad Projects" folder from Ableton, but it won't delete it from your computer:
Click "Add Folder" in the Ableton Browser again (as we did above), but this time open your "Launchpad Projects" folder and highlight "Future House Fusion" and click "Select Folder." Then click "Add Folder" in the Ableton Browser again and highlight "Hypnotic Energy" and click "Select Folder." Repeat this process for the other two packs:
Now all four packs are displayed on the left side of the Browser in Ableton. This reduces the number of clicks that you must do to use each pack, but as you add more packs then the left side of the Browser will become more cluttered. It's your choice which import option you prefer:
I chose to name my folder "Downloaded Stuff" instead of "Launchpad Projects," and I moved the folder to my "..\Ableton\Live 11 Lite\Resources" folder, and I went with the first option for importing the packs. Since I use Windows 10, I deleted the "__MACOSX" folder in each pack to reduce the clutter.
If you have a Novation MIDI controller (such as a Launchpad Pro), be sure to create an account at
the Novation customer website
and register your device. You'll need your serial # and bundle code, both of which can be found on the back of the Getting Started Guide that came with your device. Then you can download some free software under the My Account tab at that website.
At the Ableton website, the
Live 8 Legacy Pack
is available for free, so you can download this pack with all of the sounds and instruments which came with Ableton Live 8. Clicking the "Live 8 Legacy Pack" link at this website will download a file called Live8LegacyLibrary_r30431_v9.0.alp. After it downloads, find the file on your computer (probably in your Downloads folder) and double-click the file to import it into Ableton. It will automatically be placed in the "Packs" category in your Ableton Browser (which is a little bit above the red rectangle in the picture above). After it finishes importing, which will take a minute or two, then you can delete the Live8LegacyLibrary_r30431_v9.0.alp file.
In addition, the Ableton website has a number of
free packs
that you can download, and other websites offer packs that you can download and import into Ableton as well.
Playing Clips in Multiple Tracks
In this section we'll experiment with playing clips in several different tracks, using one of the packs that we downloaded in the previous section. We're going to continue from where we left off in Part One, so click the File menu in Ableton and then click "Open Recent Set" and then click the filename that you created at the end of Part One.
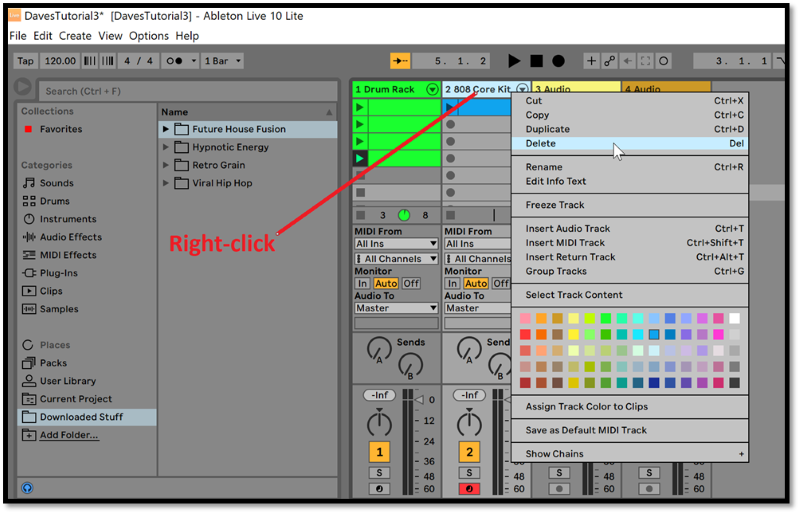
The packs that we downloaded contain audio clips (not MIDI clips), so right-click the title bar of track #2 (which is a MIDI track) and delete it because we won't be needing it:
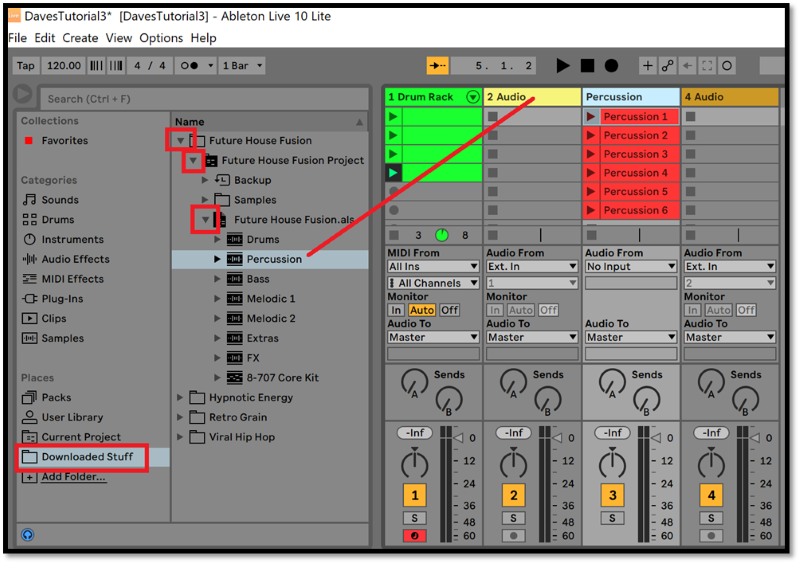
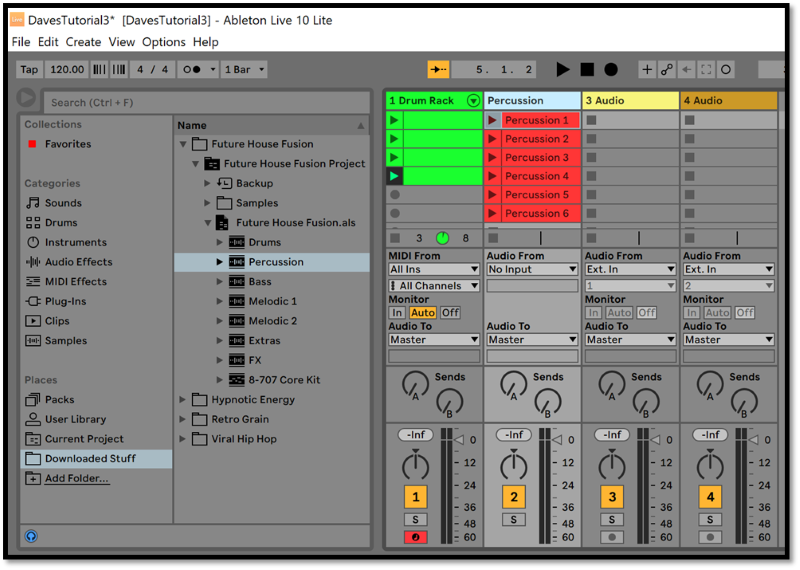
In the packs that you imported into Ableton, open the Future House Fusion pack in the Ableton Browser and expand the project (using the arrow icons highlighted with red rectangles in the picture below) until you can see the Drums and Percussion and Bass and so on. Drag Percussion onto the title bar of track #2 and notice that it creates a new track for the Percussion (your colors might be different from mine):
If the new Percussion track is in track #3 as in the picture above, then click the title bar of the Percussion track and drag it to the left on top of the title bar of track #2, then release the mouse button. This demonstrates how to change the order of your tracks:
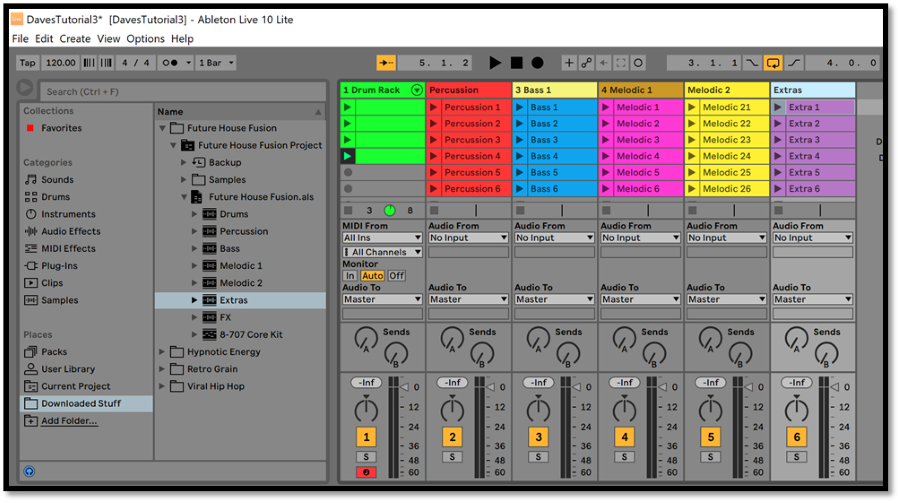
Drag Bass to the first clip slot in track #3 (not onto the title bar of track #3). This demonstrates how to add clips to a track without creating a new track:

In the same way, drag Melodic 1 to the first clip slot in track #4 so that it fills up track #4. Drag Melodic 2 onto the title bar of track #4 (Melodic 1) so it creates track #5. Drag Extras onto the title bar of track #5 (Melodic 2) so it creates track #6. In Ableton Live 11 Lite you can have up to 8 tracks:
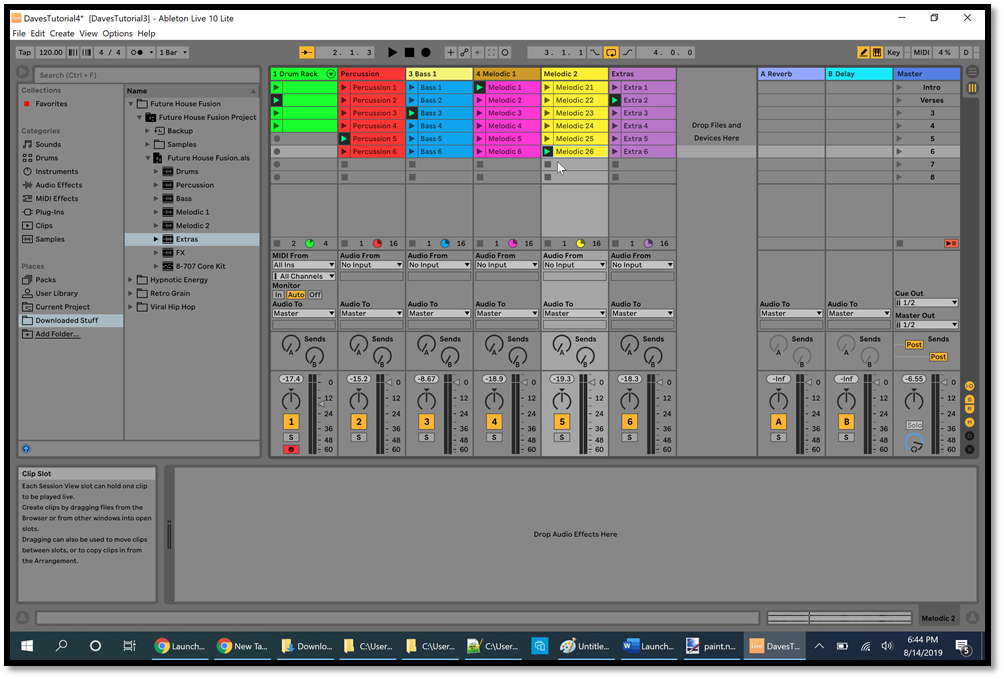
At the very bottom of the above picture there's a red button under track #1. That's the Arm Recording button for track #1, which we saw in Part One of this tutorial. We'll come back to that button in a moment.
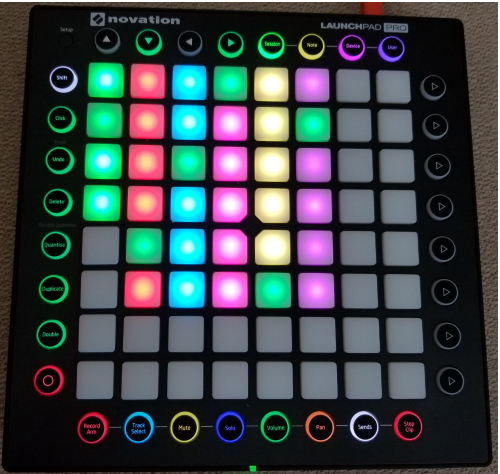
On your Launchpad, tap the Session button (highlighted with a red rectangle in the picture below) and notice that the colored pads match up with the colors of the clips in Ableton (in the above picture). The first column of pads on the Launchpad has 4 green buttons (because we have 4 green clips in track #1) and 4 red pads. The pads are red because they are record-enabled, meaning that they are ready to have clips recorded in those locations:
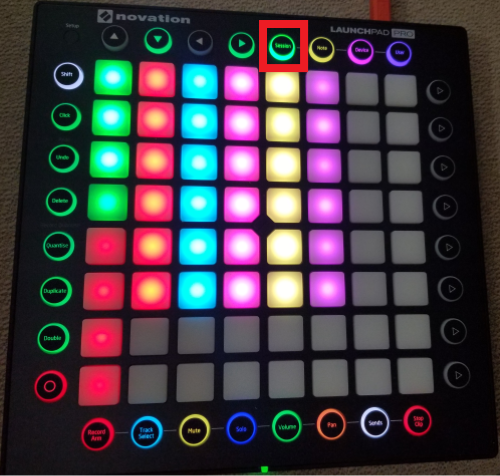
In Ableton, click the red Arm Recording button for track #1 (described above) to turn it off so it's no longer red, and notice that the bottom 4 pads in the first column on your Launchpad are now gray (not lit up). In a moment we'll see the purpose for this.
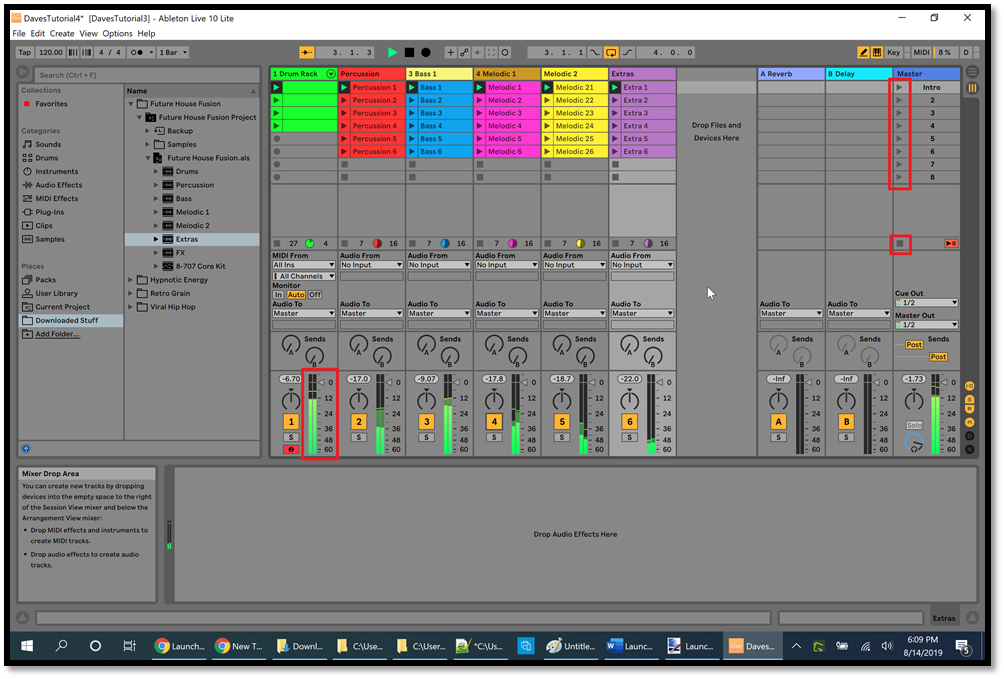
Near the top right corner of the picture below, there's a vertical column of 8 triangular Play buttons under the Master track (highlighted with a red rectangle). These Play buttons are labeled "1" through "8" by default, but the picture shows that I renamed "1" to "Intro." I did this by right-clicking on "1" and then clicking Rename and pressing Enter.
Each of the Play buttons in the Master track allows you to launch an entire row of clips at the same time. In the picture below, I've clicked the first Play button (labeled "Intro") in the Master track, which launched the first clip in each track so that they're all playing at the same time. All of the Play buttons for the first clip in each track have turned green with a black background, which indicates that these are the active clips. So this is a way to launch all of the clips for the Intro to my song, for example. When we play a row of clips like this, it's called a "scene," and the Play buttons in the Master track are the Scene Launch buttons. The second row of clips (the second scene) might be for the verses in my song (so we could rename the second Scene Launch button to "Verses"), and so on. Try clicking all of the Scene Launch buttons in the Master track to hear all of the scenes.
To stop all of the clips, we can click the Scene Launch button for an empty scene (such as scene 8), or we can click the square button below the 8 Scene Launch buttons (highlighted with a red rectangle in the picture below). Notice that neither one of these actually stops the Arrangement Position (the "3. 1. 3" in the picture below above track #2), so click the black rectangle at the top of the screen (above track #3) to stop those numbers from changing (double-click the square black rectangle to reset the numbers to "1. 1. 1.").
The drum track that we created (track #1) sounds a bit loud when we play the scenes, so you can use the Volume Slider (highlighted with a red rectangle below track #1) to lower the volume of track #1, as we saw in Part One. To the left of the Volume Slider is a button labeled "1," and below that there's a button labeled "S." While a scene is playing, try clicking the numbered button for each track and the "S" button for each track to mute a track or Solo a track:
In the top left corner of the picture above, notice the button labeled "120.00." This is the Tempo value, which we looked at in Part One. Click one of the Scene Launch buttons to play a row of clips, then change the tempo value by clicking it and dragging the mouse up or down. All of the clips will speed up or slow down as you adjust the tempo, but their pitch doesn't change. In other words, the clips don't sound any different except for their speed. This is called "warping." Warped clips are able to be played faster or slower to match your desired tempo without affecting how they sound (their pitch).
In addition to playing a row of clips (a scene), you can play any clips in any order. In the picture below, notice that the active Play buttons in my tracks are not all in the same row:
On my Launchpad, the flashing green pads show which clips are currently playing, and these green pads match up with the active Play buttons in Ableton in the above picture. Tap different lit-up pads on your Launchpad to play different clips. To stop a track, tap a gray unlit pad at the bottom of that track. This is why we turned off the red Arm Recording button for track #1, because now we have gray unlit pads in track #1 for stopping the active clip in track #1:
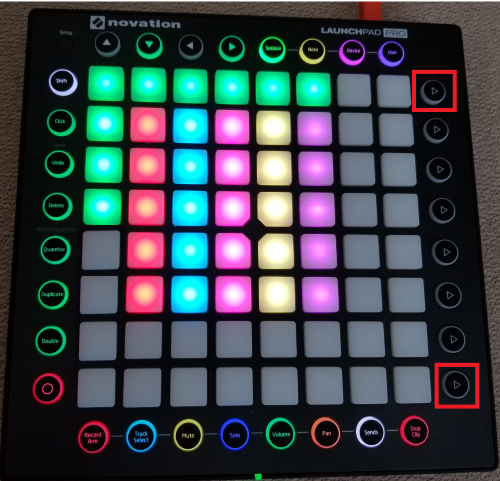
To play a scene on your Launchpad, tap one of the Scene Launch buttons on the right side of the Launchpad. In the picture below, I tapped the first Scene Launch button (highlighted with a red rectangle at the top of the picture below), so the first row of clips is playing and the pads in the first row are all flashing green. To stop all clips, simply launch an empty scene, for example by tapping the last Scene Launch button (highlighted with a red rectangle at the bottom of the picture below). Remember to click the black square at the top of the screen in Ableton to stop the Arrangement Position numbers:
In Part Three we'll create our own version of a well-known song.
Part Three
Modification History
-
November 12, 2023 - Changed the title.
-
July 7, 2023 - Changed the title.
-
December 12, 2021 - Updated the tutorial for Ableton Live 11.
-
October 24, 2019 - Modified the wording to clarify some of the instructions.
-
August 26, 2019 - Added a definition of "warping."
-
August 16, 2019 - New page.
Dave Root
|