Create Music with Ableton Live 11 on Windows 10/11
Play Music with the Novation Launchpad (Or Other MIDI Devices)
The Complete Beginner's Tutorial for Both
Part Three
Feel It Still by Portugal. The Man
In Part Three we're going to create our own version of the beginning of Feel It Still by Portugal. The Man, because the instruments don't sound too difficult to replicate in Ableton. Click the link to listen to the official video of
Feel It Still.
Let's start with a clean slate, so click the File menu in Ableton and then click "New Live Set." Remember to click the View menu and turn off Sends and In/Out. We won't be using these features, and turning them off gives us more room on the screen.
Now let's add the instruments we'll need. You can spend as much time as you want hunting for the perfect instrument, or changing the sound of an instrument to make it as faithful as possible to the original, but in this tutorial the focus is on learning more features of Ableton and the Launchpad. Therefore, we won't be too concerned with making an exact reproduction of the song.
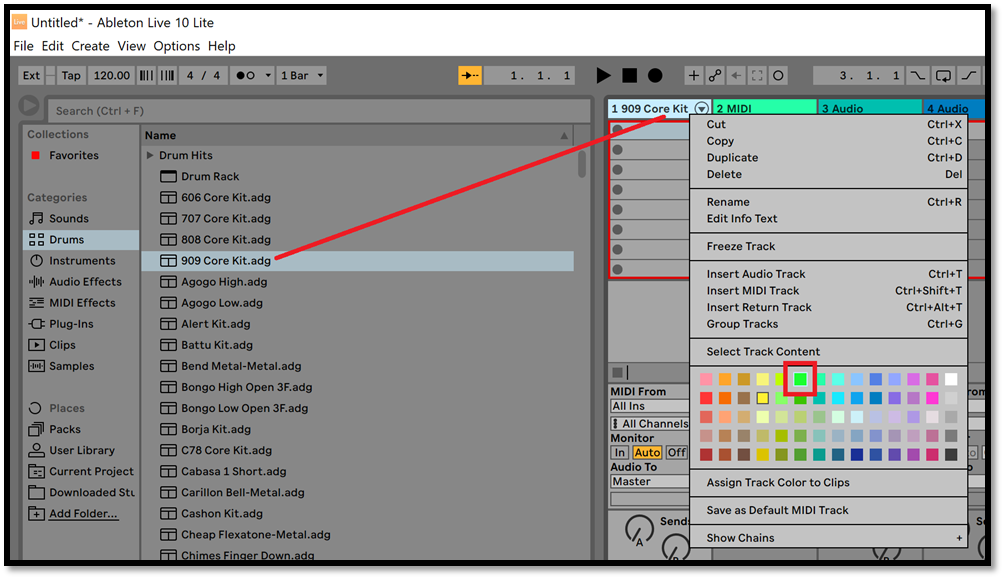
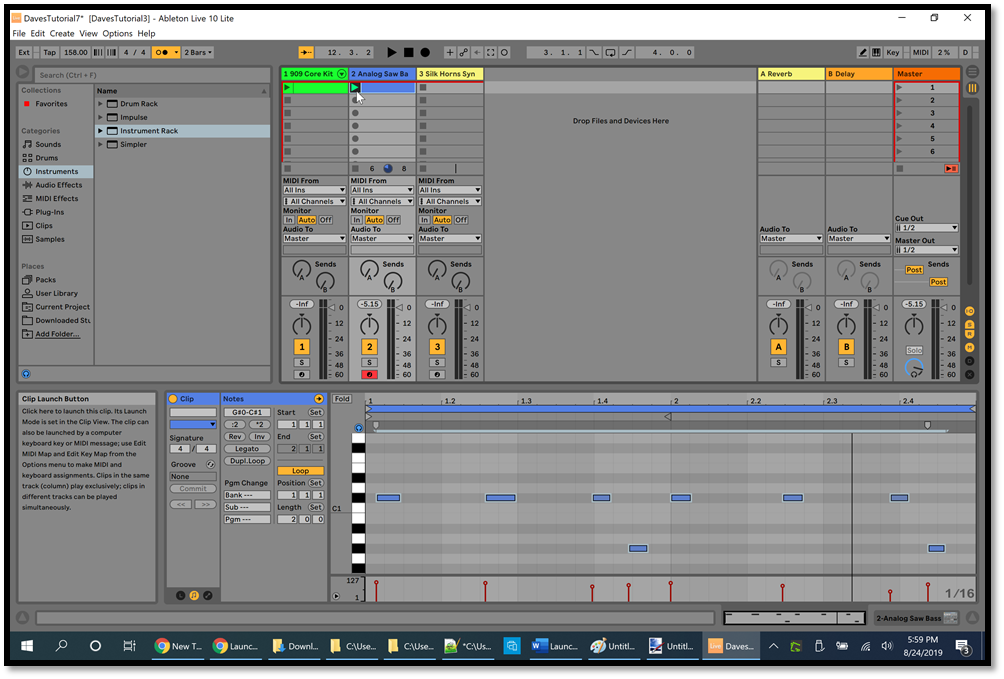
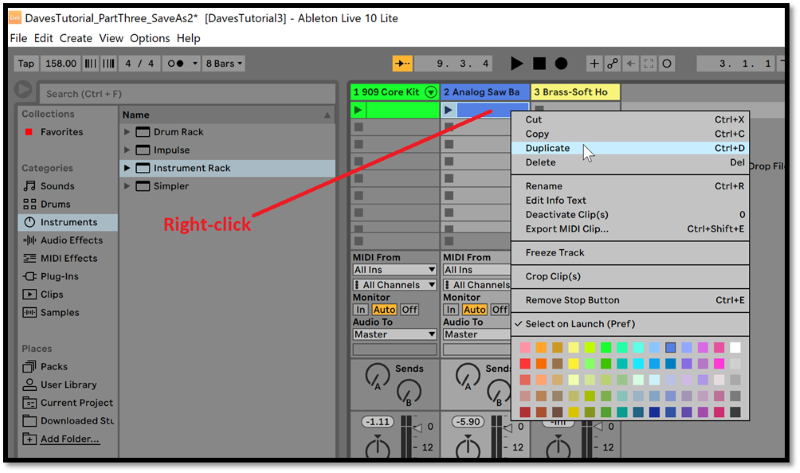
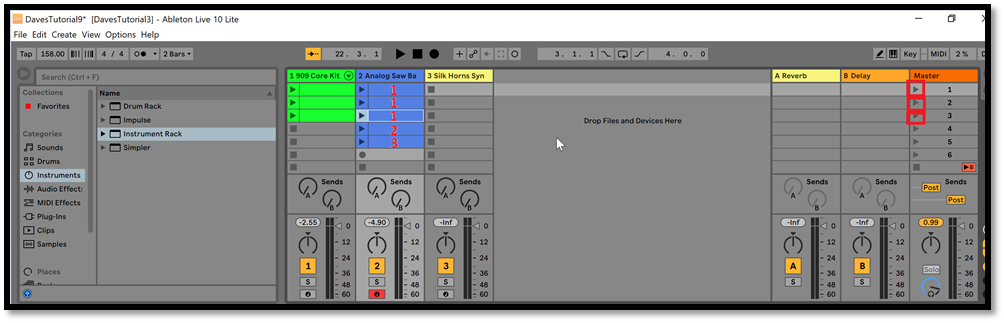
For the drums, click Drums on the left side of the Ableton Browser, then drag "909 Core Kit" onto the title bar of the first MIDI track (any of the drum kits will do, I just happened to choose this one). Right-click the title bar of the first MIDI track and make it green (highlighted with a red rectangle in the picture below), just like we did in Part One. Remember that you can zoom in your browser by pressing Ctrl+= a few times, and zoom out by pressing Ctrl+- a few times, and restore the normal zoom by pressing Ctrl+0:
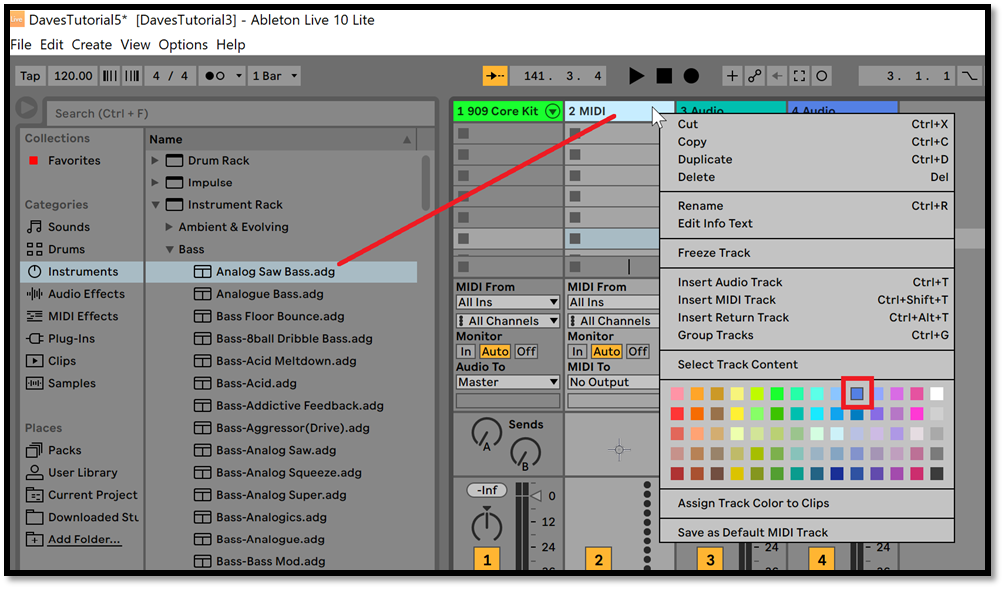
For the bass, click Instruments on the left side of the Ableton Browser, then expand Instrument Rack, then expand the Bass section. Drag "Basic FM House Bass" ("Analog Saw Bass" in Ableton Live 10 as in the picture below) onto the title bar of the second MIDI track (because it sounds similar to the bass guitar in the song), then right-click the title bar of the second MIDI track and change the color to blue (highlighted with a red rectangle in the picture below):
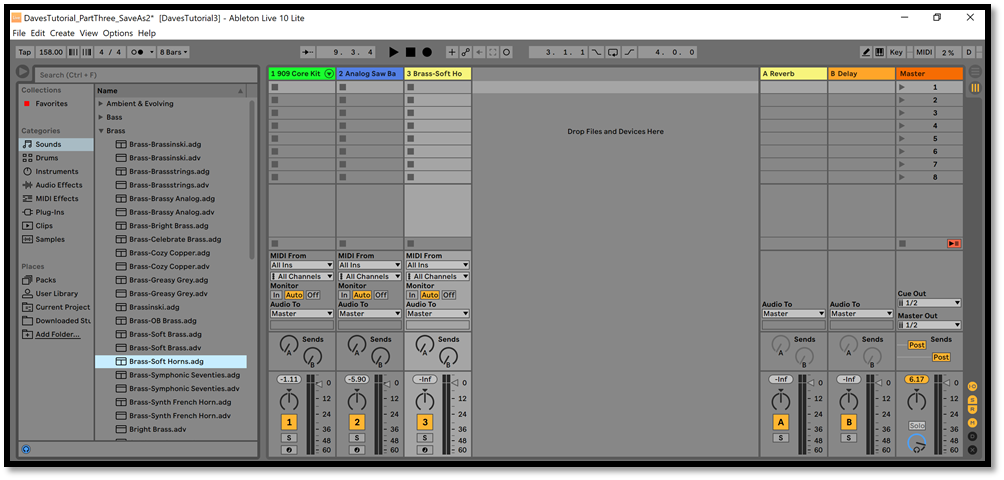
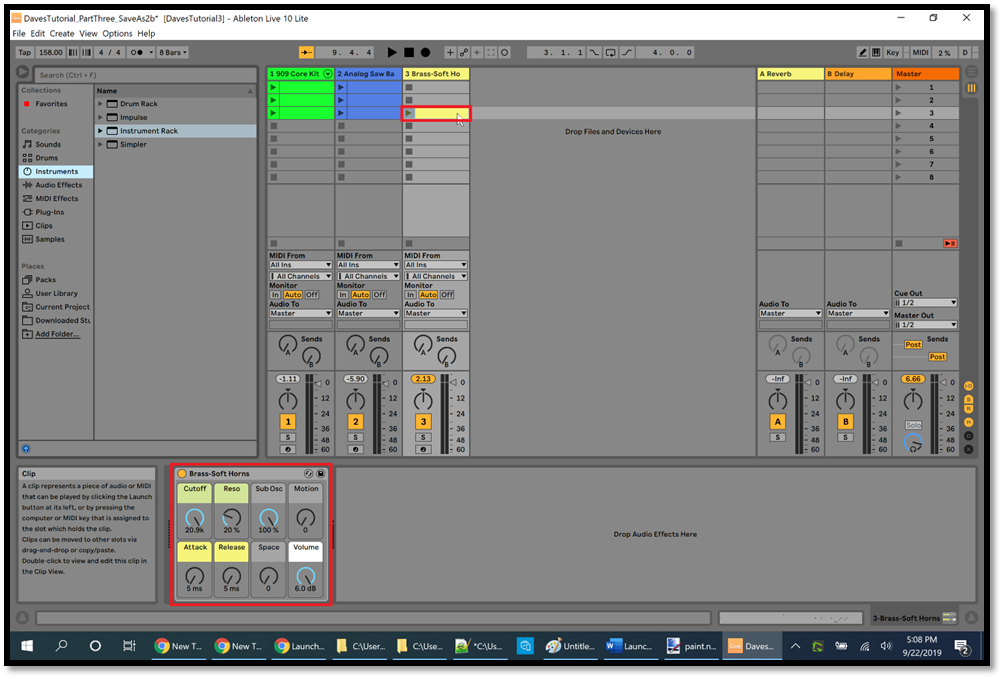
Since we're adding instruments (which need to go into MIDI tracks), right-click the title bars of the two Audio tracks and delete them. Then click the Create menu and click "Insert MIDI Track." This will create a third track. In the Ableton Browser, click "Sounds" on the left and expand the Brass section, then drag "Brass-Soft Horns" onto the title bar of track #3. Right-click the title bar of track #3 and change it to yellow (the first yellow in the first row of colors). Now the top part of your Ableton workspace should look something like this:
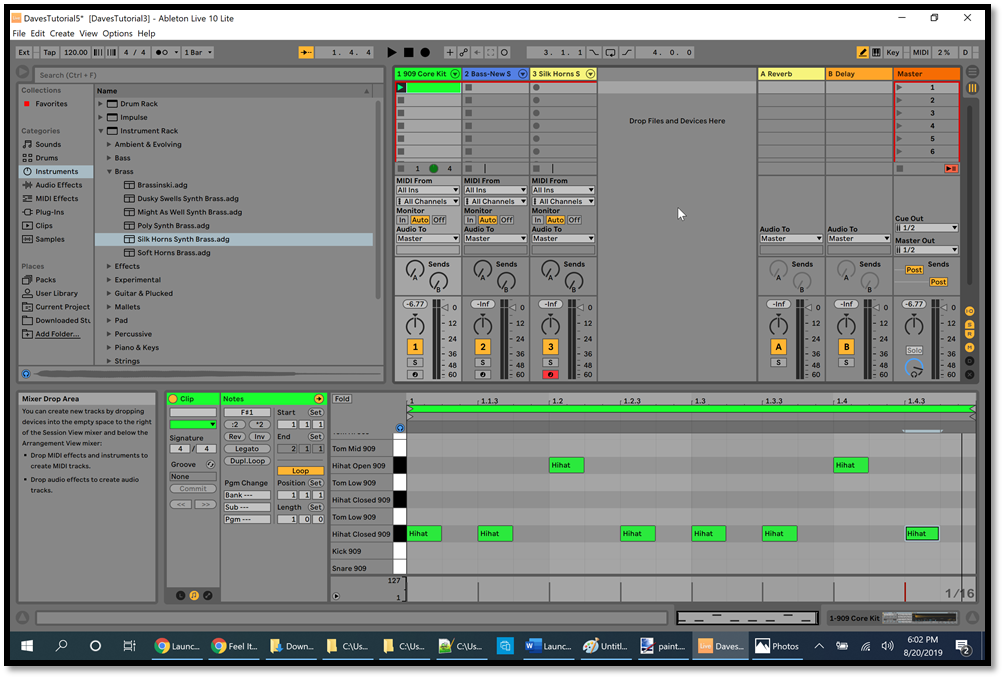
The drum beat is very simple, and in the beginning of the song all you can hear is a closed Hihat and an open Hihat. Double-click the first clip slot in track #1 so you can create a clip (like we did in Part One), and draw in the drum beats as in the picture below (showing the drum sounds for Ableton Live 10). In Ableton Live 11 the drum sounds are "Open HiHat" and "Closed HiHat." Near the top right corner of the picture you can see that the Draw Mode button (which looks like a pencil) is on, which makes it easy to draw in the drum beats. Click the Play button for this clip, and adjust the "120.00" button (near the top left of the Ableton screen) to change the tempo while you're listening to the actual song. After the picture I'll give you the exact tempo for this song, but see if you can find the right tempo:
This song is played at 158 BPM (Beats Per Minute), so change the "120.00" button to 158.00. Then play the drum clip while the song is playing to verify that this is the correct tempo. Stop the clip, and now we'll work on the bass riff using the Launchpad. To do this, double-click the first clip slot in track #2 in Ableton, then tap the Note button on your Launchpad to go into Note mode. In Ableton, turn on the Arm Recording button for track #2 (highlighted with a red rectangle under track #2 in the picture below) so that you can record a clip in track #2 using the Launchpad.
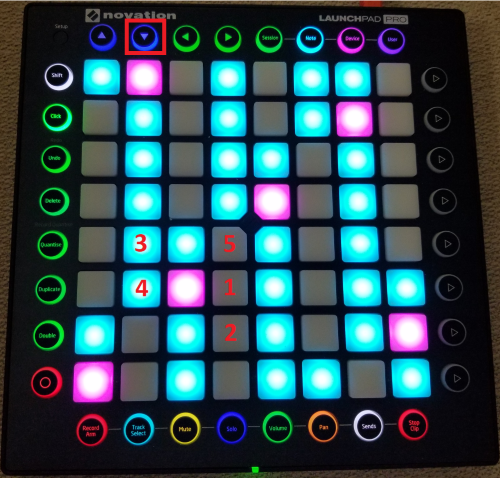
In the Note Editor at the bottom right of the Ableton screen, scroll down until you can see C1 next to the Piano Roll (the black and white buttons). The first note in the song is a C#, so click the black button above C1 in the Piano Roll (highlighted with a red rectangle at the bottom of the picture below) and notice which pad turns green on your Launchpad. This is the first note in the song, labeled C#1 in Ableton, but it's in the bottom row of pads on the Launchpad, which means that we can't play any notes lower than this one on the Launchpad:

Tap the "down arrow" button on your Launchpad (highlighted with a red rectangle in the picture below), then click the C#1 button in Ableton and notice that the green pad has moved up so that you can play notes on the Launchpad below C#1. The picture shows the pads that you'll need to tap in order to play the full bass riff. Tap the pad labeled "1" three times to the beat of the song, then the pad labeled "2," then "1" three times, then "2," then repeat the riff with pads "3" and "4," then repeat with pads "5" and "1," then start the whole riff over again. By listening to the bass guitar at the beginning of the song and tapping these pads, you should be able to play along with the song:
Now let's record the first part of the bass riff, using only the pads labeled "1" and "2" in the above picture. This part of the bass riff is 2 bars long, so click the "1 Bar" button (highlighted with a red rectangle at the top left in the picture of Ableton above) and change it to 2 bars. Also click the Length value (highlighted with a red rectangle at the bottom left in the picture of Ableton above) and change it to 2 and press Enter. The Length is in the "Clip" section in Ableton Live 11, but it's in the "Notes" section in Ableton Live 10. Now we can create 2 bars of music (because of the Length value), and this clip will loop for the full 2 bars before another clip is allowed to begin (because we changed "1 Bar" to "2 Bars"). Also turn on the click track, which is highlighted with a red rectangle at the top left in the picture of Ableton above, next to the "1 Bar" button.
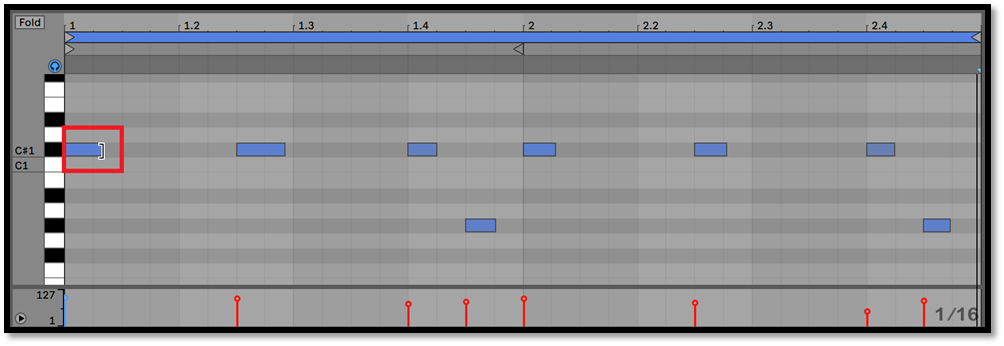
Listen to the first part of the song and try to memorize the rhythm of the bass guitar. Then launch the first clip in track #2 in Ableton in order to start the click track playing. Watch the vertical black line moving from left to right in the Note Editor in Ableton, and when it reaches the end of the screen then it's time to start playing the bass riff using the pads labeled "1" and "2" in the above picture. Practice playing the first 2 bars of the song, then tap the Arm Recording button on your Launchpad (the red button with a circle on it). This allows you to record notes from your Launchpad. Keep in mind that if you record more than 2 bars then you will be recording on top of the first 2 bars that you recorded, because Ableton will loop back to the beginning after 2 bars. This is how it looked in the Note Editor when I recorded the first 2 bars:
To make the bass notes more accurate, first turn off Draw Mode (the button which looks like a pencil at the top right of the Ableton screen). Then drag each blue icon so it snaps to the vertical lines shown in the picture below. In other words, drag each blue icon so that the left side of the icon lines up with the faint vertical lines in the picture below. Add or delete any blue icons as needed so that your Note Editor looks like the picture (we'll fix the size of the icons in a moment). Play this clip along with the song, and notice that it sounds just about right for the first 2 bars:
To make our bass riff sound even closer to the song, move your mouse pointer to the right side of the first blue icon until the mouse cursor changes to look like a square bracket (]) as in the picture above. While the mouse cursor looks like a square bracket, click and drag the mouse to the right to make the blue icon longer. Do the same for all of the blue icons to make them look like the picture below:
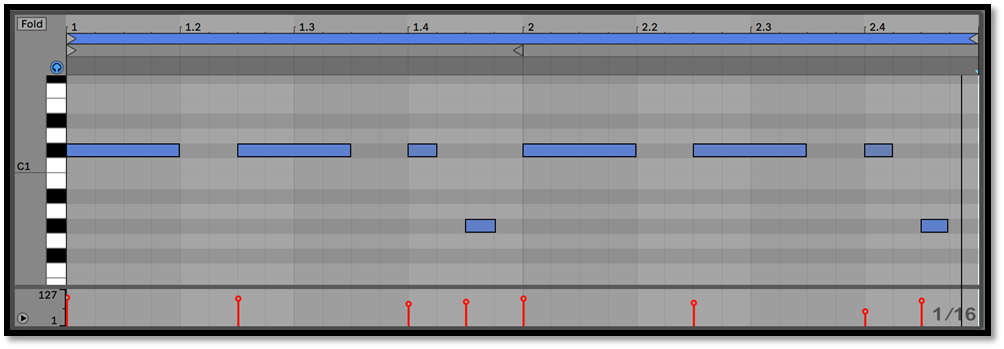
This causes the bass notes to sound for a longer period of time, which matches the song better than my original bass notes. Now we have the first 2 bars finished, so let's right-click the first clip in track #2 and then click Duplicate:
Now we're working on the second clip in track #2. Click somewhere in the Note Editor (so that the Note Editor has the focus), then click the Edit menu, then click Select All. This will highlight all of the blue icons in the Note Editor. Click one of the widest blue icons and drag it up 3 rows to E1 (Notice "E1" on the left side of the picture below), which will cause all of the blue icons to move up. Make sure that you don't drag the icons left or right:
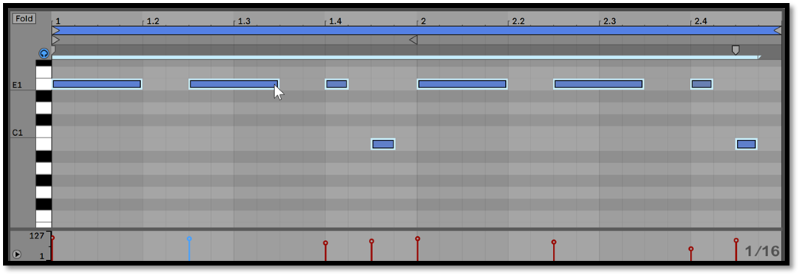
Repeat that process by duplicating the second clip, clicking in the Note Editor to give it the focus, clicking the Edit menu, then clicking Select All. This will highlight all of the blue icons in the Note Editor. Click one of the widest blue icons and drag it up 2 rows to F#1, which will cause all of the blue icons to move up. Make sure that you don't drag the icons left or right:

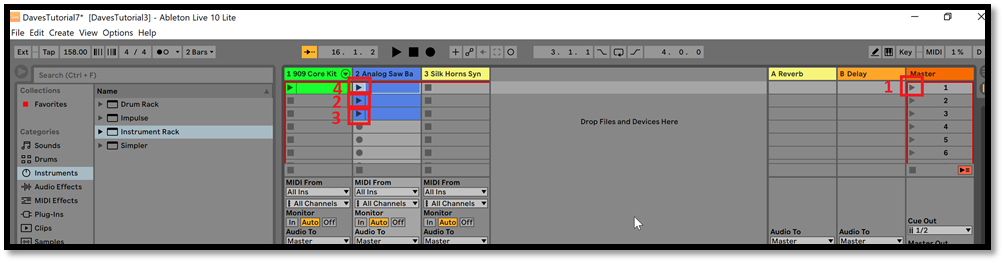
To play the song, click the Play button for scene 1, highlighted with a red rectangle at the right in the picture below, marked with a "1." This will start the drums and the bass together. When they start playing, immediately click the Play button for the second clip in track #2, marked with a "2" in the picture below. It won't start playing until the 2 bars for the first clip have played. When the second clip starts, click the Play button for the third clip in track #2, marked with a "3." When it starts playing, click the Play button for the first clip in track #2, marked with a "4." Let this clip play for 2 bars to finish up the 8-bar bass riff before you launch the second clip in track #2 (marked with a "2"), and so on:
On your Launchpad, tap the Session button to go into Session mode, then you can play the song using the pads just as you did in Ableton.
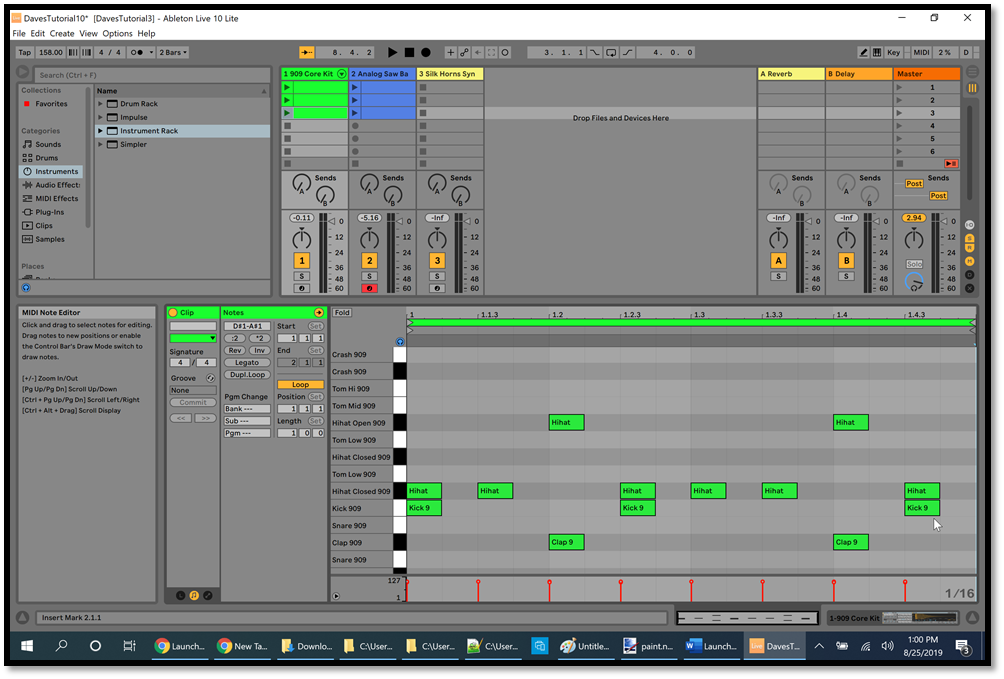
In track #1 in Ableton, duplicate the first clip as we've done before, then add the "Clap 909" ("Hand Clap" in Ableton Live 11) icons as in the picture below:
Duplicate the second clip and add the "Kick 909" icons (the bottom-most "Bass Drum" in Ableton Live 11) as in the picture below:
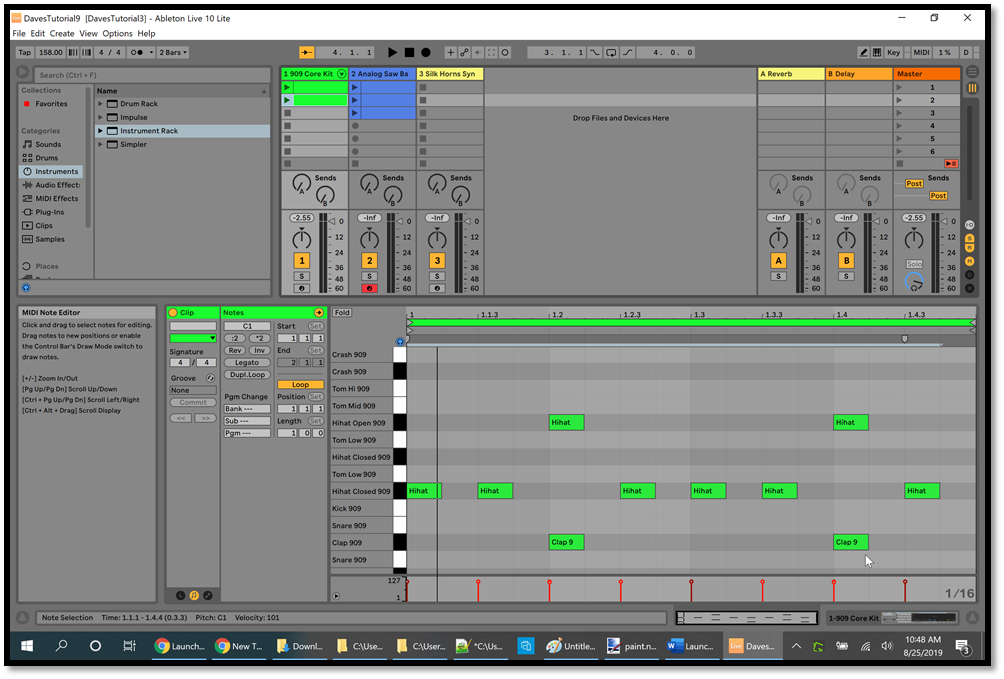
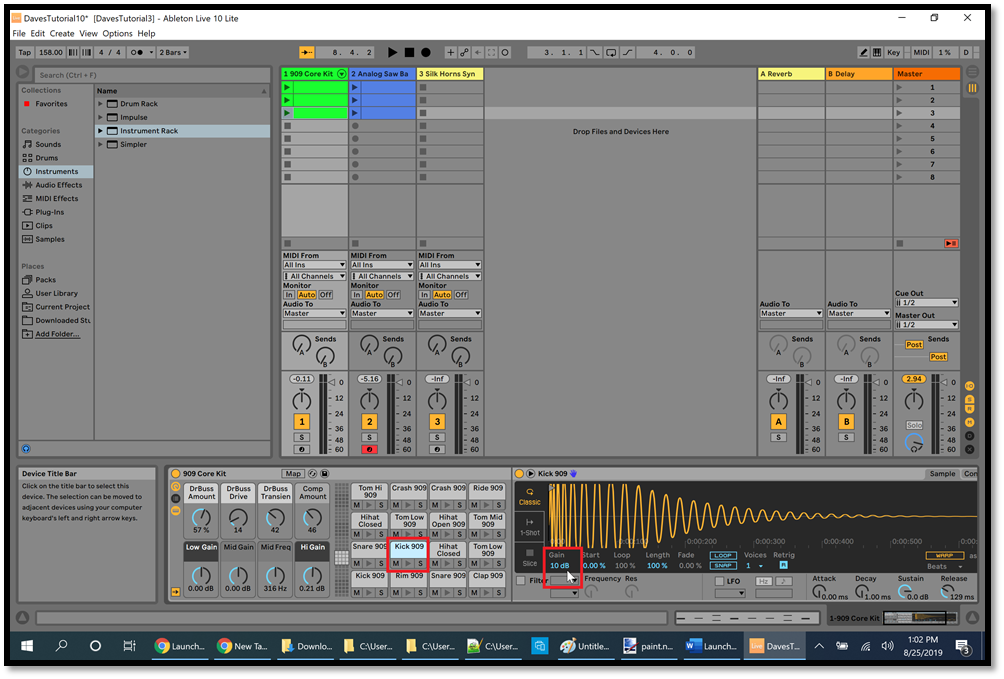
The kick drum isn't very loud, so let's increase its volume. These instructions and the picture below are for Ableton Live 10. Press Shift+Tab on your computer keyboard to see the Device view at the bottom of the Ableton screen, then click the "Kick 909" which is highlighted with a red rectangle in the picture below (don't click the "Kick 909" at the bottom left corner of the drum sounds). If you don't see the various drum sounds as in the picture below then click the third clip in track #1 to select it. To the right of the "Kick 909" there's a Gain setting (highlighted with a red rectangle), which is essentially the volume for the kick drum. Launch the third clip in track #1, then click the Gain value and drag the mouse up or down to adjust the volume to your liking (you can also click the Gain value and type in a number). A value of 10 gives it a nice punch:
To increase the kick drum's volume in Ableton Live 11, press Shift+Tab on your computer keyboard to see the Device view at the bottom of the Ableton screen. Play the green clip #3 in track #1 (highlighted with a red rectangle in the picture below), and notice which drum sounds have an orange-ish triangular Play button lighting up at the bottom of the screen (those are the sounds being played in this clip), then click the words "Bass Drum" (so they turn light blue) for the bass drum that's playing, highlighted with a red rectangle in the picture below. To the right of that, the round "Show/Hide Devices" button is highlighted with a red rectangle:
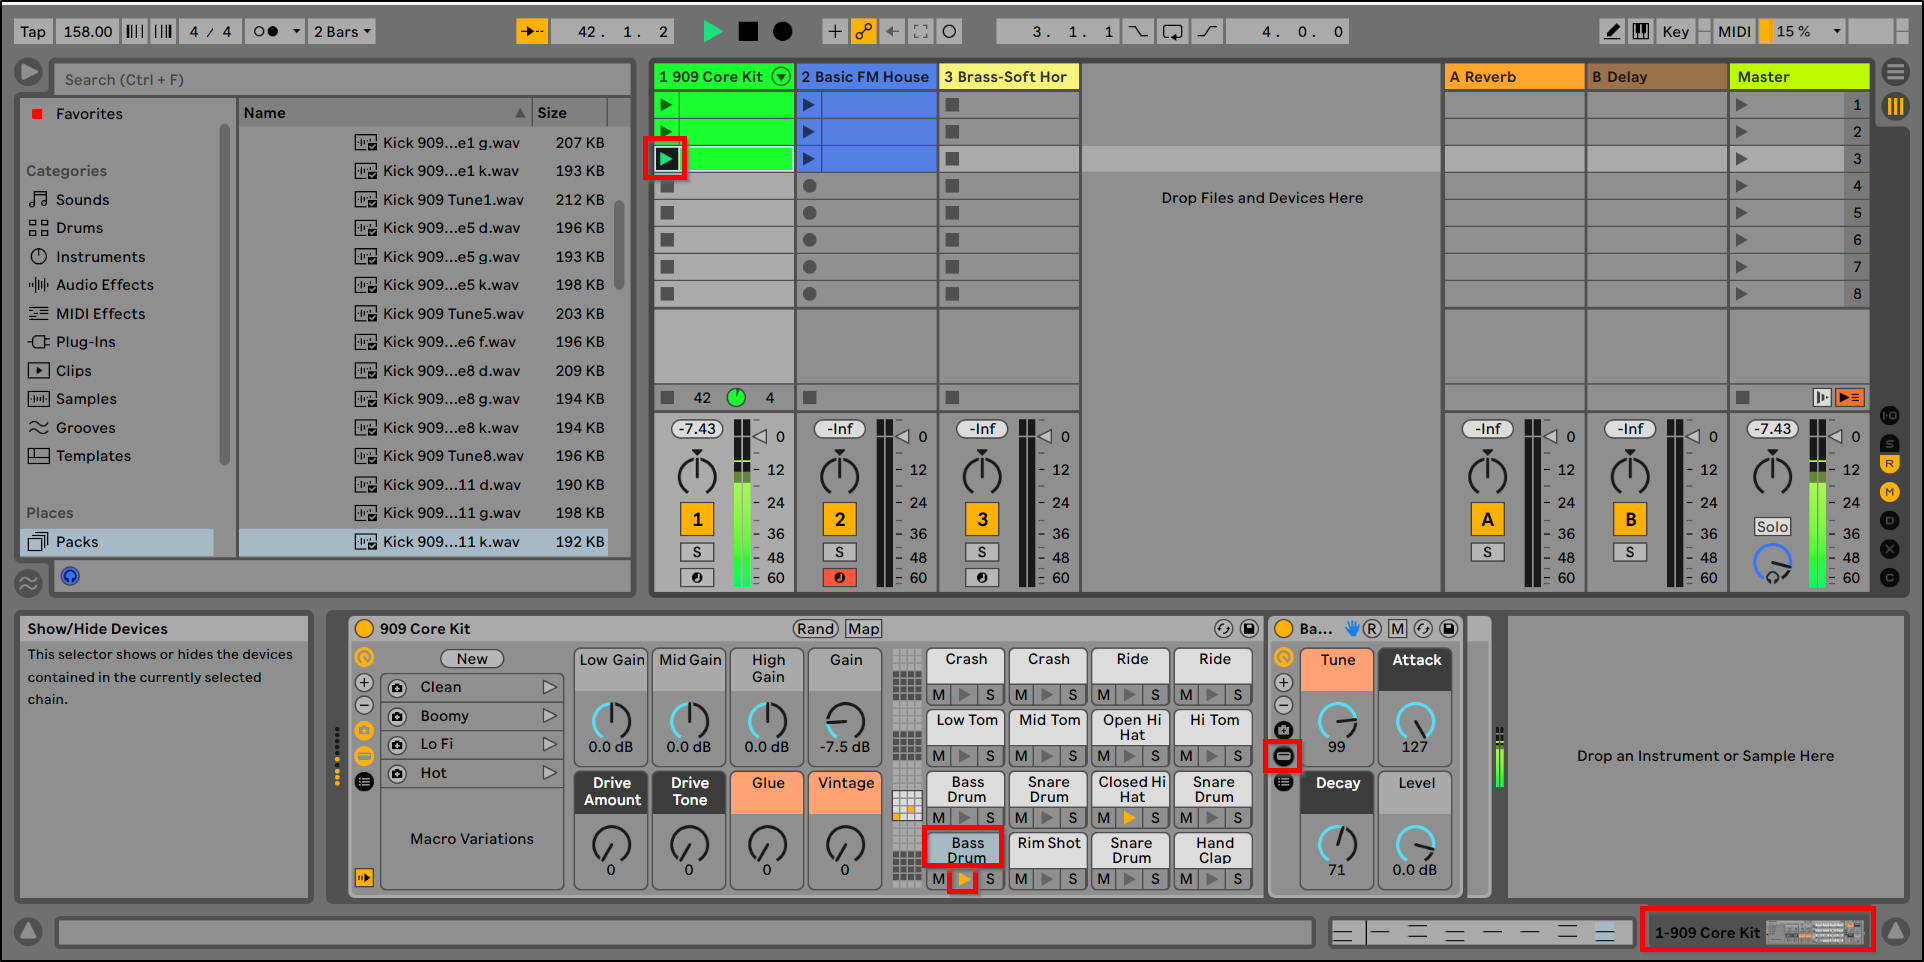
Click the round "Show/Hide Devices" button, then click and drag to the right in the "Device View Selector" (highlighted with a red rectangle at the bottom right in the picture above). This allows you to change various attributes of the kick drum, but for now just click the "Volume" control (highlighted with a red rectangle in the picture below) and drag the mouse up until the volume is between 1 and 2 dB. This gives the kick drum a nice punch:

The hand clap volume is also a bit too quiet, so in Ableton Live 11 click the words "Hand Clap" to turn them light blue (highlighted with a red rectangle on the left in the picture below). Click the "Volume" control and drag the mouse up or down to find a good volume (somewhere between -1 and -2 dB works well). There's a bit of fade-out in the hand clap sound, so click the "Release" control and drag the mouse up or down to reduce the fade-out (just under 300 ms works well):

To make it easier to play along with the song, let's setup some scenes. In track #2, click and drag the third clip down 2 slots, then click and drag the second clip down 2 slots. The second and third clips are still in the same order as before, but now there are 2 empty slots below the first clip in track #2:
In track #2, duplicate the first clip, then duplicate the second clip. Now the first 3 clips are identical (basically they're all the first clip), followed by the second and third clips:
In the top right of the above picture, notice that the first 3 Scene Launch buttons in the Master track are highlighted with red rectangles. The entire bass riff is 8 bars, so we can play the first 8 bars like this: scene 1, blue clip 2, blue clip 3, scene 1 ("blue clip 2" refers to the blue clip which has the number 2 on it in the above picture). When a scene or clip begins playing, immediately launch the next scene or clip. Play the scenes and clips in the following order:
scene 1, blue clip 2, blue clip 3, scene 1
scene 2, blue clip 2, blue clip 3, scene 2
scene 3, blue clip 2, blue clip 3, scene 3
See the pattern? It's a bit tricky at first, but if you play the song on your Launchpad then this gives you things to do to make your performance more impressive to others. In fact, you could rearrange the scenes and clips to make your performance on the Launchpad appear even more complex. On the other hand, in Part Six we'll see that recording a song from the Session view onto the Arrangement view makes it easy to play an entire song with just a single click.
Next we'll add a brass instrument in order to illustrate a few more features of Ableton, but first let's simplify our version of the song. Before we do that, click the File menu, then click "Save Live Set As," then choose a location and a filename for saving what you've done so far.
In track #2 (the blue track), right-click and delete the second, third, fourth, and fifth clips, leaving only the first clip (highlighted with a red rectangle in the picture below). Click the first clip so that you can see the notes in the Note Editor at the bottom of the Ableton screen, then click the "Dupl. Loop" button (highlighted with a red rectangle to the left of the Note Editor in the picture below). In Ableton Live 11, click the "Duplicate" button. If you're in the Device view then press Shift+Tab to return to the Note Editor:
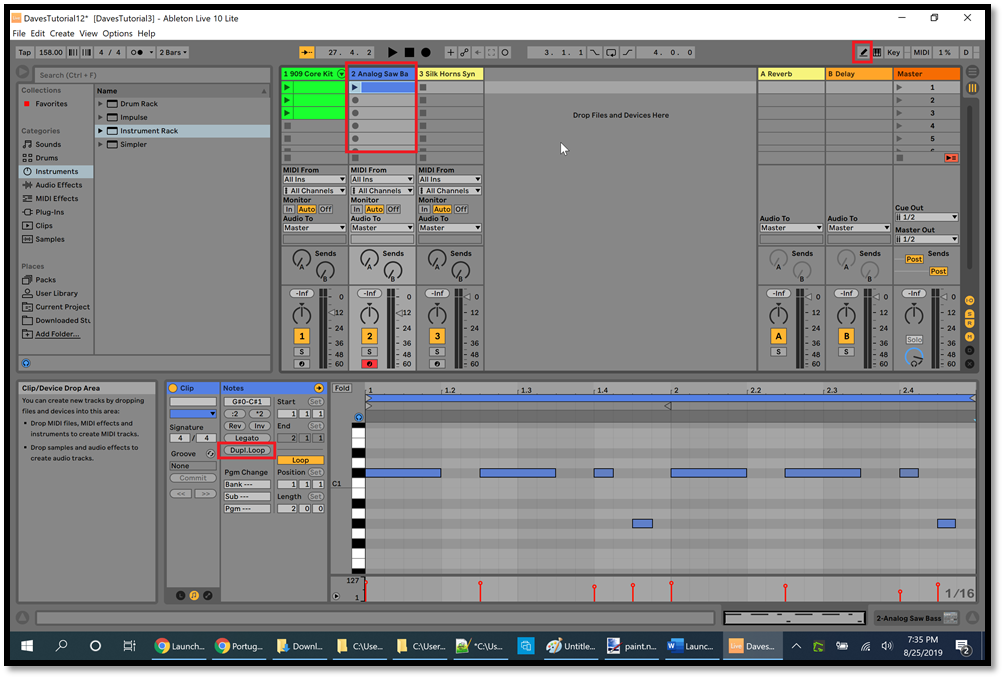
Clicking the "Dupl. Loop" or "Duplicate" button will copy/paste the existing blue icons, and the new icons are automatically highlighted with a white border around each icon. Make sure that the Draw Mode button is off (highlighted with a red rectangle near the top right of the picture above). Click one of the highlighted icons and drag it up 3 rows (which will move all of the highlighted icons) so that the Note Editor looks like this:

Click the "Dupl. Loop" or "Duplicate" button again. Click and drag the mouse to draw a rectangle around the blue icons shown in the picture below:
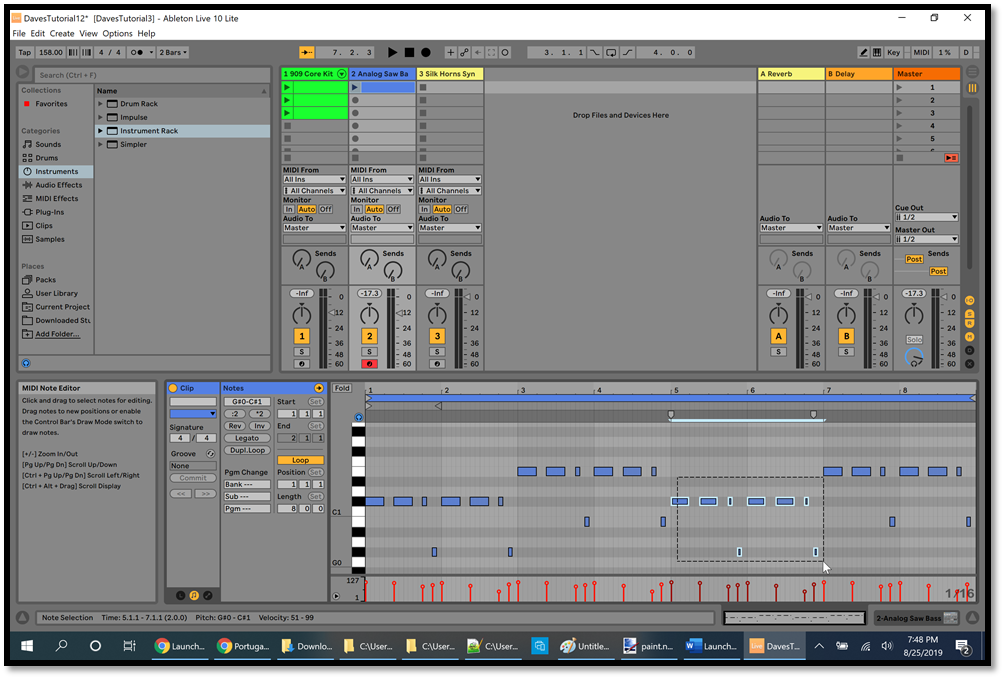
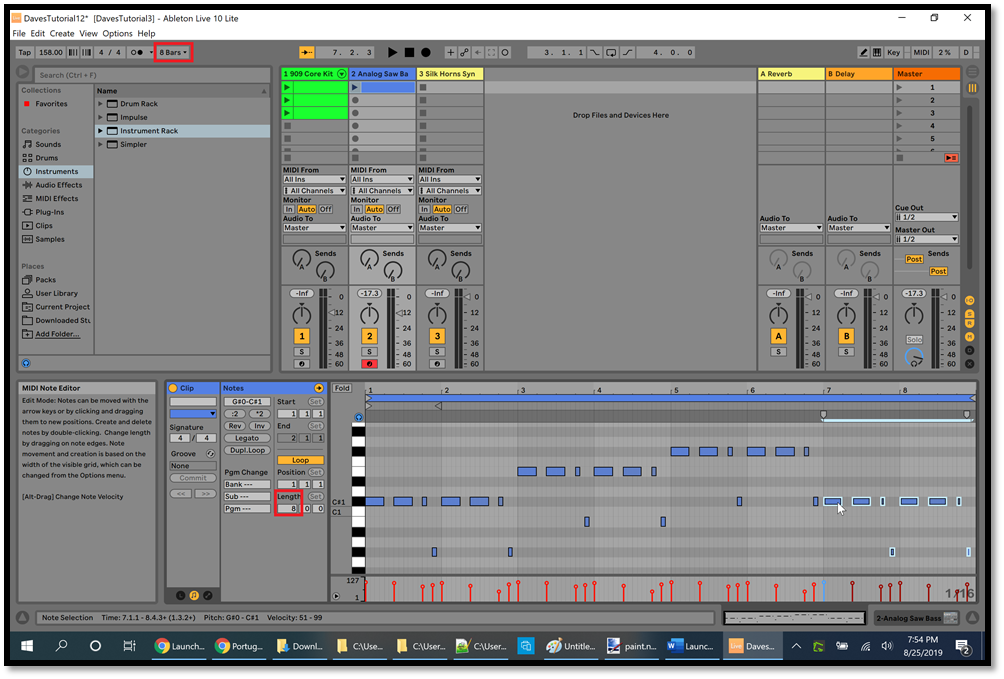
Click one of the highlighted icons and drag it up 5 rows. Then draw a rectangle around the remaining blue icons (to the right of the ones you just dragged), and drag the highlighted icons down 3 rows. Now the Note Editor should look like the picture below. Since this clip is now 8 bars long (see the Length value highlighted with a red rectangle to the left of the Note Editor in the picture below), change the loop value to 8 bars (highlighted with a red rectangle at the top of the picture below) so that the clip will play the full 8 bars before the next clip or scene is allowed to begin playing:
Right-click the first clip in track #2 and duplicate it, then right-click the second clip in track #2 and duplicate it. Now you have 3 clips in track #2 which are all identical to each other, and each one contains the entire 8-bar bass riff. To play the song, launch scene 1, and when it starts playing then immediately launch scene 2, and when it starts playing then immediately launch scene 3. Listen to scene 3, then click the Stop button (the black square at the top of the screen).
This is a much simpler way to play the song because when a scene starts playing then we can immediately launch the next scene, but there's a potential problem doing it this way. When you launch scene 1, notice that the Play buttons for the second clip in tracks 1 and 2 will blink for 8 bars, waiting their turn to begin playing. Then when you launch scene 2, the third clips in tracks 1 and 2 will blink for 8 bars before they begin playing. What if you want a clip to begin playing before the 8-bar bass riff has finished? You might be able to create scenes to accomplish what you're trying to do, but the original way that we played this song gives us more control because our loop was only 2 bars instead of 8 bars. Another issue is that it's kind of boring (and looks boring to our audience) if all we're doing is launching 8-bar scenes on our Launchpad. So there are different ways to approach a song, and it's good to know some of the benefits and drawbacks that you might encounter.
Now let's add a brass instrument. In track #3, double-click the third clip slot (highlighted with a red rectangle in the picture below) so that we can create a clip for scene 3. In the Piano Roll (the black and white buttons to the left of the blue icons in the Note Editor in the above picture), scroll with your mouse wheel until you can see C1. The first note that we want is C#, so click the black button (labeled C#1) above C1 a few times to see how it sounds. The round button (which looks like headphones) above the Piano Roll (just under the "Fold" button in Ableton Live 11) needs to be blue so that you can hear the notes when you click the Piano Roll buttons. Notice that the note doesn't sound like the brass notes that you can hear starting at 0:36 in the song (see the YouTube link at the top of this page).
To fix this, press Shift+Tab to see the Device view, and change the values to match the picture below (highlighted with a red rectangle at the bottom of the picture). You can do this by clicking a value and dragging the mouse up or down to adjust the value, or by clicking a value and typing in a number. The Cutoff and Sub Osc and Volume are all at their maximum values, and the Reso is at 20%, and the rest are all at their minimum values (I simply adjusted all of the values up and down until I got the best sound):
After changing those values, press Shift+Tab to return to the Note Editor, and click the black C#1 button a few times. Notice that the brass sound is now much closer to the one in the song.
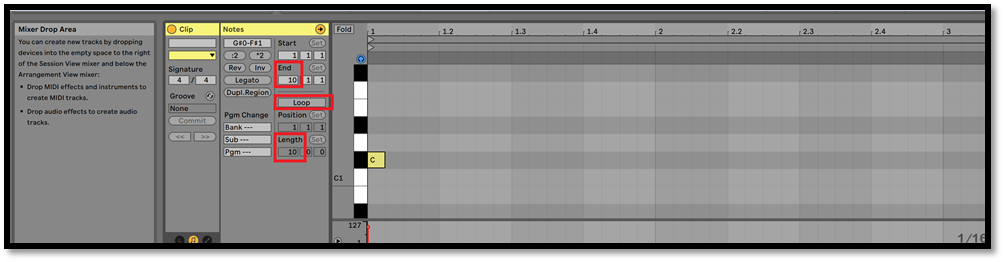
After the first brass note at 0:27 in the YouTube video, the next brass note doesn't happen until after the middle of the 8-bar bass riff, and then more brass notes are played at the end of the 8-bar bass riff. Therefore, we'll set the End value and the Length value to 10 bars to allow the clip to continue long enough to play all of the brass notes, and we'll turn off the Loop button since the brass notes are not repeated right away (see the parts highlighted with red rectangles in the picture below). Place the first brass C#1 note at the beginning of the first bar (click in the Note Editor to give it the focus, then press the Home key on your computer keyboard to jump to bar 1). Your yellow icon might look longer than mine depending on how much you're zoomed in or out in the Note Editor, but the main thing is that the note needs to take up just 1 subdivision of the beat:
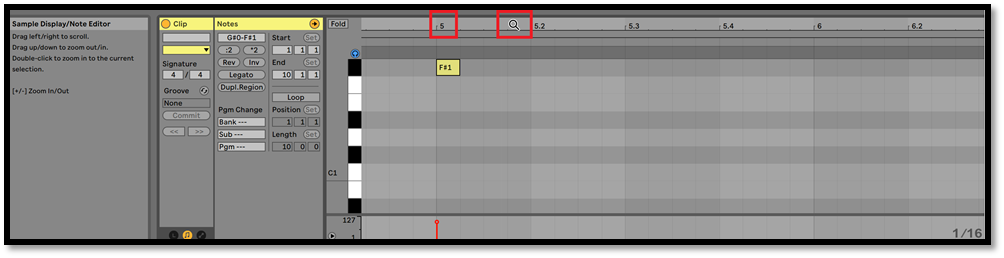
Hover your mouse over the numbers above the Note Editor until it looks like a magnifying glass (highlighted with a red rectangle in the picture below). The numbers are the bars, so click and drag the mouse to the left until you reach bar 5 (highlighted with a red rectangle in the picture below), then place a brass note at F#1 at the beginning of bar 5:
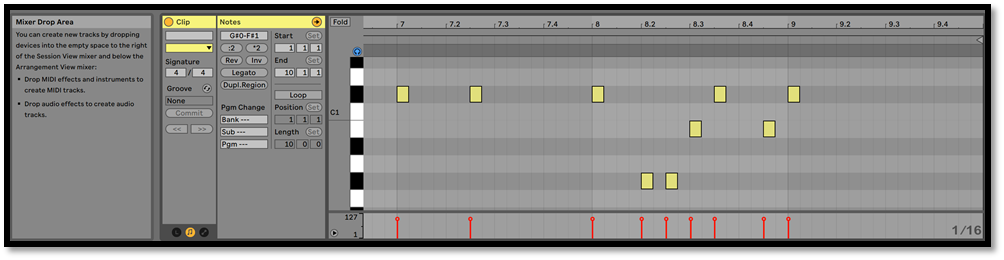
Hover your mouse over the numbers above the Note Editor until it looks like a magnifying glass, then click and drag the mouse to the left again until you reach bar 7. While you're holding down the mouse button, you can drag the mouse up or down to zoom in or out in the Note Editor, which makes the icons wider or narrower, as we saw in Part One.
Place the remaining brass notes as in the picture below:
In the third picture above we turned off the Loop button to prevent this clip from looping, and we changed the End and Length values to 10. Now let's modify the third clip in track #1 and track #2 so that when we play all 3 scenes our song will end at the end of the third scene.
Click the third clip in track #1 to highlight it so that you can see the green icons in the Note Editor. Click the "Dupl. Loop" or "Duplicate" button (to the left of the Note Editor) several times until the Length value is 8 bars (which matches the 8-bar bass riff), then click the Loop button (to the left of the Note Editor) to turn it off. Click the third clip in track #2 to highlight it so that you can see the blue icons in the Note Editor. Click the Loop button (to the left of the Note Editor) to turn it off, but don't click the "Dupl. Loop" or "Duplicate" button because this clip is already 8 bars long. Set the End value (above the Loop button) to 9 and press Enter because the bass riff is 8 bars long.
Launch all 3 scenes one at a time to listen to the song (as we did a moment ago), then click the Stop button (the black square at the top of the screen) to stop the clips.
This is as far as we're going with this song in this tutorial, and you can get more practice by adding in more of the song on your own. But first, click the File menu, then click "Save Live Set As," then choose a location and a filename for saving what you've done so far.
In Part Four we'll use a simple chord progression to try out some MIDI effects and audio effects, and learn some other useful tricks in Ableton.
Part Four
Modification History
-
November 12, 2023 - Changed the title.
-
July 7, 2023 - Changed the title.
-
December 12, 2021 - Updated the tutorial for Ableton Live 11.
-
October 24, 2019 - Modified the wording to clarify some of the instructions.
-
August 26, 2019 - New page.
Dave Root
|