Create Music with Ableton Live 11 on Windows 10/11
Play Music with the Novation Launchpad (Or Other MIDI Devices)
The Complete Beginner's Tutorial for Both
Part Four
MIDI Effects and Audio Effects
Let's start with a clean slate, so click the File menu in Ableton and then click "New Live Set." Then click the View menu and turn off "In/Out" and "Sends." We won't be using these features, and turning them off gives us more room on the screen.
My first MIDI track (track #1) is yellow, so right-click the title bar of your first MIDI track and click the first yellow color in the top row of colors to make it easier to follow along in this tutorial.
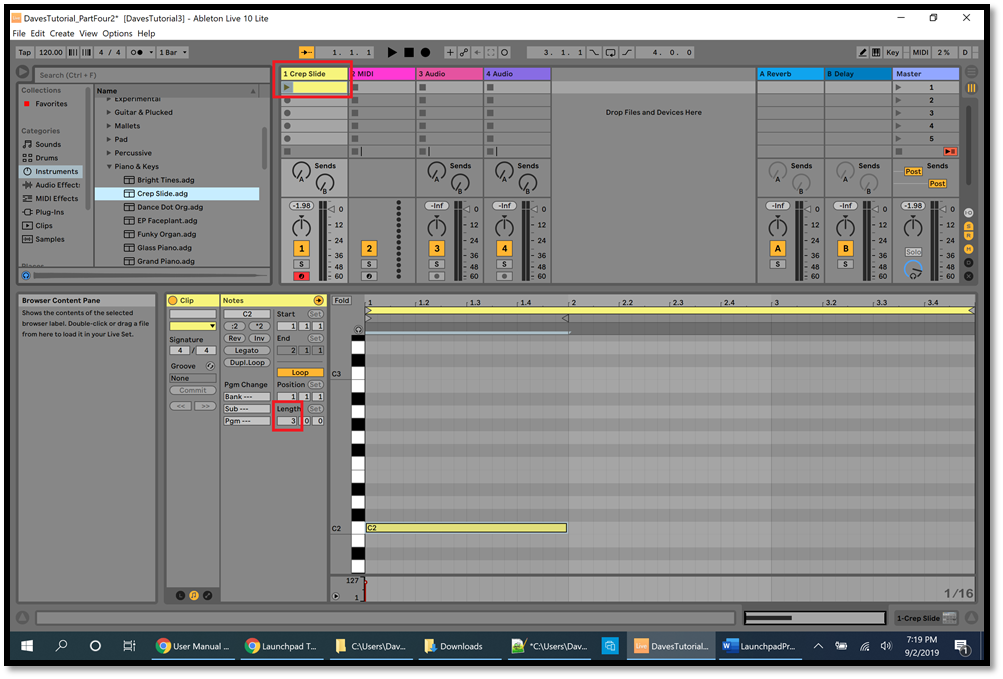
In the Ableton Browser, click Instruments and then expand Instrument Rack, and then expand Piano & Keys, and then drag "Crep Slide" (in Ableton Live 11 use "E-Piano Crep Slide") onto the title bar of your first MIDI track. Then double-click the first clip slot in track #1 so that you can see the Piano Roll and the Note Editor at the bottom of the screen.
In Part Three we saw that if you hover the mouse over the bar numbers above the Note Editor (so that the mouse cursor looks like a magnifying glass) then you can click and drag down or up to zoom in or out in the Note Editor. Similarly, if you hover the mouse to the left of the Piano Roll (so that the mouse cursor looks like a magnifying glass) then you can click and drag right or left to zoom in or out in the Piano Roll. You can also hold down the Alt key on your computer keyboard and use the scroll wheel on the mouse to zoom in or out in the Piano Roll when the mouse is over the Note Editor. In addition, the Fold button at the top left corner of the Piano Roll will remove every note which does not have any icons so that you only see the notes which have icons (such as C2 in the picture below).
To the left of the Piano Roll, change the Length value to 3 and press Enter (in Ableton Live 11 this is in the "Clip"section) so that we can draw 3 bars of music. Place a note at C2 at the beginning of bar 1, and then hold down the Shift key on your computer keyboard and press the right arrow several times until the note takes up the entire first bar:
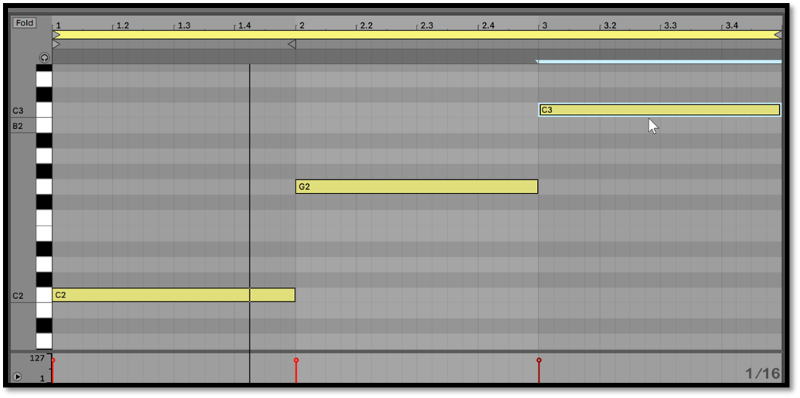
Hold down the Ctrl key on your computer keyboard, then click and drag the note at C2 to create a new note, and drag the new note until it's at G2 in bar 2, taking up all of bar 2, then release the mouse button. The note at G2 is currently highlighted, so press Ctrl+D to duplicate the highlighted note, then use the arrow keys on your computer keyboard to move the new note to C3 in bar 3. Hold down the Shift key and press the down arrow key. This will move the note down an octave to C2 in bar 3. Keep the Shift key pressed and then press the up arrow key to move the icon up an octave back to C3. This demonstrates some ways of copying and moving notes around in the Note Editor.
You now have 3 notes. Launch the first clip in track #1 to see how it sounds, then click the Stop button (the black square at the top of the screen):
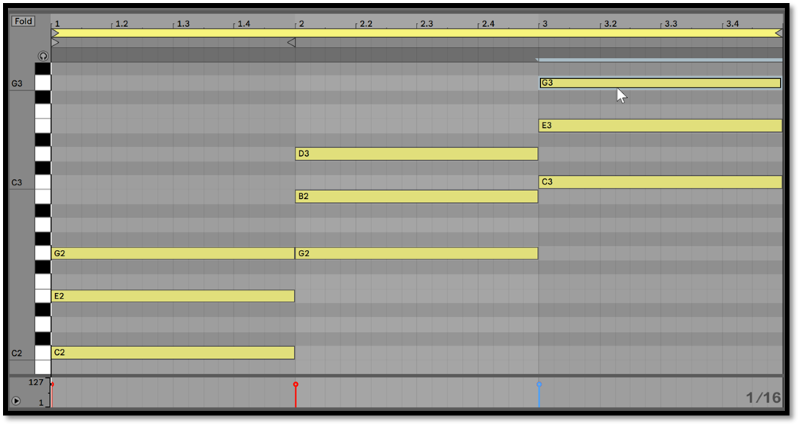
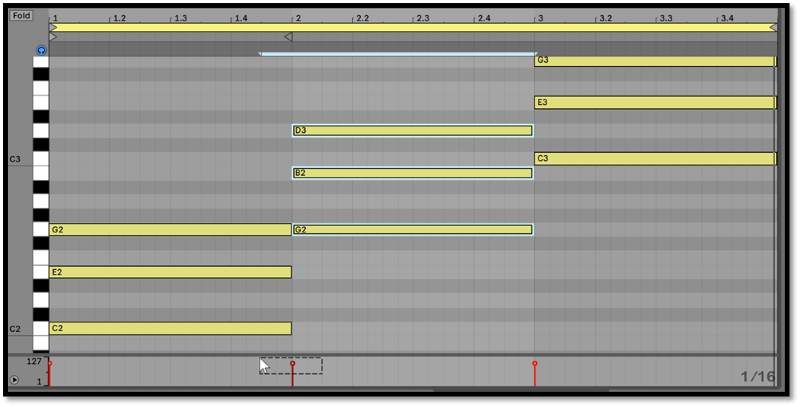
Right-click the first clip in track #1 and click Duplicate (now you're automatically working in the second clip). Hold down the Ctrl key on your computer keyboard, then click and drag the note at C2 up 4 notes until the new note is at E2 in bar 1, then release the mouse button. Keeping the Ctrl key down, click and drag the note at E2 up 3 notes until the new note is at G2 in bar 1. You now have 3 notes in bar 1, all of which take up the entire length of bar 1. Do the same thing with the note at G2 in bar 2 (placing the new notes at B2 and D3 in bar 2), then do the same thing with the note at C3 in bar 3 (placing the new notes at E3 and G3 in bar 3), as in the picture below.
You have now created 3 chords, because a chord is defined as 3 or more notes played at the same time. Without going into a bunch of music theory, bar 1 will now play a C major chord, and bar 2 will now play a G major chord, and bar 3 will now play a C major chord one octave above the C major chord in bar 1 (technically they're called "major triads" because there are exactly 3 notes being played in the chords). Launch the second clip to see how it sounds, then click the Stop button:
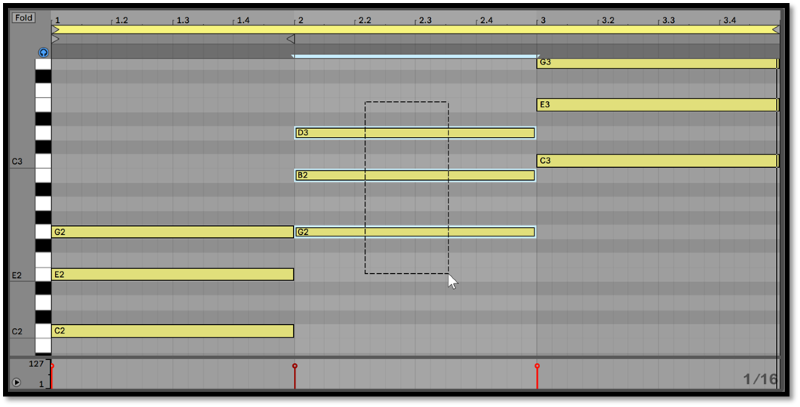
Above the Piano Roll is a round button which looks like headphones (which we saw in Part One) (this button is just under the Fold button in Ableton Live 11). Click it to turn it blue so that you can hear the notes when you click the black and white buttons in the Piano Roll. This also enables you to hear the notes when you click or drag them. If you click in the Note Editor away from the icons and drag the mouse to create a rectangle around a chord, you'll hear the individual notes in the chord. If you drag the rectangle around the notes fast enough then you'll be able to hear the full chord:
Another way to hear the full chord is to click in the Velocity Editor (below the Note Editor, as we saw in Part One) and drag a rectangle up until it covers the circle at the top of the red line:
Now click the white buttons in the Piano Roll labeled C2 and E2 and G2, which are the same notes as the C major chord that you drew in bar 1. By playing the notes one at a time in the C major chord, you played an "arpeggio." This just means that instead of playing the notes in a chord all at once, you played them individually. Try playing an arpeggio with those same notes in this order: C2, E2, G2, G2, E2, C2 (we'll come back to this arpeggio in a moment). You can play the notes in a chord in any order you like.
In the Ableton Browser, click MIDI Effects on the left side and then drag Arpeggiator onto the title bar of track #1. This will place an Arpeggiator effect into the Device view at the bottom of the screen, which will create arpeggios. Then drag Chord onto the title bar of track #1. This will place a Chord effect into the Device view, which will create chords. Now click Audio Effects in the left side of the Ableton Browser and drag Auto Filter (in Ableton Live 11 you first need to expand "EQ & Filters") onto the title bar of track #1. This will place an Auto Filter effect into the Device view. All of these effects will enable you to modify the sounds of the clips in track #1.
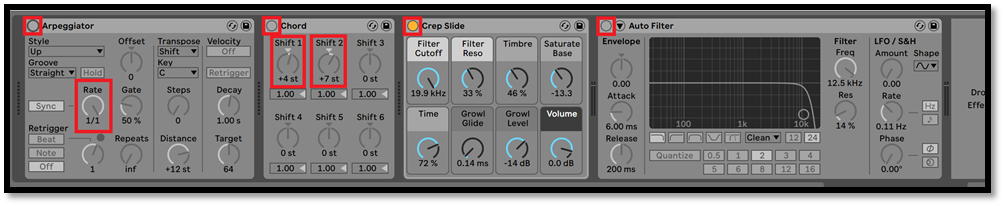
Each effect has an on/off button at the top left corner (highlighted with small red rectangles in the picture below), and for now we'll turn off all of the effects except for "Crep Slide" (which is the instrument for this track). In the Arpeggiator effect, click the Rate value and drag the mouse up until it says "1/1." In the Chord effect, click the Shift 1 value and slowly drag the mouse up until it says "+4 st" and then click the Shift 2 value and slowly drag the mouse up until it says "+7 st." Now we're ready to try out these effects:
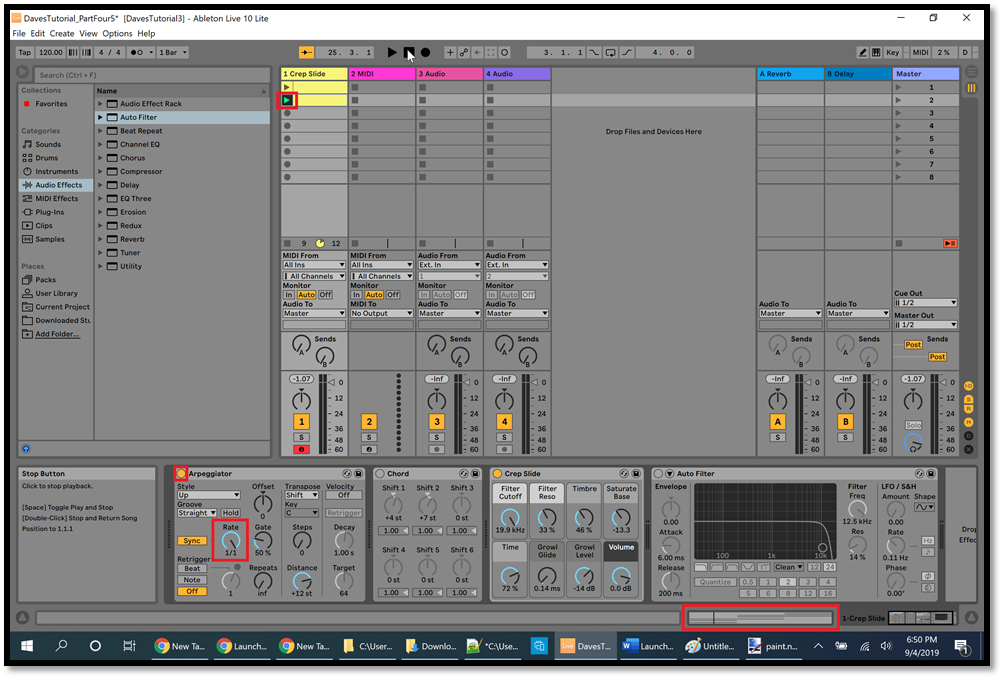
Launch the second clip in track #1, which will play 3 chords (1 chord in each bar). Near the bottom right corner of the picture below, the Clip View is highlighted with a red rectangle. You can watch the vertical black line in the Clip View as it moves from left to right, showing you which notes or chords are being played. Now turn on the Arpeggiator effect by clicking the round button at the top left corner of the Arpeggiator, highlighted with a red rectangle. Since the Rate value (highlighted with a red rectangle in the picture below) is 1/1, now you can only hear 1 note being played in each bar. Click the Rate value and slowly drag down until it says "1/3," and now you can hear all 3 notes in each chord, one at a time. Click the Gate value (next to Rate) and drag down until it's at the minimum level, then slowly drag up until it's at the maximum level. This affects how long each note is played:
Now click the Rate value and drag down until it says "1/6." This will play a 6-note arpeggio for every bar. Click the Style dropdown and select "Up & Down." This will play the arpeggio in bar 1 as C2, E2, G2, G2, E2, C2, just like we did above.
Turn off the Arpeggiator effect and listen to the chords for a moment, then launch the first clip in track #1. This is the same chord progression as the second clip, but it only has single notes. Turn on the Chord effect and notice that the first clip with the Chord effect on sounds exactly like the second clip with the Chord effect off. This is because we set the Shift 1 and Shift 2 values in the Chord effect so that it will shift the notes in the first clip by the same number of steps (semitones) which are between the notes in each chord in the second clip. With the Chord effect on, and the first clip playing in track #1, if you change the Shift 1 value to "+3 st" (i.e. 3 steps or semitones above the original note) then you'll hear minor chords (technically they're called "minor triads" because there are exactly 3 notes being played in the chords). If you change the value of Shift 3 to "+10 st" (10 steps or semitones above the original note) then you've added a fourth note to the chords, and now they're all playing minor seventh chords.
Now, here's where things get interesting. With the first clip playing, turn off the Chord effect so that you hear a single note being played in each bar. Turn on the Arpeggiator effect, and you should hear 6 single notes being played in each bar (the same notes repeated), because we left the Rate value at 1/6. Since the first clip doesn't have any chords, the Arpeggiator effect can only play the same note over and over in each bar. Now turn on the Chord effect. This takes the single notes from the Arpeggiator and turns them into chords. While the first clip is playing, click the title bar of the Chord effect and drag it left until it's before the Arpeggiator effect, then release the mouse button. Now the Chord effect is turning the single notes in the first clip into chords, and the Arpeggiator effect is turning those chords into arpeggios.
The thing to notice here is that the effects are processed from left to right, so the order of the effects can make a dramatic difference in the sound.
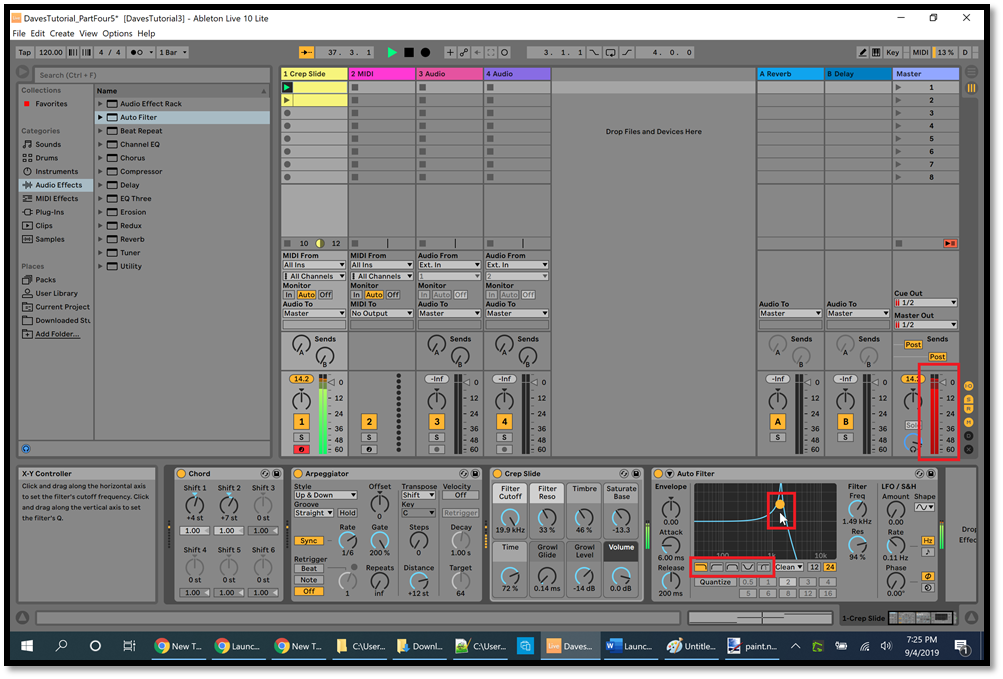
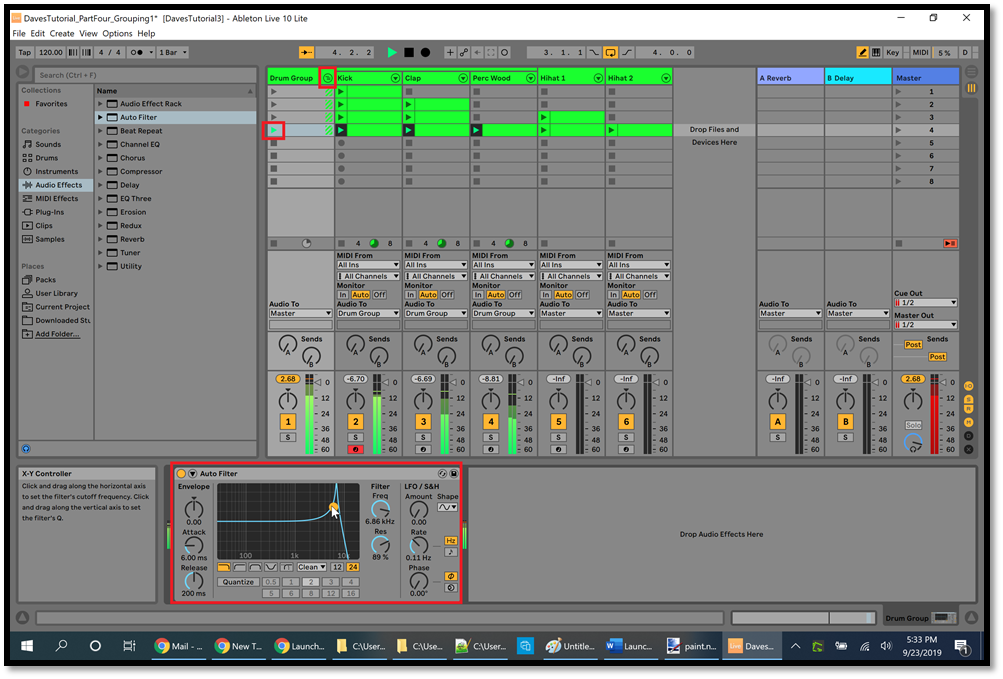
While the first clip is playing, turn on the Auto Filter effect so that all of the effects are on. In the Auto Filter graph area, click the orange circle (highlighted with a red rectangle in the picture below) and slowly drag it around, left and right and up and down, and notice how this changes the sound. Try clicking the buttons below the graph area (highlighted with a red rectangle in the picture below) and then dragging the orange circle in the graph. These controls enable you to shape the sound to be just the way you want it, and you'll see people in YouTube tutorials using these controls and explaining the reasons why they're doing this.
In the picture below, notice that the volume under the Master track (on the right side of the screen, highlighted with a red rectangle) has turned red. This is called "clipping," and in my case it's being caused by the changes that I made in the Auto Filter effect. Clipping happens when an audio output is being pushed beyond its maximum limit, which causes crackling and distortion. You want to avoid clipping, so keep an eye on your Master volume as you're working on your songs, and make sure it stays green. If I like the changes that I made in the Auto Filter effect, for example, but I want to avoid clipping, then I can simply reduce the volume of track #1 so that the Master volume stays in the green:
Grouping Tracks
Click the Stop button (the black square at the top of the screen) to stop the clip. Click the File menu in Ableton and then click "Open Recent Set" and then click the filename that you created at the end of Part One (feel free to save the changes that you made in the previous section, but we won't be using that chord progression again in this tutorial).
Listen to all 4 clips in track #1 to refresh your memory of what they sound like. In the fourth clip, notice that you can see where all of the drum sounds are in relation to the other drum sounds (in the Note Editor). We'll come back to that in a moment:

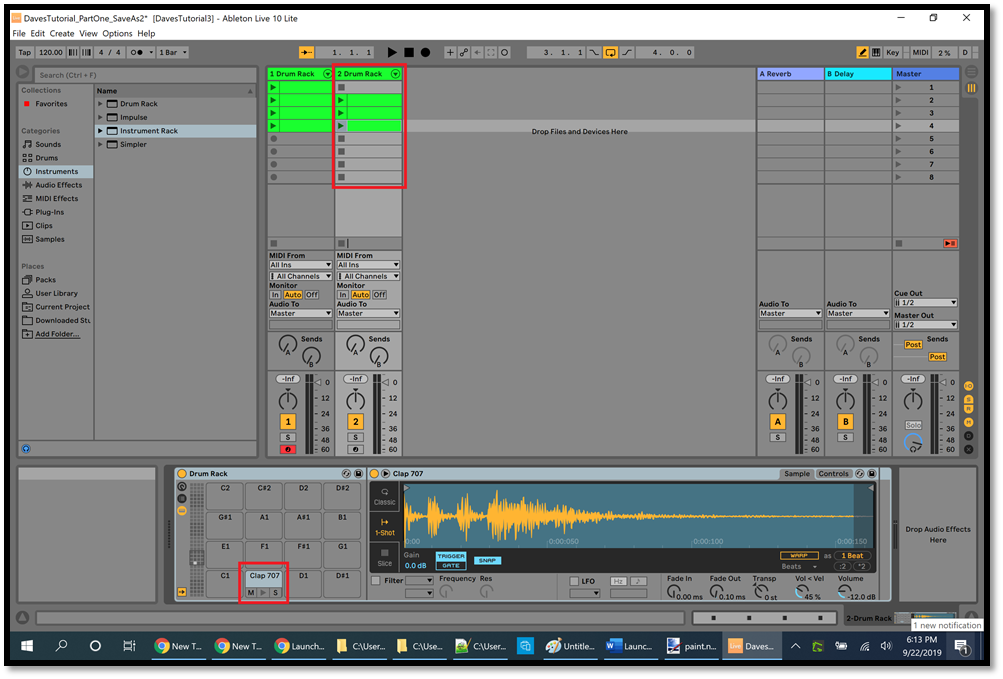
Right-click the title bar in tracks 2, 3, and 4, and delete them. Now press Shift+Tab to see the Device view. Click and drag "Clap 707" from the Drum Rack at the bottom of the screen (highlighted with a red rectangle at the bottom of the picture below) up to the right of track #1, where the title bar of track #2 would be. Release the mouse button, and you should now have a second track labeled "Drum Rack." Play all 3 clips in track #2 and notice that the only drum sound they have is "Clap 707," and also notice that they automatically contain the 3 clips which have the "Clap 707" sounds, then stop the clips:
Right-click the title bar for track #2 and click Rename, then type in "Clap" and press Enter. Click the fourth clip in track #1 to highlight it, then click and drag "Perc Wood" from the Drum Rack at the bottom of the screen up to the right of track #2, where the title bar of track #3 would be. Release the mouse button, and you should now have a third track labeled "Drum Rack." Play the clip in track #3 and notice that the only drum sound it has is "Perc Wood," then stop the clip. Right-click the title bar for track #3 and click Rename, then type in "Perc Wood" and press Enter.
Click the fourth clip in track #1 to highlight it, then click and drag "Hihat 808 Close" ("Hihat Closed" in Ableton Live 11) from the Drum Rack at the bottom of the screen up to the right of track #3, where the title bar of track #4 would be. Release the mouse button, and you should now have a fourth track labeled "Drum Rack." Notice that the only drum sound it has is "Hihat 808 Close." Right-click the title bar for track #4 and click Rename, then type in "Hihat 1" and press Enter.
Click the fourth clip in track #1 to highlight it, then click and drag "Hihat Acoustic" ("Hihat Open" in Ableton Live 11) from the Drum Rack at the bottom of the screen up to the right of track #4, where the title bar of track #5 would be. Release the mouse button, and you should now have a fifth track labeled "Drum Rack." Notice that the only drum sound it has is "Hihat Acoustic." Right-click the title bar for track #5 and click Rename, then type in "Hihat 2" and press Enter.
Right-click the title bar for track #1 and click Rename, then type in "Kick" and press Enter. Your workspace should now look like the picture below. Instead of having all of the drum sounds in a single track, we've moved each drum sound to its own track:
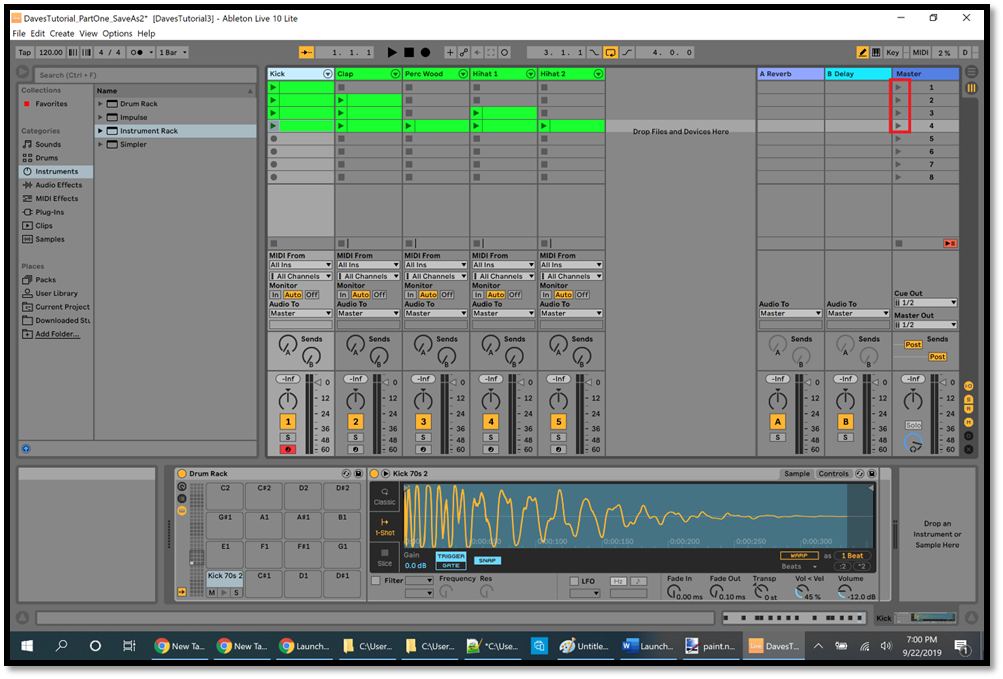
Click the first 4 Play buttons in the Master track (highlighted with a red rectangle in the picture above), and what you'll hear is the same as clicking the 4 clips in track #1 that we created in Part One. In other words, we've turned each clip from Part One into a scene. Click the first Play button in the Master track to launch the first scene (to turn off the hihats), then click the Stop button (the black square at the top of the screen).
One benefit of moving each drum sound to its own track is that it's now easier to Mute or Solo any of the drum sounds, compared to having them all in one clip. Also, we can now add effects to any of the drum sounds, or easily adjust the volume of any of the drum sounds. Ableton Live 11 Lite only allows us to have 8 tracks, and we used up 5 of those tracks just on drum sounds, so this is one of the drawbacks of this approach.
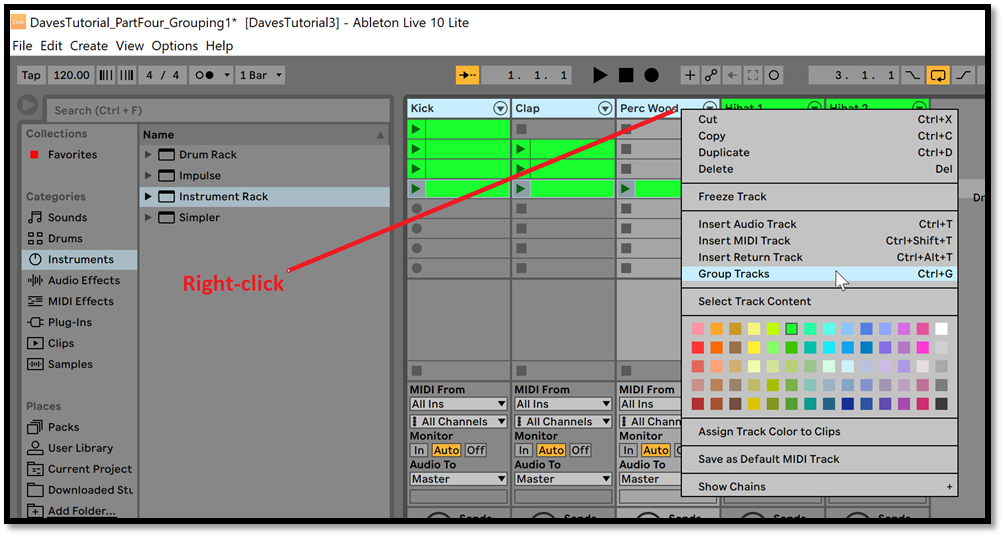
If we want to add an effect to the kick, clap, and perc wood sounds but not to the hihat sounds, for example, then we can group the first 3 tracks together. Click the title bar of track #1 to highlight it, then hold down the Ctrl key on your computer keyboard and click the title bars of track #2 and track #3. Now the title bars of the first 3 tracks are highlighted with a light blue color. Right-click one of the highlighted title bars, then click "Group Tracks":
This will create a new track to the left of track #1, which is the Group track. Right-click the title bar of this Group track and click Rename, then type in "Drum Group" and press Enter. Now your workspace looks like this:
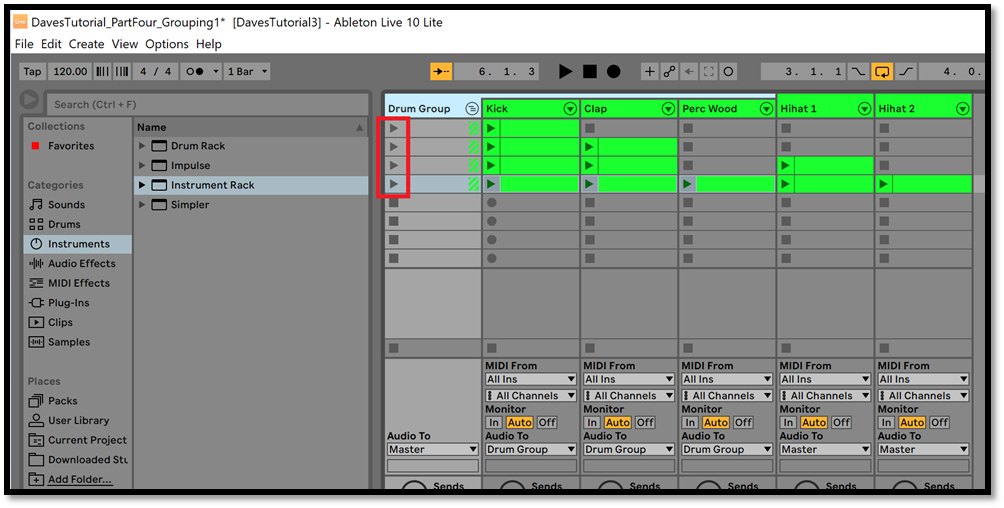
The Drum Group track has 4 Play buttons (highlighted with a red rectangle in the picture above), which are essentially the Scene Launch buttons (group launch buttons) for the clips which are part of this group. Click the 4 group launch buttons and notice that you don't hear any hihats because they're not in this group. Click the Stop button.
Click Audio Effects in the left side of the Ableton Browser and drag Auto Filter (in Ableton Live 11 you first need to expand "EQ & Filters") onto the title bar of the Drum Group. This will place an Auto Filter effect into the Device view, which will enable us to shape the sound for the entire group all at once. Click the fourth group launch button (highlighted with a red rectangle in the picture below), then play around with the Auto Filter as we did above and see how it changes the sounds for the kick, clap, and perc wood all at once. You can also click the button in the Drum Group title bar (highlighted with a red rectangle in the picture below) to hide the tracks in the group. After you try it, be sure to unhide the tracks in this group:
In a similar way, we could create a group for the hihats and apply some effects just to the hihats.
Right-click the title bar of the Auto Filter and click Delete to remove it. Now click the third green clip in the Clap track to highlight it. Press Shift+Tab on your computer keyboard to return to the Note Editor so that you can see the clap icons, and notice that you don't see any other drum icons. So if you want to add some more claps, it's not very obvious where they will be in relation to the other drum sounds. Recall that at the beginning of this section we were able to see all of the drum sounds in relation to each other.
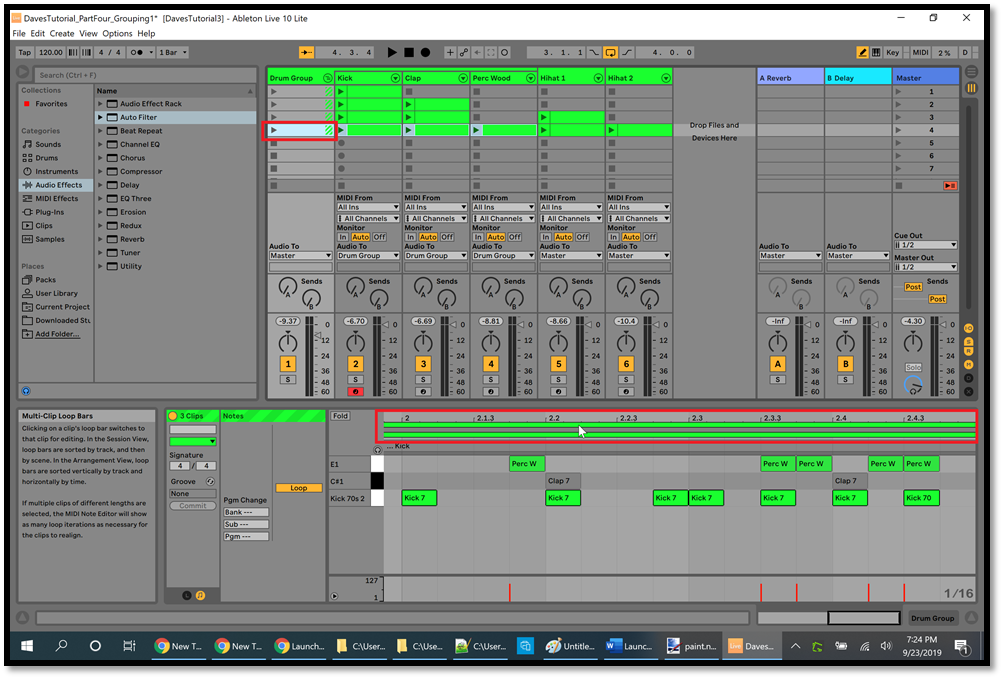
Now click the fourth clip slot in the Drum Group to highlight it. This allows you to see all of the drum icons in this group, and you can click one of the long, thin green lines above the Note Editor to select which drum sound to edit (highlighted with a red rectangle near the bottom of the picture below):
In fact, you can click the title bar for the Drum Group to highlight it, then hold down the Ctrl key on your computer keyboard and click the title bars for both of the hihat tracks to highlight them, and then you'll be able to see all of the drum icons and hihat icons in relation to each other in the Note Editor, and select which sounds to edit.
Click the File menu in Ableton, then click "Save Live Set As," then choose a location and a filename for saving what you've done so far.
Creating Scale Markers
In Part Five we're going to create a basic EDM (Electronic Dance Music) song, and to do that it will be helpful to know which notes are in the scale that we want to use. Here's a useful trick for knowing which notes are in the scale that you're using.
In Ableton, click the File menu, then click "New Live Set." This will create a new project. In the Ableton Browser, click Instruments and then expand Instrument Rack, and then expand Piano & Keys, and then drag "Crep Slide" ("E-Piano Crep Slide" in Ableton Live 11) onto the title bar of your first MIDI track. Then double-click the first clip slot in track #1 so that you can see the Piano Roll and the Note Editor at the bottom of the screen.
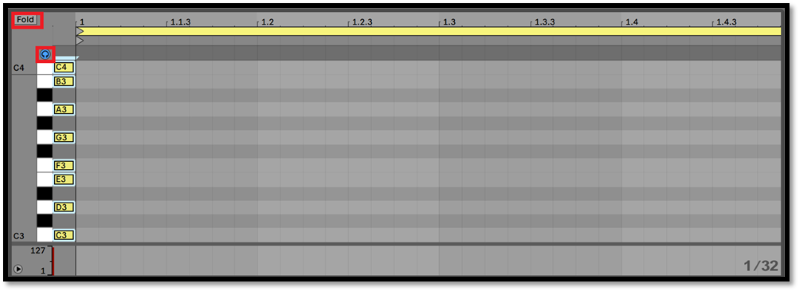
Right-click in the Note Editor and change the Fixed Grid to 1/32, then turn on the Draw Mode button (the pencil button near the top right corner of the Ableton screen). Above the Piano Roll, click the round headphones button (just under the "Fold" button in Ableton Live 11) to turn it blue so that you can hear the notes as you draw them. Place notes at the beginning of bar 1 for every white note in the Piano Roll from C1 up to C5. Click the Fold button (above the Piano Roll) and scroll up and down to verify that you don't have any black notes, then click Fold again to turn it off.
Without going into much music theory (which you can find on the Internet), all of the notes that you created are in the key of C major. Press Ctrl+A to highlight all of the icons, then press the left arrow key once to shift them all to the left:
Now you have icons in the key of C major for several octaves, all of which are located before bar 1 (which means that they won't be played when you launch the clip). If you start at C3, for example, and click each white button in the Piano Roll up to C4, you'll recognize the familiar "do re mi fa sol la ti do" scale (in the key of C). Click File/Save Live Set As, and use the filename "CMajorScale.als".
When you add notes and chords to a song, if you only use notes which have one of your scale icons then you can be certain that all of your notes will be in the key of C major.
Take a look at the yellow icon for C3 in the above picture, and notice that the yellow icon for D3 is two steps (two semitones) above C3. So if you were to move the C3 icon up two steps then it will be at D3. In the same way, if you press Ctrl+A on your computer keyboard to highlight all of the yellow icons, and press the up arrow key twice to move all of the yellow icons for our C major scale up two steps, then the entire scale will become a D major scale. At that point, when you add notes and chords to your song, if you only use notes which have one of these scale icons then you can be certain that all of your notes will be in the key of D major. Search the Internet to learn how to create other scales, such as minor scales, and then you can use this trick for making chords and melodies in those other scales.
Double-click the second clip slot in track #1, and notice that the Note Editor doesn't have the scale marker icons which you created in the first clip in track #1. To add the scale markers, turn off the Draw Mode button, then click the first clip slot to highlight it, then click in the Note Editor to give it the focus, then press Ctrl+A to highlight all of the scale marker icons, then press Ctrl+C to copy the icons. Now click the second clip slot to highlight it, then click in the Note Editor to give it the focus, then press Ctrl+V to paste the scale marker icons, then press the left arrow key until the scale marker icons are before bar 1.
In Part Five we'll create a basic EDM (Electronic Dance Music) song to demonstrate some more features of Ableton.
Part Five
Modification History
-
November 12, 2023 - Changed the title.
-
July 7, 2023 - Changed the title.
-
December 12, 2021 - Updated the tutorial for Ableton Live 11.
-
October 24, 2019 - Modified the wording to clarify some of the instructions.
-
September 25, 2019 - Added a section called "Grouping Tracks" and a section called "Creating Scale Markers."
-
September 04, 2019 - New page.
Dave Root
|