The Most Useful Rope Knots
for the Average Person to Know
Decorative Knots
To see more details in the pictures, zoom in by holding down the CTRL key and pressing + several times.
Restore by holding down the CTRL key and pressing 0.
|
The
Home Page
describes some knotting terminology, and it explains a number of factors which affect the security of the knots that you tie. Always keep in mind that there are risks associated with ropes and knots, and the risks are entirely your own.
Site Map
Decorative Knots
Knots can be attractive and decorative in addition to being useful. This article describes several decorative knots which were chosen for their symmetric and attractive qualities, as well as for their ease of tying. There are many other decorative knots, but they can be quite complex to tie (in other words, I didn't include them here because I haven't yet figured out how to tie them properly!).
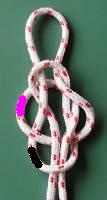
- Blimp Knot
URL: http://daveroot.neocities.org/knots/Knots_Decorative.html#Blimp
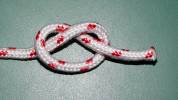
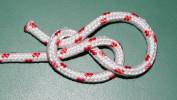
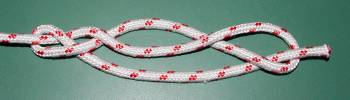
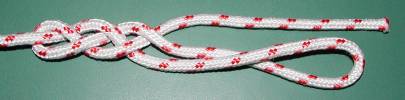
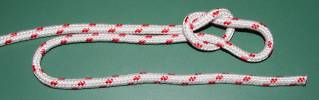
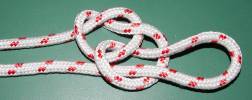
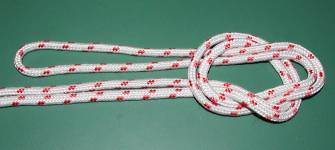
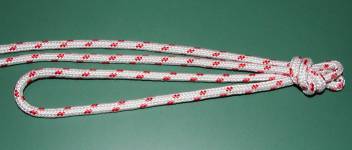
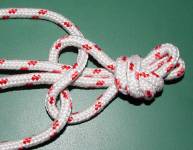
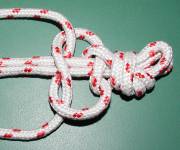
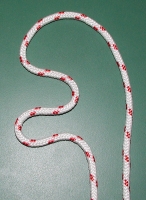
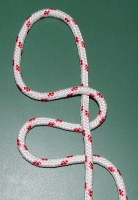
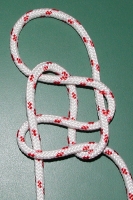
This can be used as a decorative "stopper knot" or "pull knot" at the end of a rope or string.
To tie this knot, start with an
Overhand Knot
(picture 1), then follow the rest of the pictures.
 -1 -1
 -2 -2
 -3 -3
 -4 -4
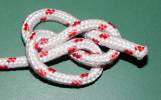
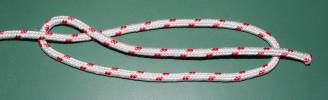
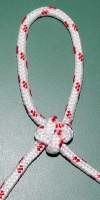
Budworth calls this a "Blimp Knot" because it is similar to a
Zeppelin Bend
but is smaller and softer, and he says, "This is a nicely symmetrical ornamentation for an otherwise uninteresting length of cord."
(The Complete Book of Decorative Knots,
p.34).
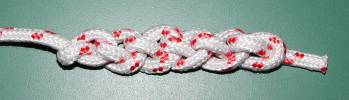
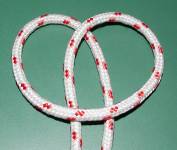
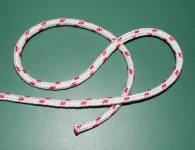
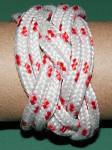
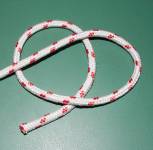
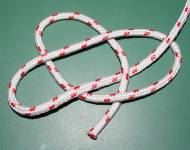
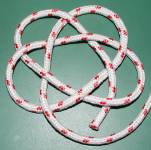
- Braid Knot
URL: http://daveroot.neocities.org/knots/Knots_Decorative.html#Braid
This can be used as a decorative "pull" at the end of a rope or string, or as a "friendship braid," or as a decorative handle, and so on.
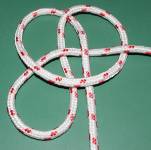
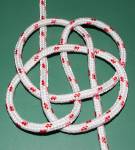
To tie this knot, start by looping the rope around twice in order to create three strands to work with (picture 1). Begin "braiding" the three strands (just like braiding hair) by bringing the bottom strand over the center strand, then bringing the top strand over the new center strand (picture 2). Continue alternating in this way (picture 3) until you've braided as far as you can go (picture 4). As you're braiding the rope, keep the end of the rope outside of the braid (picture 3).
 -1 -1
 -2 -2
 -3 -3
 -4 -4
Budworth says, "It shortens and adds attractive bulk to a light pull, waist-tie, friendship braid, or whatever. In thicker material it creates a superb makeshift handle for a travelling case."
(The Complete Book of Decorative Knots,
p.35)
- Chain Stitch or Chain Plait or Chain Sinnet or ABOK #2868
URL: http://daveroot.neocities.org/knots/Knots_Decorative.html#ChainStitch
Like the
Braid Knot,
this can be used as a decorative "pull" at the end of a rope or string, or as a "friendship braid," or as a decorative handle, and so on.
Start by tying a
Slip Knot
(picture 1). Push a
bight
from the end of the rope through the loop of the
Slip Knot
(picture 2), and continue pushing a new
bight
through each previous
bight,
working your way towards the end of the rope. Push the end of the rope through the final
bight
in order to "lock" the Chain Stitch (picture 3). To untie this knot, simply remove the end of the rope from the final
bight,
then pull both ends of the rope apart from each other. This will untie all of the
Slip Knots.
Kids love this one because all of the knots seem to "magically" disappear at once when both ends are pulled!
 -1 -1
 -2 -2
 -3 -3
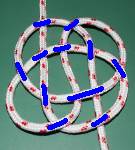
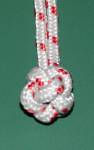
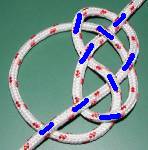
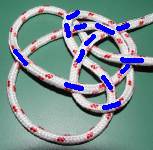
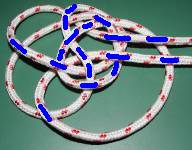
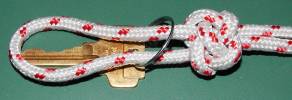
- Chinese Button or ABOK #600
URL: http://daveroot.neocities.org/knots/Knots_Decorative.html#ChineseButton
This was the knot which Chinese tailors traditionally used as buttons on dresses, jackets, night attire, and so on
(The Complete Book of Decorative Knots,
p.64).
To tie this knot, lay out the rope on a table and follow the over and under sequence exactly as in the pictures. It looks complicated, but just take it step by step. Picture 4 is identical to picture 3, but with blue lines to indicate more clearly which parts of the rope are crossing
over
other parts of the rope. After you tie the knot as in picture 3, slowly and carefully tighten the knot and work it into a button shape (picture 5).
 -1 -1
 -2 -2
 -3 -3
 -4 -4
 -5 -5
Budworth says that "Like so many fancy knots, this is a pleasure simply to make for its own sake, but it does create a basic button suitable for any occasion."
(The Complete Book of Decorative Knots,
p.63)
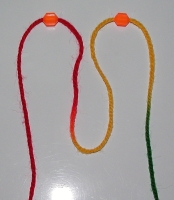
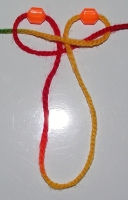
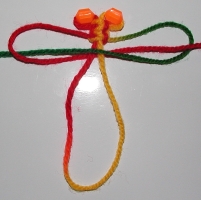
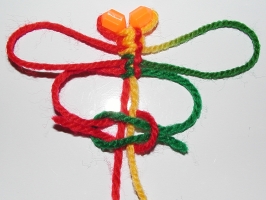
- Dragonfly
URL: http://daveroot.neocities.org/knots/Knots_Decorative.html#Dragonfly
To tie a Dragonfly, start as in picture 1 (I added some beads for eyes, but they're not necessary). This creates two
bights
pointing upward, and a downward-pointing
bight
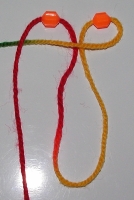
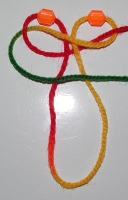
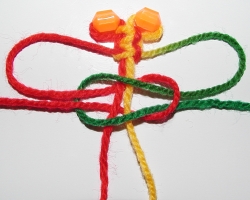
in the middle. Bring the right-most section of string across on top of the downward-pointing
bight,
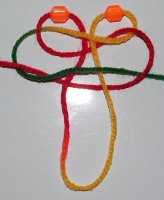
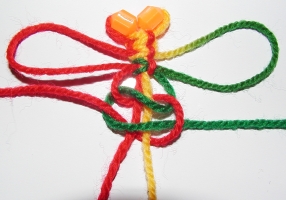
then pass it under the section of string on the left (picture 2). Bring the left-most section of string under the downward-pointing
bight,
then pass it through the loop on the right (picture 3). The section of string which is now on the left is the one that passed over on
top
of the downward-pointing
bight,
and it will
always
pass over on top of the downward-pointing
bight
as you tie the Dragonfly. Essentially you'll be tying
Reef Knots
all the way down, similar to the
Portuguese Sinnet
(below).
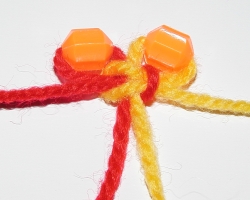
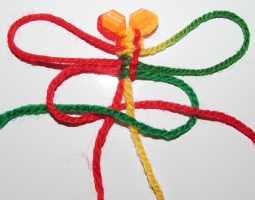
Bring the end on the left (which is green in picture 4) over on top of the downward
bight
(picture 4), then bring the other end (which is red in picture 5) over on top of the green string, then under the downward
bight,
then through the green loop on the left (picture 5).
In picture 5, notice that you've tied a
Reef Knot.
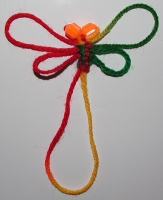
Tighten the
Reef Knot
and draw it up towards the beads in order to form the Dragonfly's head (picture 6). Repeat steps 2 through 6 in order to tie another
Reef Knot.
Tighten the
Reef Knot
and draw it up towards the Dragonfly's head, then tie another
Reef Knot
to form the wings (pictures 7 and 8).
Tighten the
Reef Knot
and draw it up towards the Dragonfly's head, then tie another
Reef Knot
(picture 9). At this point you might want to tie a couple more
Reef Knots
in order to create some separation between the two sets of wings, but I didn't do this in the pictures. Tighten the
Reef Knot(s)
and draw them up towards the head, then tie another
Reef Knot
to form a smaller pair of wings (pictures 10 and 11).
You can continue to tie
Reef Knots
all the way down the Dragonfly's body, or you can simply make a few more
Reef Knots
and then leave the rest of the downward
bight
as the Dragonfly's body (picture 12). To finish off the Dragonfly, cut the ends of string and then glue them behind the Dragonfly (pictures 11 and 12).
 -1 -1
 -2 -2
 -3 -3
 -4 -4
 -5 -5
 -6 -6
 -7 -7
 -8 -8
 -9 -9
 -10 -10
 -11 -11
 -12 -12
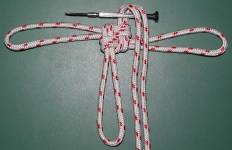
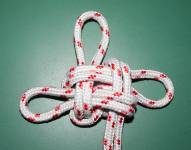
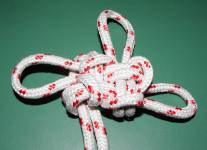
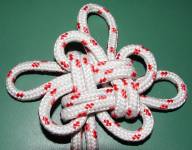
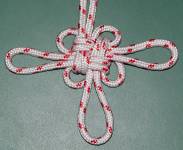
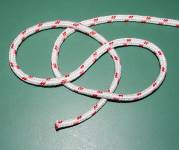
- Good Luck Knot or Shamrock Knot or ABOK #2436
URL: http://daveroot.neocities.org/knots/Knots_Decorative.html#GoodLuck
This is a very attractive knot which seems complicated at first, but it's actually not very difficult to tie. It's similar to the
Triple Crown Knot.
To tie this knot, first lay out the rope on a table as in picture 1 so that there are three
bights
pointing North, West, and East. The two ends of the rope are pointing South. It's helpful to place an object such as a screwdriver across the two ends of the rope (as in picture 2), then bring the two ends of the rope up and over the East-pointing
bight
so that the ends of rope are now pointing North (picture 2). Bring the East-pointing
bight
over to the left so that it's now pointing West (picture 3). Bring the North-pointing
bight
over and down so that it's now pointing South, and tuck it under the screwdriver (picture 4). Bring the West-pointing
bight
over to the right and tuck it through exactly where the screwdriver is laying, then remove the screwdriver (picture 5). Carefully pull the ends of the rope and the three
bights
in order to tighten the knot at the center (picture 6).
Place the screwdriver across the ends of the rope again, then bring the ends of the rope over and down so that they're pointing South (picture 7). Repeat the procedure for the three
bights
as before (first with the East-pointing
bight,
then with the South-pointing
bight,
then tuck the West-pointing
bight
through where the screwdriver is, then remove the screwdriver) (picture 8).
Turn the knot over and notice that the back side has four extra strands of rope which don't appear on the front side of the knot (compare pictures 8 and 9). Pull those four extra strands of rope out slightly so that they form four small loops (picture 10). Finish tightening the knot (picture 11).
 -1 -1
 -2 -2
 -3 -3
 -4 -4
 -5 -5
 -6 -6
 -7 -7
 -8 -8
 -9 -9
 -10 -10
 -11 -11
Budworth says, "Embellish a gift-wrapped parcel with this knot, hang it around your neck (or give one to a friend) or on your front door during any festive season, or use it as a complex of belt loops for keys or tools."
(The Complete Book of Decorative Knots,
p.46)
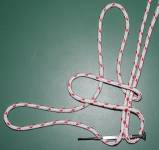
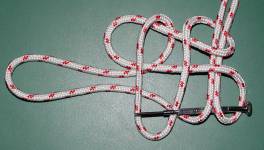
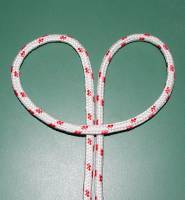
- Jug Sling Hitch or ABOK #1142
URL: http://daveroot.neocities.org/knots/Knots_Decorative.html#JugSlingHitch
This knot is useful for creating a handle for bottles, bags, and so on.
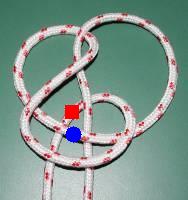
To tie this knot, start as in picture 1. Grab the vertical strand of rope on the left (near the top), and bring it under the vertical strand on the right, then bend it back over towards the left again (picture 2). Notice the part of the rope which crosses over the two vertical strands in picture 1, and find that same section of rope in picture 2 (it's marked with a blue circle in picture 2). Bring that strand
under
the strand above it (marked with a red square in picture 2), then bring it
over
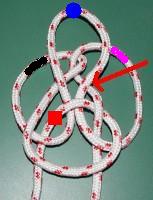
the two linked loops at the top of picture 2 (as in picture 3). With your thumb and finger, hold the two strands which are crossing each other where the red arrow is pointing in picture 3. Bring the pink and black sections of rope in picture 3 down to their new positions in picture 4. Place the neck of the bottle through the center of the knot, then tighten the knot (picture 5).
 -1 -1
 -2 -2
 -3 -3
 -4 -4
 -5 -5
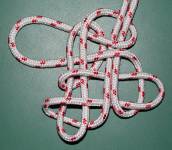
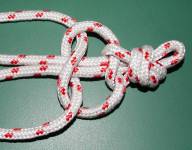
- Knife Lanyard or ABOK #787
URL: http://daveroot.neocities.org/knots/Knots_Decorative.html#KnifeLanyard
This makes an attractive lanyard knot.
To tie this knot, first lay out the rope on a table and form a
bight
facing to the left (which will become the loop for this lanyard knot), then form a small loop with the upper end of the rope (picture 1). In pictures 2 and 3, take the bottom end of the rope and then form a
Carrick Bend.
After you complete the
Carrick Bend,
look closely to make sure that the rope is crossing under and over in an exactly alternating pattern. Pictures 6, 7, and 8 are identical to pictures 3, 4, and 5, but with blue lines to indicate more clearly which parts of the rope are crossing
over
other parts of the rope.
In picture 4, take the end of the rope which is pointing to the South-West and bring it up and over the knot, then bring it through the center of the
Carrick Bend
(from behind). In picture 5, take the end of the rope which is pointing to the North-East, bring it under the other end of the rope, then over the original
bight
(the one which will become the main loop), then bring it under the
Carrick Bend
and through the center of the
Carrick Bend
(from behind). Now both ends of the rope are coming out of the center of the
Carrick Bend
from behind.
Carefully tighten the knot into a symmetrical shape as in picture 9. To use this as a lanyard knot, slide the loop through a key ring, knife ring, etc. (picture 9), then pass the loop over the object (the key, knife, etc.) and pull the knot tight (picture 10). This forms a
Lark's Head Hitch (Cow Hitch)
around the ring. If the object is too big to pass the loop of rope around it, then in picture 9 you can pass both ends of the rope through the loop in the rope. This will also form the
Lark's Head Hitch (Cow Hitch)
around the ring.
 -1 -1
 -2 -2
 -3 -3
 -4 -4
 -5 -5
 -6 -6
 -7 -7
 -8 -8
 -9 -9
 -10 -10
Budworth says, "Originally used to form the loop of a neck lanyard that actually did have a seaman's knife suspended from it. This knot will do for anything requiring a fixed loop in a middled strand."
(The Complete Book of Decorative Knots,
p.48)
- Monkey's Fist or ABOK #2202
URL: http://daveroot.neocities.org/knots/Knots_Decorative.html#MonkeysFist
This is a decorative knot which is often asked about, and it has a practical purpose as a way to add weight to the end of a rope for throwing it to someone else (as in heaving a line from one boat to another). My Monkey's Fists never seem to come out very well, so here are some instructions for how to tie this knot:
Monkey's Fist.
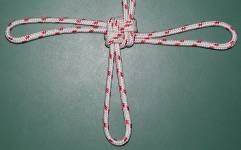
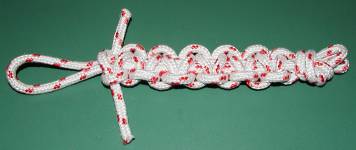
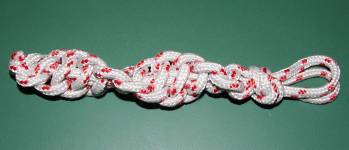
- Portuguese Sinnet or Solomon Bar or ABOK #2496
URL: http://daveroot.neocities.org/knots/Knots_Decorative.html#PortugueseSinnet
Like the
Braid Knot
and the
Chain Stitch,
the Portuguese Sinnet can be used as a decorative "pull" at the end of a rope or string, or as a fancy handle, and so on.
To tie this knot, I like to begin with a
Slip Knot
in a doubled rope (picture 1). Tighten the knot, leaving just a small portion of the two loops sticking out to the right (picture 2). Make sure that the ends of the rope are the same length, and they should be about three times the length of the big loop which is pointing to the left in picture 2 (you'll get a better feel for this as you practice a few times). The big loop which is pointing to the left in picture 2 will be the "core" of the Portuguese Sinnet, so the finished Portuguese Sinnet will be the same length as the big loop. With the two ends of the rope, tie an
Overhand Knot
around the big loop as in picture 3, then tie another
Overhand Knot
so that you've tied a
Reef Knot
around the two strands of the big loop (picture 4). In picture 4, notice that the end of the rope which is at the bottom of the picture is always on top of the two strands of the big loop, and the other end of the rope is always on the bottom of the two strands of the big loop. Keep this order as you tie
Overhand Knots
all the way down the length of the big loop (picture 5). When the ends of the rope are almost used up, my way of locking the end of the Portuguese Sinnet is to pass both ends of the rope through the remaining portion of the big loop (from opposite directions), then tighten the big loop (to lock the ends of the rope) by pulling the big loop from the other end (where you had tied the
Slip Knot)
so that you end up with two loops at the "top" of the Portuguese Sinnet (picture 6).
 -1 -1
 -2 -2
 -3 -3
 -4 -4
 -5 -5
 -6 -6
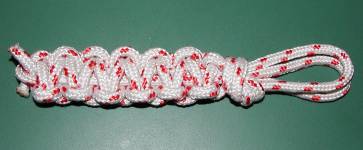
This method creates a flat version of the Portuguese Sinnet. If you tie
Granny Knots
instead of
Reef Knots
(picture 1 below) then you'll end up with a fancy twisted version of the Portuguese Sinnet (picture 2).
 -1 -1
 -2 -2
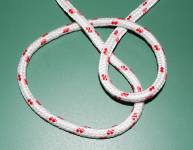
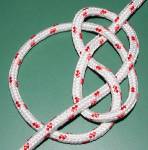
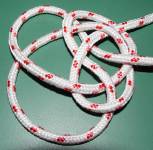
- Square Knot or ABOK #1032
URL: http://daveroot.neocities.org/knots/Knots_Decorative.html#SquareKnot
Many people refer to the
Reef Knot
as the Square Knot, but this is the "real" Square Knot. First make two small
bights
(curves) as in picture 1. The lower
bight
points to the left and the upper
bight
points to the right, then the main part of the rope curves up and around and then down. Bring the main part of the rope under the upper part of the upper
bight,
then completely on top of the lower
bight
(picture 2). Then bring the main part of the rope up and under both
bights
(picture 3), then bring it downwards over the upper
bight
and pass it under the lower part of the lower
bight
(picture 3). Dress and set the knot (picture 4).
 -1 -1
 -2 -2
 -3 -3
 -4 -4
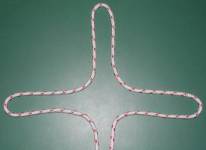
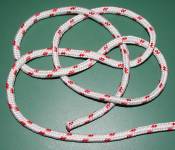
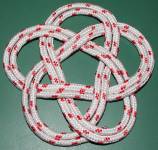
- Turk's Head Knots or ABOK #1306
URL: http://daveroot.neocities.org/knots/Knots_Decorative.html#TurksHead
Turk's Head knots are popular for decorative as well as practical purposes. Turk's Heads are described in terms of the number of "Bights" (the "bends" along the outer edges) and "Leads" (the sets of criss-crossing strands) that they contain. If you don't have enough Bights (B) around an object then the knot will appear stretched out or elongated, and if you have too many Bights then you won't be able to properly tighten the knot around the object. The number of Leads (L) will determine how wide your knot will be.
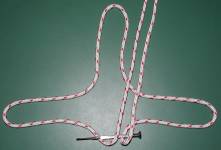
To tie a 4Lx3B Turk's Head as a flat "mat," first form the shape in picture 1. The longer part of the rope which extends off to the left beyond the border of picture 1 will be the working end. Bring the working end back towards the right so that it passes entirely under the loop on the left (picture 2). Bring the working end of the rope back towards the left so that it weaves through the strands of rope in an over-under-over-under-over pattern, then curve it back towards the other end of the rope (picture 3). You've now created a "one-ply" 4Lx3B Turk's Head knot. To make a "two-ply" knot, simply rethread the entire knot with the working end of the rope, precisely following the original path (picture 4). This creates a "doubled" 4Lx3B Turk's Head mat, and you can make it as loose (with large gaps where the green is showing through in picture 4) or as tight (with little or no gaps) as you desire. If you have enough rope then you can thread the working end through the knot again to make a "three-ply" knot, and so on.
 -1 -1
 -2 -2
 -3 -3
 -4 -4
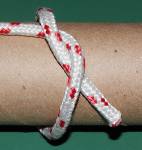
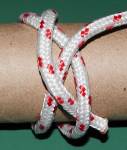
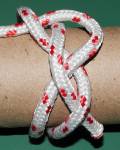
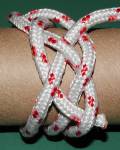
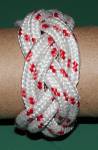
Turk's Head knots are often tied around cylindrical objects. To tie a 4Lx3B Turk's Head around a post of some kind, first tie a basic
Overhand Knot
around the object (picture 1 below). Bring the working end of the rope behind the object (to the left of the
Overhand Knot)
and around to the front at the bottom of the object, then thread it through the
Overhand Knot
as in picture 2. Bring the working end back towards the left, over the first strand and under the second strand (picture 3). Now bring the working end behind the object (to the left of the knot) and around to the front at the bottom again, then thread it over-under-over as in picture 4. Now bring the working end behind the object (to the right of the knot) and around to the front at the bottom, and you've completed a one-ply 4Lx3B Turk's Head. If you thread the working end of the rope through the knot again, precisely following the original path, then tighten carefully, you'll have a two-ply 4Lx3B Turk's Head (picture 5).
 -1 -1
 -2 -2
 -3 -3
 -4 -4
 -5 -5
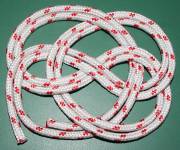
To tie a 3Lx5B Turk's Head as a flat mat, first form the shape in picture 1. Now bring the working end of the rope back towards the right so that it weaves through the strands of rope in an over-under-over pattern (picture 2). Bring the working end back towards the left and down so that it weaves through the strands of rope in an under-over-under-over pattern, then curve it up towards the other end of the rope (picture 3). You now have a one-ply 3Lx5B Turk's Head mat. To make a two-ply mat, simply rethread the entire knot with the working end of the rope, precisely following the original path (picture 4). This creates a "doubled" 3Lx5B Turk's Head mat, and you can make it as loose (with large gaps where the green is showing through in picture 4) or as tight (with little or no gaps) as you desire. If you have enough rope then you can thread the working end through the knot again to make a three-ply knot, and so on. If you wish, you can pass an object through the center of the 3Lx5B mat, then tighten the knot carefully (picture 5).
 -1 -1
 -2 -2
 -3 -3
 -4 -4
 -5 -5
Here are several websites with more information on Turk's Head knots:
"The Most Useful Rope Knots for the Average Person to Know -- Decorative Knots"
URL: http://daveroot.neocities.org/knots/Knots_Decorative.html
Modification History
| 01/13/2005: |
Added the Dragonfly and the Square Knot. |
| 05/18/2004: |
Added some Turk's Head knots. |
| 05/10/2004: |
Added the Jug Sling Hitch and the Portuguese Sinnet. |
| 05/04/2004: |
New article. |
Dave Root
|
|