The Most Useful Rope Knots
for the Average Person to Know
Bends
To see more details in the pictures, zoom in by holding down the CTRL key and pressing + several times.
Restore by holding down the CTRL key and pressing 0.
|
The
Home Page
describes some knotting terminology, and it explains a number of factors which affect the security of the knots that you tie. Always keep in mind that there are risks associated with ropes and knots, and the risks are entirely your own.
Site Map
Bends (and other ways of tying ropes together)
When two ends of rope (from the same rope or from different ropes) are tied together with a single knot, the knot is referred to as a "bend."
My current preferences are the
Fisherman's Knot
and the
Alpine Butterfly Bend,
although I'm trying out the
Double Harness Bend
more and more lately.
Practice tying your favorite knots periodically (from different angles) so that you'll remember how to tie them when you need them.
Here are some bends:
- Adjustable Grip Bend
URL: http://daveroot.neocities.org/knots/Knots_Bends.html#AdjustableGripBend
This bend is similar to the
Fisherman's Knot
(below), except that it uses
Adjustable Grip Hitches
instead of
Overhand Knots.
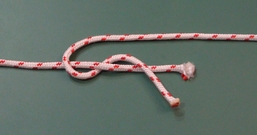
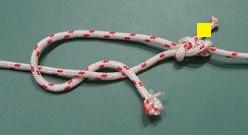
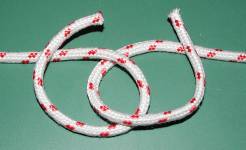
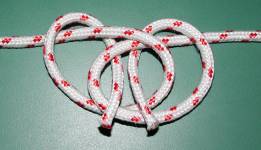
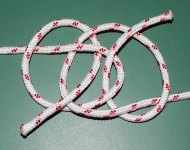
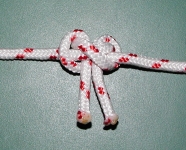
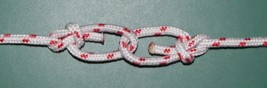
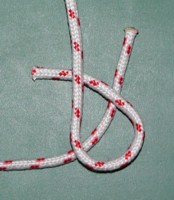
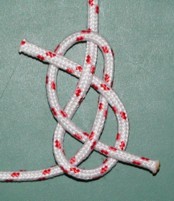
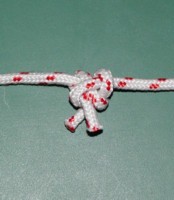
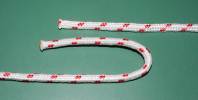
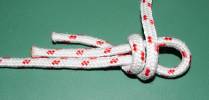
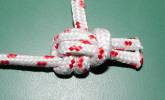
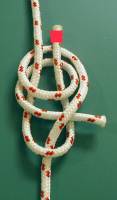
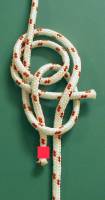
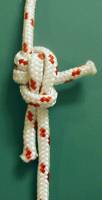
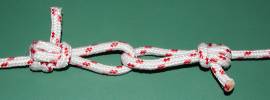
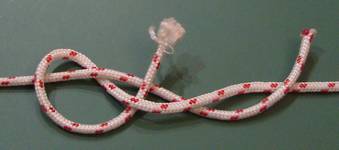
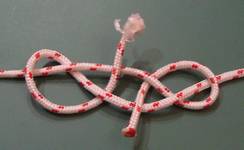
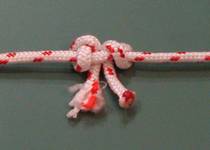
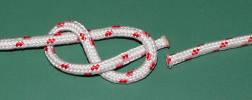
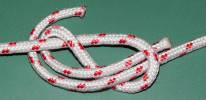
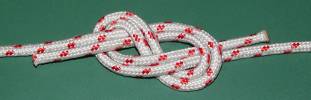
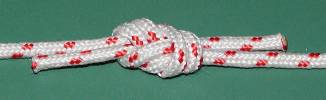
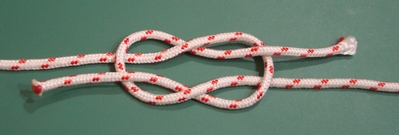
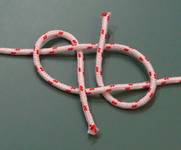
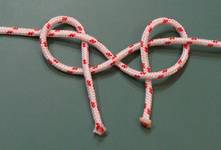
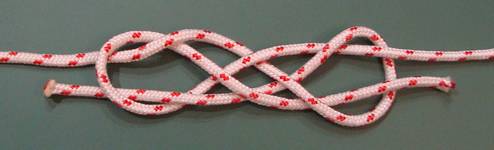
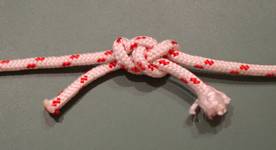
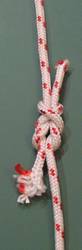
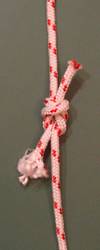
Using one end of rope, tie an
Adjustable Grip Hitch
around the other end of rope (pictures 1 and 2). Dress and set the knot, then flip the rope over and once again tie an
Adjustable Grip Hitch
around the other end of rope (which is partially displayed in picture 3). In picture 2, notice that the end of rope with a yellow square on it is pointing down and to the left, and when you flip the rope over (picture 3) then the end of rope with a yellow square is now pointing up and to the right. After you dress and set both knots, you can position them anywhere along the rope and they'll hold their position (picture 4).
 -1 -1
 -2 -2
 -3 -3
 -4 -4
According to Budworth, "This practical slide-and-grip knot can be grasped and shifted easily by hand in either direction but locks up firmly under load. After the load is removed, the knot may be slid along the rope again. The momentum of a fall will cause the knot to slide and so absorb energy. ... Later tests involving 5.5-mm (1/4-in) Kevlar indicated that,
when used as adjustable bends,
these knots grip (i.e., do not slip) and break at around 80% of the absolute rupture load of the material used. This figure may be an underestimate."
(The Complete Book of Knots,
p.95, emphasis added).
If you like the
Adjustable Grip Hitch
then this is an easy way to remember how to attach two ropes to each other. Keep in mind that three wraps around (rather than one or two wraps as in picure 2) gives the
Adjustable Grip Hitch
more security and gripping power.
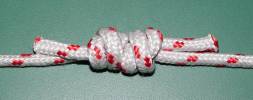
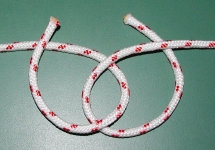
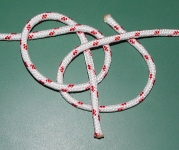
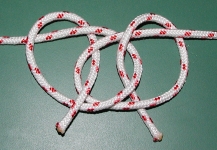
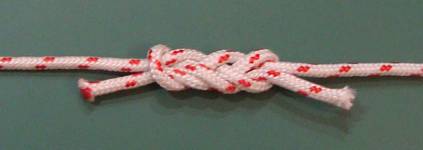
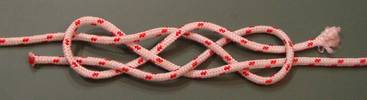
- Alpine Butterfly Bend
URL: http://daveroot.neocities.org/knots/Knots_Bends.html#AlpineButterflyBend
This is a variation of the
Alpine Butterfly
which turns it into a secure bend.
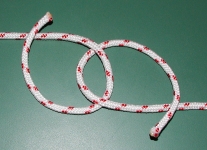
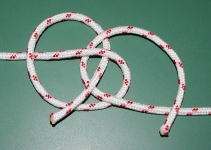
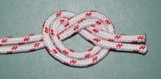
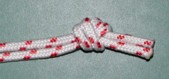
Method #1
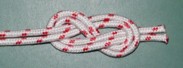
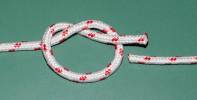
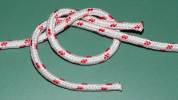
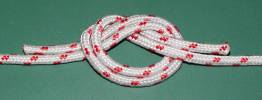
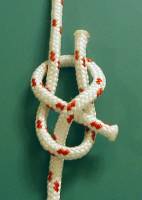
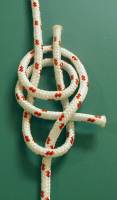
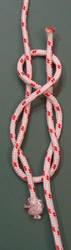
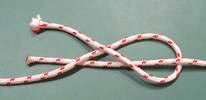
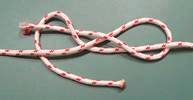
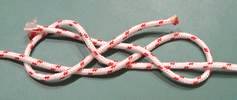
Make a loop in the end of rope which is coming in from the left in picture 1, making sure that the end curves upward and crosses over on top of the main part of the rope. In picture 1, the end of rope coming in from the right passes under and then through the loop from behind, curving down and around to the right, then it curves upward to form a loop with the end crossing over on top of the main part of the rope. Notice that the two loops are essentially mirror-images of each other in picture 1. Bring both ends of rope through the center of the knot (where the two loops overlap each other) from behind (picture 2). In picture 2, notice that the two ends of rope are passing through the center of the knot from the same direction (i.e. from behind). Dress and set the knot (picture 3).
 -1 -1
 -2 -2
 -3 -3
This bend is very easy to remember how to tie because it doesn't matter which way you pass the second end of rope through the loop in the first end of rope, and it doesn't matter if you curve the two ends of rope upwards or downwards, and it doesn't matter if you cross the two ends of rope on top of or behind the main parts of the ropes. The
only
thing that matters is that the two ends of rope form interlocked loops which are mirror-images of each other, and that they both pass through the center of the knot together (i.e. in the same direction).
This knot is somewhat similar to the
Ashley Bend,
and the
Hunter's Bend,
and the
Shakehands Bend,
and the
Zeppelin Bend,
and it should only be used with two ends of rope which are roughly the same thickness. All five of these bends are variations on a theme of interlocked
Overhand Knots,
and all five are considered to be strong and secure bends. In the pictures of these five bends, notice that the end of rope which is coming in from the left side always loops around and crosses over on top of itself. So the difference in these five bends depends on what happens with the end of rope coming in from the right side. See the Summary section for some advantages that the Alpine Butterfly Bend has over the other four similar bends.
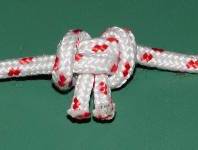
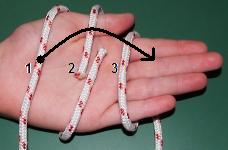
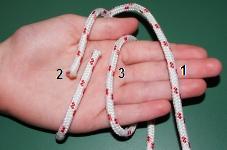
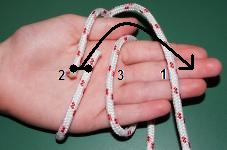
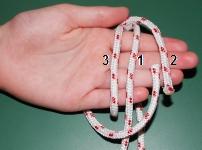
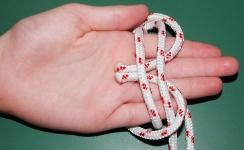
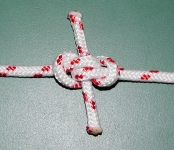
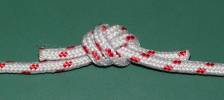
Method #2
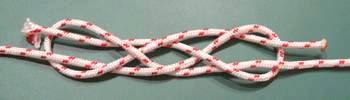
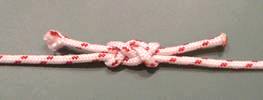
Wrap one end of rope once around your hand (strand #1 in picture 1 below) so that the end of the rope comes up from the bottom (as part of strand #2 in picture 1). In reality you would hold the end of rope against your palm with your thumb, unlike in the pictures. Then overlap the other end of rope with the first end of rope (as part of strand #2 in picture 1), holding both ends with your thumb, and wrap the rope around your hand so that you essentially have three strands of rope laying on the palm of your hand (picture 1 below). Grab the left-most strand (#1 in picture 1) and bring it all the way to the right over the other strands (pictures 1 and 2). Once again grab the left-most "strand" (i.e. the two overlapped ends) (#2 in picture 3) and bring the ends all the way to the right over the other two strands (pictures 3 and 4). After bringing the overlapped ends over the other two strands, push them back to the left
under
the other two strands (picture 5). The dressed knot should look like picture 3 above.
 -1 -1
 -2 -2
 -3 -3
 -4 -4
 -5 -5
According to Budworth, the Alpine Butterfly can be pulled in two or three directions at once without distorting or capsizing, and he says that if your rope is damaged then you can isolate the damaged area by tying an Alpine Butterfly around it
(The Complete Book of Knots,
p.86-87). This indicates that the Alpine Butterfly Bend is strong and secure, because the two ends of rope can be viewed as a "damaged" section of the rope.
In
The Complete Rigger's Apprentice
(p.72), Brion Toss refers to this as the Strait Bend, and he says, "This knot, structurally analogous to the
Butterfly Knot
(Figure 3-34), is the strongest of this series and neither slips nor jams." On p.70, Toss says that in his experience, the Strait Bend (the Alpine Butterfly Bend) is on a par with the
Ashley Bend,
which survived 100 pulls in Ashley's testing.
Method #3
An alternate way to tie two ropes together is simply to make interlocking
Alpine Butterfly loops.

One advantage of this method is that it can be used with two ropes which have different thicknesses. Strictly speaking this is not really a bend, but if you like the
Alpine Butterfly
then this is an easy way to remember how to attach two ropes to each other fairly securely (the point here is that the "average" person might not recall how to tie a secure bend when needed).
- The Ashley Bend or ABOK #1452
URL: http://daveroot.neocities.org/knots/Knots_Bends.html#AshleysBend
Clifford Ashley invented this bend and published it in
The Ashley Book of Knots,
listing it simply as #1452. For this reason, people sometimes refer to it as ABOK #1452
("Ashley Book of Knots" #1452), or as "the Ashley Bend."
To tie this knot, make a loop in the end of rope which is coming in from the left in picture 1, making sure that the end curves upward and crosses over on top of the main part of the rope. In picture 1, the end of rope coming in from the right passes over and then through the loop from the front, curving up and around to the right, then it curves downward to form a loop with the end crossing over on top of the main part of the rope. Notice that the two loops are
not
mirror-images of each other in picture 1. Bring both ends of rope through the center of the knot (where the two loops overlap each other) from behind (pictures 2 and 3). In picture 3, notice that the two ends of rope are passing through the center of the knot from the same direction (i.e. from behind). Dress and set the knot (picture 4), which results in a mirror-image of knot #1452 in
The Ashley Book of Knots.
 -1 -1
 -2 -2
 -3 -3
 -4 -4
This knot is somewhat similar to the
Alpine Butterfly Bend,
and the
Hunter's Bend,
and the
Shakehands Bend,
and the
Zeppelin Bend,
and it should only be used with two ends of rope which are roughly the same thickness. All five of these bends are variations on a theme of interlocked
Overhand Knots,
and all five are considered to be strong and secure bends. In the pictures of these five bends, notice that the end of rope which is coming in from the left side always loops around and crosses over on top of itself. So the difference in these five bends depends on what happens with the end of rope coming in from the right side. See the Summary section for some advantages that the Alpine Butterfly Bend has over the other four similar bends.
In
The Complete Rigger's Apprentice
(p.70), Brion Toss says that the Ashley Bend has all of the advantages of the
Zeppelin Bend,
but it's easier to tie. Toss also points out that the Ashley Bend survived 100 pulls in Ashley's testing (p.70).
- Bowline Bend or ABOK #1455
URL: http://daveroot.neocities.org/knots/Knots_Bends.html#BowlineBend
This is simply two
Bowlines
tied to each other.
Ashley says that this "is about the most common of all Hawser Bends."
(The Ashley Book of Knots,
p.264, #1455)
For a discussion of some ways to "lock" a Bowline to make it more secure, see the forum topic called
Simple lock for the bowline
at the International Guild of Knot Tyers.
- Carrick Bend or ABOK #1439
URL: http://daveroot.neocities.org/knots/Knots_Bends.html#CarrickBend
Method #1
First make a loop in one end of rope (which is coming down from above in picture 1), making sure that the end of the rope passes under the main part of the rope. Then bring the second end of rope completely under the loop (picture 1). Pass the second end of rope over the main part of the first end of rope, then under the first end of rope (picture 2). Now thread the second end of rope over, under, then over as in picture 3. Inspect the second end of rope very carefully to make sure that it exactly alternates between going under and going over as it threads its way through the knot. Dress and set the knot (picture 4).
 -1 -1
 -2 -2
 -3 -3
 -4 -4
Method #2
For another way to tie the Carrick Bend, see
Carrick Bend - the king of bends.
Method #3
For another way to tie the Carrick Bend, see
The Carrick Bend.
Ashley says that this is "perhaps the nearest thing we have to a perfect bend. It is symmetrical, it is easy to tie, it does not slip easily in wet material, it is among the strongest of knots, it cannot jam and is readily untied."
(The Ashley Book of Knots,
p.262, #1439).
According to Budworth, "Although often assumed to be strong, it is in fact only about 65% efficient. ... The symmetrical layout of the carrick bend, with eight crossing points, yields several different knots, depending on what goes over and under where. For this reason, some very unreliable knots have been misleadingly labelled carrick bends."
(The Complete Book of Knots,
p.43).
One big drawback of the Carrick Bend is that if you don't follow the under-over arrangement exactly right then the bend will be unsafe, and in fact various books, manuals, websites, etc., contain incorrect pictures of the Carrick Bend. However, this is a good bend for string (when tied correctly) because it's easier to untie than most of the other bends.
This bend should only be used with two ends of rope which are roughly the same thickness.
For some thoughts on the Carrick Bend, see the forum topic called
Carrick Bend, revisited
at the International Guild of Knot Tyers.
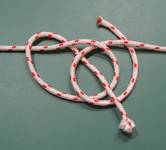
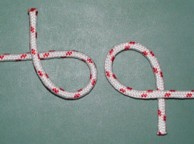
- Double Dragon Bend
URL: http://daveroot.neocities.org/knots/Knots_Bends.html#DoubleDragonBend
Method #1
This is a variation of the
Double Dragon
which turns it into a bend. In pictures 1 and 2, notice that the two ends of rope are not evenly lined up with each other. This helps them to be evenly lined up when the knot is dressed and set (picture 3).
 -1 -1
 -2 -2
 -3 -3
This bend should only be used with two ends of rope which are roughly the same thickness. However, there has been some discussion on the forum of the International Guild of Knot Tyers concerning the use of the
Double Dragon
as a mid-line loop or a bend because this might cause the knot to jam and be difficult to untie (for example, see the forum topic called
Double Dragon vs. Double-tucked Angler).
Method #2
Here's an alternate way to make a Double Dragon Bend. Start with a
Double Sheet Bend
(picture 1). Bring the end of rope which has a red square on it down over the knot, and pass it through the "loop" at the bottom (picture 2). Dress and set the knot (picture 3). If you like this form of the Double Dragon Bend, you can also tie it by using Method #2 for tying the
Double Dragon
(start wih picture 3, and imagine that the rope has been cut where the wooden rod is).
 -1 -1
 -2 -2
 -3 -3
Method #3
Another way to tie two ropes together is simply to make interlocking
Double Dragons.
One advantage of this method is that it can be used with two ropes that have different thicknesses. Strictly speaking this is not really a bend, but if you like the
Double Dragon
then this is an easy way to remember how to attach two ropes to each other fairly securely (the point here is that the "average" person might not recall how to tie a secure bend when needed).
- Double Fisherman's Knot or Grapevine Knot or Double English Knot or ABOK #1415
See the
Fisherman's Knot
(below).
- Double Harness Bend or ABOK #1421
URL: http://daveroot.neocities.org/knots/Knots_Bends.html#DoubleHarnessBend
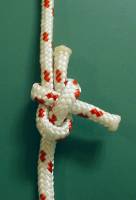
In this version of the Double Harness Bend, the ends of the rope come out of the knot parallel to each other. The non-parallel version is ABOK #1420.
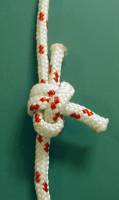
To tie this knot, start by tying a simple
Overhand Knot
with both ends of rope (picture 1). In picture 1, notice that the ends of rope have created two "holes." Using the end of rope on the left, bring it down and over the main part of the other rope, then tuck it through the "hole" on the left as shown in picture 2. Now grab the other end of rope (on the right) and tuck it through the
same
"hole" that you tucked the other end of rope through, as shown in picture 3. Dress and set the knot (picture 4).
 -1 -1
 -2 -2
 -3 -3
 -4 -4
Ashley says that #1420 (the non-parallel version) "is strong and secure," and he goes on to say that #1421 (the parallel version shown above) "appears to be preferable to the former."
In addition to being strong and secure, this bend is easy to tie, and it uses very little rope or string (i.e. it's not a very bulky knot). Ashley says that it's not very easy to untie, but other people have found that it is easy to untie.
- Double Sheet Bend or ABOK #1434
See the
Sheet Bend
(below).
- Figure-Eight Bend or Flemish Bend or ABOK #1411
URL: http://daveroot.neocities.org/knots/Knots_Bends.html#FigureEightBend
This is essentially a "rethreaded"
Figure-Eight Knot.
Method #1
Tie a
Figure-Eight Knot
in one end of a rope (picture 1), then take the other end of rope and follow all of the twists and turns of the
Figure-Eight Knot
from the other direction (pictures 2 and 3). Carefully dress and set the knot (picture 4). Make sure to dress the knot properly so that all of the strands of rope are parallel to each other and don't cross over each other unnecessarily.
 -1 -1
 -2 -2
 -3 -3
 -4 -4
This is generally considered to be a secure bend, but Ashley says that "It is bulky and bothersome to tie, and not to be preferred to [the
Ring Knot],
which is made in a similar manner."
(The Ashley Book of Knots,
p.258, #1411, brackets added).
On the other hand, Budworth says, "Writing in
The Ashley Book of Knots
(1944), Clifford W. Ashley deemed this knot '... bulky and bothersome to tie'. (He preferred the
tape knot
(p.100)). This is another instance where the needs of sailors and climbers differ"
(The Complete Book of Knots,
p.96).
So Ashley preferred the
Ring Knot
(Tape Knot) over the Figure-Eight Bend, but Budworth feels that the Figure-Eight Bend is better for climbers. For extra security, many climbers add some type of "stopper knots" to the ends of the rope, such as
Double Overhand Knots:
However, people have had serious accidents by not properly rethreading the
Figure-Eight Knot
(for example, see
SILT HAPPENS #99-2
and do a Find on "Figure 8's vs. Bowlines").
Method #2
An alternate form of a Figure-Eight Bend is the Abnormal Figure-Eight Bend. To tie this knot, simply hold the two ends of rope together and tie a
Figure-Eight Knot:
 -1 -1
 -2 -2
The general consensus among climbers seems to be that this version is not a very reliable bend. For example, when the ropes are pulled in opposite directions then it can cause this knot to distort and become unsafe (unlike the normal Figure-Eight Bend, above).
Both forms of this bend should only be used with two ends of rope which are roughly the same thickness.
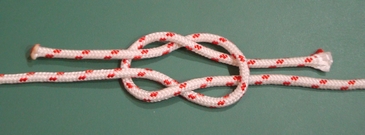
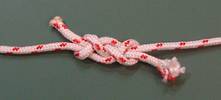
- Fisherman's Knot or Water Knot or Angler's Knot or English Knot or Englishman's Knot or True Lover's Knot or Waterman's Knot or ABOK #1414
URL: http://daveroot.neocities.org/knots/Knots_Bends.html#FishermansKnot
Oddly, the Fisherman's Knot is actually a bend, and the
Fisherman's Bend
is actually a hitch.
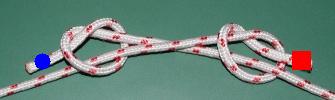
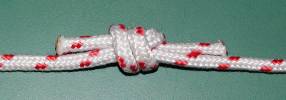
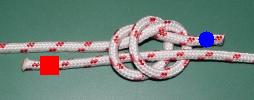
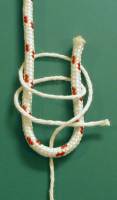
Using one end of rope, tie an
Overhand Knot
around the other end of rope (picture 1). Now flip the rope over and once again tie an
Overhand Knot
around the other end of rope (picture 2). In picture 1, notice that the end of rope with a blue circle on it is on the right side, and when you flip the rope over (picture 2) then the end of rope with a blue circle is now on the left side. I find that it works best if you tighten the knot in picture 1 before flipping the rope over to tie the second knot, but I left the first knot untightened in picture 2 just for the sake of clarity. After you tighten the two knots, pull them together and they should stack nicely next to each other (picture 3).
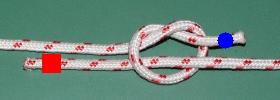 -1 -1
 -2 -2
 -3 -3
According to Budworth, "This is - strictly speaking - a strong and secure bend to join two similar ropes." (The Complete Book of Knots, p.39). However, climbers seem to prefer the Double Fisherman's Knot for its greater strength and security.
The Fisherman's Knot is easy to remember, and easy to tie, and it results in a small, nice-looking knot which is less bulky than most of the other bends. However, it can be difficult to untie if it has been under a strain. It should only be used with two ends of rope which are roughly the same thickness.
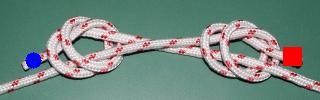
The Double Fisherman's Knot is even more secure than the Fisherman's Knot because it uses
Double Overhand Knots
instead of regular
Overhand Knots.
Using one end of rope, tie a
Double Overhand Knot
around the other end of rope (picture 1 below). Now flip the rope over and once again tie a
Double Overhand Knot
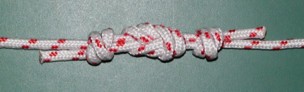
around the other end of rope (picture 2 below). In picture 1 (below), notice that the end of rope with a blue circle on it is on the right side, and when you flip the rope over (picture 2 below) then the end of rope with a blue circle is now on the left side. I find that it works best if you tighten the knot in picture 1 (below) before flipping the rope over to tie the second knot, but I left the first knot untightened in picture 2 (below) just for the sake of clarity. After you tighten the two knots, pull them together and they should stack nicely next to each other (picture 3 below).
 -1 -1
 -2 -2
 -3 -3
This bend should only be used with two ends of rope which are roughly the same thickness. It's generally considered to be a strong and secure bend, but it can be very difficult to untie.
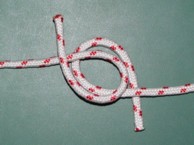
- Hunter's Bend or Smith-Hunter's Bend or Rigger's Bend
URL: http://daveroot.neocities.org/knots/Knots_Bends.html#HuntersBend
Make a loop in the end of rope which is coming in from the left in picture 1, making sure that the end curves upward and crosses over on top of the main part of the rope. In picture 1, the end of rope coming in from the right passes over and then through the loop from the front, curving down and around to the right, then it curves upward to form a loop with the end crossing behind the main part of the rope (picture 1). Notice that the two loops are
not
mirror-images of each other in picture 1. Bring the end of rope on the left through the center of the knot (where the two loops overlap each other) from behind (picture 2), then bring the end of rope on the right through the center of the knot from the front (picture 3). In picture 3, notice that the two ends of rope are passing through the center of the knot from different directions (one from behind and one from the front). Dress and set the knot (picture 4).
 -1 -1
 -2 -2
 -3 -3
 -4 -4
This knot is somewhat similar to the
Alpine Butterfly Bend,
and the
Ashley Bend,
and the
Shakehands Bend,
and the
Zeppelin Bend,
and it should only be used with two ends of rope which are roughly the same thickness. All five of these bends are variations on a theme of interlocked
Overhand Knots,
and all five are considered to be strong and secure bends. In the pictures of these five bends, notice that the end of rope which is coming in from the left side always loops around and crosses over on top of itself. So the difference in these five bends depends on what happens with the end of rope coming in from the right side. See the Summary section for some advantages that the Alpine Butterfly Bend has over the other four similar bends.
- Overhand Bend or ABOK #1410
URL: http://daveroot.neocities.org/knots/Knots_Bends.html#OverhandBend
This is simple and quick to tie, but it's often considered to be a weak bend. For example, when the ropes are pulled in opposite directions then this knot can distort and become unsafe.
To tie this knot, simply hold the two ends of rope together and tie an
Overhand Knot.
 -1 -1
 -2 -2
Ashley says that the Overhand Bend "ranks higher than the
Sheet Bend
in security, but is among the weakest of the bends."
(The Ashley Book of Knots,
p.258, #1410).
This bend should only be used with two ends of rope which are roughly the same thickness.
- Reef Knot or Square Knot or ABOK #1402
URL: http://daveroot.neocities.org/knots/Knots_Bends.html#ReefKnot
This is not a bend, but I included it here because people sometimes erroneously use it as a bend. The Reef Knot is unreliable and unsafe when used as a bend.
-1
 -2 -2
For more on the Reef Knot, see the
Miscellaneous Knots
page.
Ashley says that the Reef Knot is admirable as a binder knot, "but under no circumstances should it be used as a bend."
(The Ashley Book of Knots,
p.258, #1402).
- Reever Knot
See the
Vice Versa Bend
(below).
- Ring Knot or Water Knot or Tape Knot or ABOK #1412
URL: http://daveroot.neocities.org/knots/Knots_Bends.html#RingKnot
This bend is often referred to as the Water Knot, but Ashley says that since there are a number of knots which are called the Water Knot, perhaps it's best to use the name Ring Knot for this bend
(The Ashley Book of Knots,
p.258, #1412). When it's used with strips of webbing (such as the kind that rock climbers use) then it's sometimes referred to as the Tape Knot.
To tie this knot, first tie an
Overhand Knot
in one end of rope (picture 1), then take the other end of rope and follow all of the twists and turns of the
Overhand Knot
from the other direction (pictures 2 and 3). Carefully dress and set the knot (picture 4).
 -1 -1
 -2 -2
 -3 -3
 -4 -4
This is a fairly secure, nice-looking knot for tying two ropes of the same thickness, although it can be somewhat difficult to untie after being under a strain. It's also considered to be good for tying grasses, or wet rope, or rubber materials (e.g. for repairing swimming goggles), which makes it a versatile bend. Ashley says that "The Ring Knot is an excellent bend for wet gut."
(The Ashley Book of Knots,
p.258, #1412), and he says that it's to be preferred over the
Figure-Eight Bend
(The Ashley Book of Knots,
p.258, #1411).
According to Budworth, "This is the bend recommended for climbers' tape or webbing. It also works in rope, cord, string and the finest monofilaments. ... Isaac Walton called this knot the water knot. Hutton referred to it as the ring knot"
(The Complete Book of Knots,
p.100).
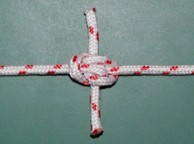
- Sennit Knot
URL: http://daveroot.neocities.org/knots/Knots_Bends.html#SennitKnot
First tie a
Whatnot
(picture 1). Grab the end of rope on the left in picture 1 and move it 90 degrees clockwise to the position shown in picture 2, then grab the end of rope on the right in picture 1 and move it 90 degrees clockwise to the position shown in picture 2. In picture 2, where the end of rope on the right (pointing upwards) crosses over itself, grab the crossing point and rotate the loop so that the end of rope is pointing downwards (picture 3). Do this by rotating the crossing point
away
from you so that the end of rope goes behind the main part of the other end of rope. Grab the end of rope on the left in picture 3 and bring it towards the right and push it through the loop on the right as shown in picture 4, then grab the end of rope on the right in picture 3 and bring it towards the left and push it through the loop on the left as shown in picture 4. Dress and set the knot by pulling the ends of the ropes away from each other (which will deform the knot into a "ball" shape), then pull the main parts of the ropes away from each other (picture 5).
 -1 -1
 -2 -2
 -3 -3
 -4 -4
 -5 -5
This is a flat and decorative bend in which the ends of the ropes sit nicely parallel to the main parts of the ropes. Dick Clements says that this is a secure knot which is relatively easy to untie after it has held a heavy load (see
An Alternative Technique for Tying the Sennit Knot).
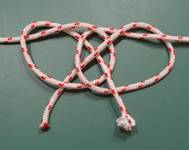
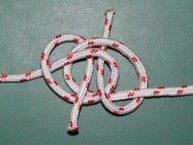
- Shakehands Bend
URL: http://daveroot.neocities.org/knots/Knots_Bends.html#ShakehandsBend
Make a loop in the end of rope which is coming in from the left in picture 1, making sure that the end curves upward and crosses over on top of the main part of the rope. In picture 1, the end of rope coming in from the right passes under and then through the loop from behind, curving down and around to the right, then it curves upward to form a loop with the end crossing behind the main part of the rope (picture 1). In the
Ashley Bend,
the end of rope coming in from the right passes
over
and then through the loop from the front, which is the only difference in how you tie these two knots. Notice that the two loops are
not
mirror-images of each other in picture 1. Bring the end of rope on the left through the center of the knot (where the two loops overlap each other) from behind (picture 2), then bring the end of rope on the right through the center of the knot from the front (picture 3). In picture 3, notice that the two ends of rope are passing through the center of the knot from different directions (one from behind and one from the front). Dress and set the knot (picture 4).
 -1 -1
 -2 -2
 -3 -3
 -4 -4
This knot is somewhat similar to the
Alpine Butterfly Bend,
and the
Ashley Bend,
and the
Hunter's Bend,
and the
Zeppelin Bend,
and it should only be used with two ends of rope which are roughly the same thickness. All five of these bends are variations on a theme of interlocked
Overhand Knots,
and all five are considered to be strong and secure bends. In the pictures of these five bends, notice that the end of rope which is coming in from the left side always loops around and crosses over on top of itself. So the difference in these five bends depends on what happens with the end of rope coming in from the right side. See the Summary section for some advantages that the Alpine Butterfly Bend has over the other four similar bends.
- Sheet Bend or ABOK #1431
URL: http://daveroot.neocities.org/knots/Knots_Bends.html#SheetBend
This is a well-known bend, but it's not generally considered to be very strong or reliable.
 -1 -1
 -2 -2
According to Budworth, "Security tests have shown it to spill after an average 22 tugs out of 100, and it is not a very strong knot, with a breaking strength of 55%."
(The Complete Book of Knots,
p.40).
This bend can be used with two ends of rope that are different thicknesses, as long as the thinner rope is the one which wraps around the thicker rope:
This bend is also good for tying ends of cloth together.
The Double Sheet Bend is more secure than the Sheet Bend. Simply make an extra turn with the end of rope which is coming up from the bottom, as in picture 1 below.
 -1 -1
 -2 -2
The Double Sheet Bend is better than the basic Sheet Bend, but it's not usually considered to be a very secure knot. In Ashley's testing, the Double Sheet Bend came apart after only 36 pulls, compared with the
Ashley Bend
which stayed intact through 100 pulls (see p.273 of
The Ashley Book of Knots
or p.70 of
The Complete Rigger's Apprentice
by Brion Toss).
You can make the Double Sheet Bend more secure by turning it into a
Double Dragon Bend,
using Method #2.
The Double Sheet Bend can be used with two ends of rope that are different thicknesses, as long as the thinner rope is the one which wraps around the thicker rope:
This bend is also good for tying ends of cloth together.
- Simple Simon Bends
URL: http://daveroot.neocities.org/knots/Knots_Bends.html#SimpleSimonBends
Two versions of this bend are called "Simple Simon Under" and "Simple Simon Over," and there's a doubled version and several symmetric versions as well.
To tie the "Simple Simon Under," first make a
bight
in one end of rope. In picture 1, the end of rope coming downwards from the top is the one which has been formed into a
bight.
The other end of rope will do the rest of the work, so we'll call it the Working End. Bring the Working End over the bottom of the
bight
and then wrap it around the
bight
as in picture 1, then tuck it through the bottom of the
bight
parallel to the way that it entered into the
bight
(picture 1). As the Working End wraps around the
bight
and then crosses itself, notice that it crosses
under
itself. Dress and set the knot (picture 2).
 -1 -1
 -2 -2
To tie the "Simple Simon Over," first make a
bight
in one end of rope. In picture 1 below, the end of rope coming downwards from the top is the one which has been formed into a
bight.
The other end of rope will do the rest of the work, so we'll call it the Working End. Bring the Working End over the bottom of the
bight
and then wrap it around the
bight
as in picture 1 below, then tuck it through the bottom of the
bight
parallel to the way that it entered into the
bight
(picture 1 below). As the Working End wraps around the
bight
and then crosses itself, notice that it crosses
over
itself. Dress and set the knot (picture 2 below).
 -1 -1
 -2 -2
Notice that if you don't wrap the Working End around the
bight
then you would have a
Reef Knot.
The Simple Simon bends are similar to the
Sheet Bend
(especially the Simple Simon Under), but with extra security. For even more security, see the Double Simple Simon and the Symmetric Simple Simon in Dick Clements' article called
The Symmetric Simple Simon Bend.
- Versa Vice Bend
See the
Vice Versa Bend
(below).
- Vice Versa Bend
URL: http://daveroot.neocities.org/knots/Knots_Bends.html#ViceVersaBend
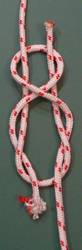
Make a loop in one end of a rope (picture 1). Pass another end of rope through the loop as in picture 2 (we'll call this the Working End). Bring the Working End up and on top of the first end of rope, then pass it down and behind the first end of rope and the main part of the first rope (picture 3). Bring the Working End up and under itself so that it forms a loop around the first rope (picture 4). Pass the Working End through the loop in the first end of rope so that the Working End is parallel to its own main part of the rope (picture 5). Dress and set the knot (picture 6).
 -1 -1
 -2 -2
 -3 -3
 -4 -4
 -5 -5
 -6 -6
The Vice Versa Bend is essentially the same as the Reever Knot. The only difference is that with the Vice Versa Bend, the ends of rope both end up on the
same
side of the knot (compared to the main parts of the ropes), but with the Reever Knot the ends of rope end up on
opposite
sides of the knot (below). Compare pictures 5 and 6 above (the Vice Versa Bend) with pictures 3 and 4 below (the Reever Knot).
An easy way to tie the Reever Knot is to start with the
Double Harness Bend
(pictures 1 and 2 below), then pass the ends of the rope through the outer loops as in picture 3 below. Dress and set the Reever Knot as in picture 4 below.
-1
-2
 -3 -3
 -4 -4
These knots tend to be considered as good bends for joining wet or slippery or incompatible materials such as synthetic ropes or shock elastics (e.g. bungee cords).
Dick Clements did a study of these two knots, and he seems to indicate that both versions are strong and secure, with his preference being the above Reever Knot as having the greater strength. He uses the terms "Vice Versa" and "Reever" interchangeably, which is unfortunate because when there's tension on the main parts of the rope in both of these knots, these two knots will react differently to the forces being applied.
For a discussion of these knots, see Dick Clements' article called
The Vice Versa Bend and the Reever Knot,
and also see the forum topic called
Quiz. Name (of) this bend!
at the International Guild of Knot Tyers.
For a discussion of a similar knot called the "Versa Vice Bend" (and the "Versa Vice Loop") see Dick Clements' article called
The Versa Vice Bend and Its Loop Knot,
and also see the forum topic called
New (better?) way to tie an elegant loop knot
at the International Guild of Knot Tyers.
- Zeppelin Bend or Rosendahl's Bend
URL: http://daveroot.neocities.org/knots/Knots_Bends.html#ZeppelinBend
This was Lieutenant Commander Charles Rosendahl's preferred bend for mooring the zeppelin that he commanded, which is where the name comes from.
To tie this knot, make a loop in the end of rope which is coming in from the left in picture 1, making sure that the end curves upward and crosses over on top of the main part of the rope. In picture 1, the end of rope coming in from the right forms a loop with the end curving down and crossing behind the main part of the rope. Notice that the two loops are
not
mirror-images of each other in picture 1, and notice that the end of rope coming in from the right does
not
pass through the loop on the left. Place the loop on the left on top of the loop on the right (picture 2), then bring the end of rope on the left through the center of the knot from behind (picture 3), then bring the end of rope on the right through the center of the knot from the front (picture 4). In picture 4, notice that the two ends of rope are passing through the center of the knot from different directions (one from behind and one from the front). Dress and set the knot (picture 5).
 -1 -1
 -2 -2
 -3 -3
 -4 -4
 -5 -5
This knot is somewhat similar to the
Alpine Butterfly Bend,
and the
Ashley Bend,
and the
Hunter's Bend,
and the
Shakehands Bend,
and it should only be used with two ends of rope which are roughly the same thickness. All five of these bends are variations on a theme of interlocked
Overhand Knots,
and all five are considered to be strong and secure bends. In the pictures of these five bends, notice that the end of rope which is coming in from the left side always loops around and crosses over on top of itself. So the difference in these five bends depends on what happens with the end of rope coming in from the right side. See the Summary section for some advantages that the Alpine Butterfly Bend has over the other four similar bends.
According to Budworth, "This is probably the best of a whole trustworthy family of symmetrical bends comprising two interlocked overhand knots. It works even in big stiff hawsers and cables and is suitable for everything from hobbies to heavy industrial use. ... The knot does not have to be completely tightened before loading; it is secure even with daylight showing through it (fig. 4)."
(The Complete Book of Knots,
p.44).
Summary
The Reef Knot (which is often incorrectly referred to as the Square Knot) is unreliable and unsafe as a bend. It should never be used for that purpose. The Overhand Bend is quick and simple, and it's used sometimes when the rope or string will not need to hold a heavy load. It's not generally considered to be very safe or secure, and it can be difficult to untie after it has been under a strain. The Sheet Bend and the Double Sheet Bend can be useful for tying ends of cloth together, but they're often considered to be too weak and unreliable for rope or string.
The Carrick Bend and Double Fisherman's Knot are generally considered to be strong and secure, but they have certain disadvantages. For example, they can be difficult to remember how to tie properly if you don't use them very often, and the Double Fisherman's Knot can also be very difficult to untie. The Carrick Bend is usually very easy to untie, which makes it a good bend for string.
The Ring Knot (Water Knot, Tape Knot) is easy to remember because it's simply a rethreaded Overhand Knot, and it results in a nice-looking knot. It's fairly easy to tie and dress, and it's a fairly strong and secure bend, but it can be difficult to untie after being under a strain. It's also recommended when tying together webbing (or tape), wet materials, rubber materials, and so on.
The Figure-Eight Bend (Flemish Bend) is fairly easy to remember because it's simply a rethreaded Figure-Eight Knot, but it's less quick and easy to tie and dress than the Ring Knot. It's also bulkier than the Ring Knot. However, due to its twists and turns it has more internal friction than the Ring Knot, and therefore it's stronger and more secure. For this reason, climbers often prefer the Figure-Eight Bend (with some type of Stopper Knots) over other bends for situations when lives are at stake.
The Simple Simon bends are similar to the Sheet Bend (especially the Simple Simon Under), but with extra security. For even more security, see the Double Simple Simon and the Symmetric Simple Simon in Dick Clements' article called
The Symmetric Simple Simon Bend.
The Sennit Knot is a flat and decorative bend, and Dick Clements says that it's a secure knot which is relatively easy to untie after it has held a heavy load.
Ashley says that the Double Harness Bend #1420 (the non-parallel version) "is strong and secure," and he goes on to say that #1421 (the parallel version) "appears to be preferable to the former." In addition to being strong and secure, this bend is easy to tie, and it uses very little rope or string (i.e. it's not a very bulky knot). Ashley says that it's not very easy to untie, but other people have found that it is easy to untie. It can easily be turned into a Reever Knot.
The Reever Knot and the Vice Versa Bend tend to be considered as good bends for joining wet or slippery or incompatible materials such as synthetic ropes or shock elastics (e.g. bungee cords). Dick Clements did a study of these two knots, and he seems to indicate that both versions are strong and secure, with his preference being the Reever Knot as having the greater strength. He uses the terms "Vice Versa" and "Reever" interchangeably, which is unfortunate because when there's tension on the main parts of the rope in both of these knots, these two knots will react differently to the forces being applied.
The Adjustable Grip Bend allows you to position two Adjustable Grip Hitches anywhere along the rope, and they'll hold their position.
The Fisherman's Knot (Angler's Knot, Englishman's Knot, True Lover's Knot, etc.) is easy to remember, and easy to tie, and it results in a small, nice-looking knot which is less bulky than most of the other bends. However, it can be difficult to untie if it has been under a heavy strain.
The Alpine Butterfly Bend, Ashley Bend (ABOK #1452), Hunter's Bend (Rigger's Bend), Shakehands Bend, and Zeppelin Bend (Rosendahl's Bend) are all based on interlocked Overhand Knots, and they're all considered to be strong and secure bends. However, the Alpine Butterfly Bend has some advantages over the other four bends. For one thing, the other four bends are "unforgiving" in the sense that if you pass one end of rope through a loop in the other end of rope from the wrong direction, or if you curve the second end of rope upwards when you should have curved it downwards, or if you cross the second end of rope on top of itself when it should have crossed behind itself, then you won't end up with the bend that you were trying to tie. You might end up with a knot which isn't very secure. In contrast, the Alpine Butterfly Bend is very forgiving. It doesn't matter which way you pass the second end of rope through the loop in the first end of rope, and it doesn't matter if you curve the two ends of rope upwards or downwards, and it doesn't matter if you cross the two ends of rope on top of or behind the main parts of the ropes. The
only
thing that matters is that the two ends of rope form interlocked loops which are mirror-images of each other, and that they both pass through the center of the knot together (i.e. in the same direction). This makes the Alpine Butterfly Bend very easy to remember how to tie properly, unlike the other four bends. In addition, Budworth says that the Alpine Butterfly can be pulled in two or four directions at once without distorting or capsizing, and that you can isolate a damaged section of rope by tying an Alpine Butterfly around it, both of which indicate that the Alpine Butterfly Bend is strong and secure. Furthermore, Toss says that the Alpine Butterfly Bend is the strongest of the series of bends in his book, and that it neither slips nor jams, and that it's on a par with the Ashley Bend, which survived 100 pulls in Ashley's testing.
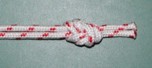
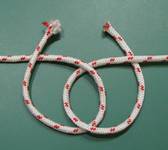
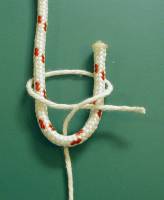
The Alpine Butterfly Bend, Bowline Bend, Double Dragon Bend, and Figure-Eight Bend are all based on loop knots which are fairly strong and secure. These loop knots (Alpine Butterfly, Bowline, Double Dragon, and Figure-Eight) work well when tying together two ropes of different thicknesses. Simply tie a loop knot (such as the Alpine Butterfly) in one end of a rope, and then tie the same loop knot in the end of another rope so that both loop knots are interlocked as in this picture:
Practice tying your favorite knots periodically (from different angles) so that you'll remember how to tie them when you need them.
My preferred bends are the Fisherman's Knot and the Alpine Butterfly Bend, although I'm trying out the Double Harness Bend more and more lately (which can easily be turned into a Reever Knot).
For other people's preferred knots, see the forum topics called
"Best of breed" knots?
and
Top ten most useful knots
at the International Guild of Knot Tyers.
"The Most Useful Rope Knots for the Average Person to Know -- Bends"
URL: http://daveroot.neocities.org/knots/Knots_Bends.html
Modification History
| 12/15/2010: |
Added the Double Harness Bend, the Reever Knot, the Sennit Knot, the Shakehands Bend, the Simple Simon Bends, the Versa Vice Bend, and the Vice Versa Bend. Removed the Adjustable Grip Hitches (Interlocked) and replaced it with the Adjustable Grip Bend. Moved the pictures of the Double Fisherman's Knot to the section on the Fisherman's Knot. Moved the pictures of the Double Sheet Bend to the section on the Sheet Bend. |
| 01/28/2008: |
Added an alternate version of the Double Dragon Bend. Added pictures of using the Sheet Bend and the Double Sheet Bend with ropes of different thicknesses. |
| 01/26/2005: |
Added another way to tie the Alpine Butterfly Bend. |
| 01/13/2005: |
Added the Ashley Bend. Added a link to the forum of the International Guild of Knot Tyers concerning ways of "locking" a Bowline to make it more secure. Added a link to the forum of the International Guild of Knot Tyers in which other people have described their preferred knots. |
| 05/04/2004: |
Added the Hunter's Bend and a variation of the Alpine Butterfly Bend. |
| 04/15/2004: |
Added two variations of the Double Dragon knot. |
| 12/10/2002: |
New article. |
Dave Root
|
|