KnotMaker 2.3 | Written by Derek Smith and Dave Root |
Help - Individual Ropes window |
Help > Individual Ropes window |
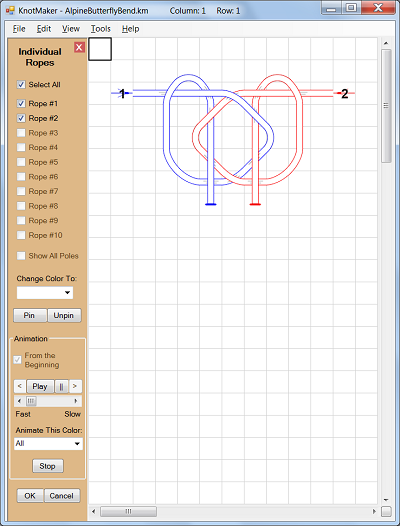
The Individual Ropes window allows you to work with individual ropes, such as deleting entire ropes or changing the color of entire ropes or animating entire ropes.
Each rope needs to have exactly one Tail End tile, because this is a unique tile that enables the program to know where each rope begins.
This window contains the following options:
- A set of checkboxes, one for each rope: These checkboxes allow you to show or hide individual ropes on the canvas (up to a maximum of 10).
- "Select All" checkbox: Selects (or unselects) all of the individual checkboxes so that all of the ropes are displayed (or hidden) on the canvas.
- "Show All Poles" checkbox: Shows or hides all of the Pole tiles on the canvas.
- "Change Color To" combobox: Changes the color of the entire rope(s) displayed on the canvas.
To change the color for only a part of a rope, first close the Individual Ropes window and then modify the rope by adding a temporary Tail End tile in order to separate the rope into two individual ropes. In the Individual Ropes window, hide all of the ropes except the one that needs to change color, then use the "Change Color To" combobox to change the color of the displayed rope. After you select all of the ropes again and click OK to close the Individual Ropes window, you can restore the temporary Tail End tile back to the proper tile.
- "Pin" and "Unpin" buttons: Pins or unpins every tile in the displayed ropes and Poles.
- "From the Beginning" checkbox: If this checkbox is selected, then clicking the "Play" button will start the animation over from the beginning. If this checkbox is not selected, then clicking the "Play" button will continue the animation from where it was paused.
- "<" (Step Backward) button : Each time this button is clicked it will reverse the animation by one tile, allowing you to step backward through the animation.
- "Play" button: Starts the animation. If the "From the Beginning" checkbox is selected then the animation will start from the beginning, else it will start from where the animation was paused.
- "||" (Pause) button: Pauses the animation. Click the "Play" button to continue the animation from the beginning or from where it was paused, depending on the state of the "From the Beginning" checkbox.
- ">" (Step Forward) button: Each time this button is clicked it will increment the animation by one tile, allowing you to step forward through the animation.
- "Speed" scrollbar: Adjusts the speed of the animation.
- "Animate This Color" combobox: Allows you to select a single color to be animated, so that only the ropes that have a Tail End tile of the selected color will be animated. All other ropes will remain fixed in place.
- "Stop" button: Stops the animation and restores the drawing.
- "OK" button: Closes the Individual Ropes window, keeping only the displayed ropes on the canvas (i.e. the ropes that are selected in the checkboxes).
- "Cancel" button: Cancels any changes that you've made and closes the Individual Ropes window. You can also do this by clicking the "X" in the top right corner of the Individual Ropes window.
When you click the "Tools/Individual Ropes" menu item or the "Tools/View in KnotTyer3D" menu item, KnotMaker will start at each Tail End tile and follow the rope through its twists and turns in order to build a separate object for each rope. Based on the direction that the rope is traveling when it leaves a grid cell, the program knows which grid cell is next in sequence for that rope.
For example, imagine that a blue Tail End tile is in layer 2 of a grid cell, and the rope is traveling downward away from the Tail End tile (as shown for rope #1 in the first picture below). In this example, the current grid cell that the program begins examining is the one directly below the Tail End tile (because the Tail End tile is facing downward). As the program travels from the current tile to the next tile in the rope, it follows this logic:
- If the current grid cell contains a blue tile in layer 2 that connects to the Tail End tile in layer 2, then that's the next tile in the rope (because the Tail End tile is blue). Based on this tile, the program is able to determine which grid cell will become the current grid cell to examine next.
- If step 1 fails to find a tile then the program looks in the current grid cell, starting at the topmost layer, to find a blue tile in any layer that connects to the Tail End tile (because the Tail End tile is blue). If it finds one, then that's the next tile in the rope. Based on this tile, the program is able to determine which grid cell will become the current grid cell to examine next.
- If step 2 fails to find a tile then the program looks in the current grid cell, starting at the topmost layer, to find a tile of any color in any layer that connects to the Tail End tile. If it finds one, then that's the next tile in the rope. Based on this tile, the program is able to determine which grid cell will become the current grid cell to examine next.
- If steps 1, 2, or 3 succeed, then the program loops back to step 1 using the new current grid cell. If steps 1, 2, and 3 all fail to find a tile then the program assumes that it has reached the end of the current rope.
When the program is building a rope object, there can be rare cases where more than one tile will connect to the previous tile. These cases can result in the rope objects being built inaccurately.
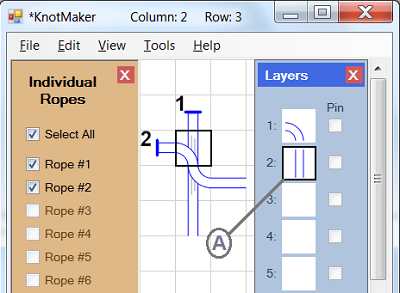
For example, take a look at the following picture. Our eyes tell us that rope #1 travels downward in a straight line, and rope #2 crosses over rope #1 as it travels toward the right. In the Layers window we can see that the highlighted grid cell in column 2 and row 3 has a vertical blue tile in layer 2 (as shown by the letter "A"), so this tile connects to the blue Tail End tile:
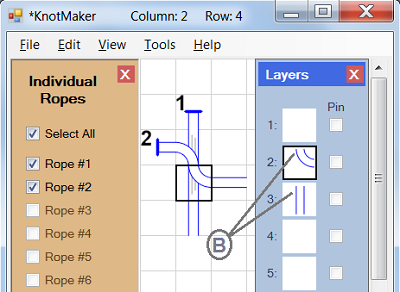
The following picture shows the layers for the highlighted grid cell in column 2 and row 4. In the Layers window we can see that there are two tiles (as shown by the letter "B") that can connect to the bottom of the vertical blue tile ("A") in the previous picture:
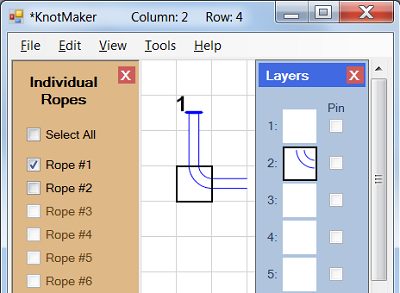
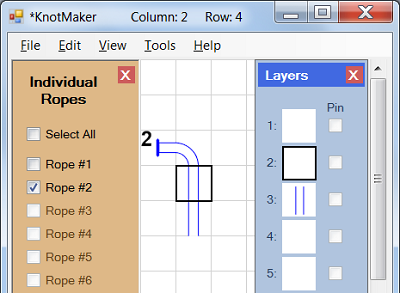
In the above two pictures, "A" shows a blue tile in layer 2, and "B" shows a blue tile in layer 2 that can connect up with the "A" tile. Therefore, the program will assume that these two tiles connect with each other because they have the same color and they're in the same layer. This means that the two separate rope objects will be built incorrectly in the Individual Ropes screen, as the following two pictures show:
In the rare cases where the individual ropes are built incorrectly, you can fix the rope-building logic using one of these methods:
- Try changing the color of one of the ropes.
- Try changing the layers for the tiles that are causing the problem, so that the two tiles that should connect together are in the same layer.
- If you don't want to change the layers that the tiles are in, try adding a duplicate tile so that the appropriate tile will be found in the appropriate layer.
- Try changing the drawing so that only one tile will connect up with the previous tile.
- December 13, 2014 - Updated for v2.2.
- January 09, 2013 - Updated for v2.1.
- May 19, 2012 - New page.