KnotMaker 2.3 Written by Derek Smith and Dave Root
   
Help - Custom Tiles and Tilesets  


    Help > Custom Tiles and Tilesets


Creating Your Own Tileset
Here's how to create your own set of tiles for KnotMaker. For simplicity, let's assume that KnotMaker.exe is located in the C:\KnotMaker_2.3 folder, and let's assume that your new tileset will be called Textured Rope (because you want to make tiles that have a more realistic rope texture):

  1. Make a new folder called C:\KnotMaker_2.3\Tilesets\Textured Rope and copy all 3 of the sub-folders from the C:\KnotMaker_2.3\Tilesets\Basic Rope folder to your new folder.

  2. Go to the C:\KnotMaker_2.3\Tilesets\Textured Rope\Tileset Config folder and edit the Tileset_Config.txt file in a text editor (e.g. Notepad). Scroll down and change the "Menu Display Name" line to say "Menu Display Name=Textured Rope". This is what will be displayed in KnotMaker under the "View/Tilesets" menu, and it needs to be the same as the folder name for your new tileset. Also change the Menu Order Number to 3 (if you want your new tileset to be the third menu item under the "View/Tilesets" menu).

  3. The C:\KnotMaker_2.3\Tilesets\Textured Rope\Base Images folder contains the following .PNG files, which you can use as models for creating your own tiles:
    1_Blue.png
    2_Blue.png
    9_Blue.png
    10_Blue.png
    17_Blue.png
    19_Blue.png
    21_Blue.png
    25_Blue.png
    29_Blue.png
    37_Blue.png
    45_Blue.png
    47_Blue.png
    49_Blue.png
    53_Blue.png
    57_Blue.png
    58_Blue.png
    BlankTile.png
    BlankTileWithGridLines.png
    These are the only .PNG files that you need in order to create a tileset that only has blue ropes (more .PNG files will be needed if you want additional rope colors or shadowing, as described below). KnotMaker will rotate and/or flip these files in order to build the full tileset, as described below.

    The tiles that come with KnotMaker are in the .PNG format, but you can also create tiles in the .BMP, .GIF, or .TIFF formats. Don't use the .JPG format because it doesn't work well in KnotMaker due to its compression. Different tilesets can use different formats, but all of the tiles in a tileset need to be in the same format.

    No matter which graphics program you use for creating tiles (e.g. MS Paint), the image size for each tile should be 256x256 pixels. This is large enough to give you good resolution while working on your tiles, and anything larger will cause performance problems in KnotMaker.

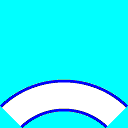
    Notice that the background of each tile is a light blue color, as in the picture below. KnotMaker will make this color transparent so that you can place several tiles on top of each other in the same grid cell to create rope crossings. You can use any color for the background as long as that same color is in the pixel at the top left corner of the .PNG file. KnotMaker looks at the color in the top left corner, then it makes that color transparent throughout the entire tile. Every corner of the tile needs to have the transparent color because when you build a tileset in KnotMaker (explained below), KnotMaker will rotate the tile several times in order to create all 4 orientations of the tile. Each orientation of the tile needs to have the light blue color in the top left pixel:


    Don't use black (RGB 0,0,0) in your tiles, because for some reason black becomes transparent in KnotMaker. Instead, use RGB 1,0,0 (which looks like black).

    The BlankTileWithGridLines.png file is an empty tile with grid lines, and this file can be used as a template to make new tiles. For the best results, make the rope segment in your tile cover up the grid lines at the top and left sides, but keep it just inside the grid lines at the bottom and right sides. When you're finished drawing the tile, change the grid line color from gray to light blue (if light blue is your transparent color). Also change the white sections outside of your rope to light blue.

  4. If you want to add a new rope color to KnotMaker (e.g. orange), then make a copy of each blue tile (e.g. 25_Blue.png) and change the filenames to use your new color (e.g. 25_Orange.png).

    You also need to tell KnotMaker about the new color by going to the C:\KnotMaker_2.3\Tilesets\Textured Rope\Tileset Config folder and editing the Tileset_Config.txt file in a text editor (e.g. Notepad). Scroll down until you see the names of the colors, then add your new color (spelled exactly as in the filenames that you're creating, such as 25_Orange.png):
    Color1=Blue
    Color2=Red
    Color3=Orange
    Color4=
    Color5=

  5. If you want to add shadowing to some of the tiles in your new tileset, simply make a copy of a tile and put "_Shadows" after the tile number in the filename (e.g. 17_Shadows.png). These are the main tiles that benefit from having shadowing:
    17_Shadows.png
    19_Shadows.png
    21_Shadows.png
    25_Shadows.png
    29_Shadows.png
    The shadowed version of a tile will be displayed automatically when there's another tile above it in the same grid cell. If you don't want any shadowing in your new tileset, simply delete the "_Shadows" files.

  6. When you're ready to build your full tileset based on the tiles that you created above, run KnotMaker and click the "View/Tilesets" menu, then select a different tileset than the one you're about to build. This will release the existing picture files from memory so the new files can be loaded into memory and be manipulated.

    Now click the "Tools/Build a Tileset" menu item. Enter the path where your tileset is located (C:\KnotMaker_2.3\Tilesets\Textured Rope). If the path that you entered contains a Tileset Config sub-folder then the "Build" button will be enabled.

    Select a file format (e.g. PNG) in the "Save As" combobox, then click the "Build" button. All of the files for your new tileset will be created using your selected file format, and they will be saved in the C:\KnotMaker_2.3\Tilesets\Textured Rope\Tileset Images folder.

    You should now be able to select your new tileset under the "View/Tilesets" menu. Test your tiles at all of the cell sizes to ensure that the tiles look good no matter how big or small they are. Open the AllTiles.km drawing to see how all of your tiles look. Make complex drawings with your tiles to verify that all of the rope segments line up properly.


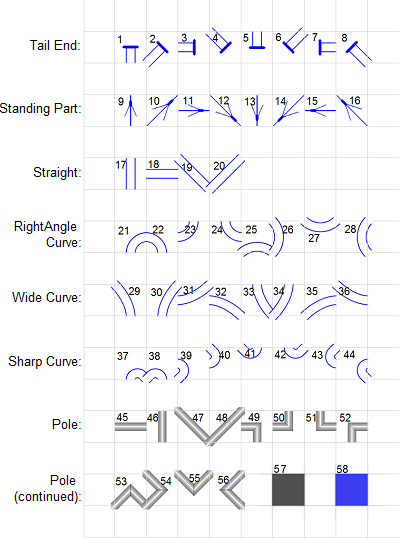
Here's the full set of tiles in the Basic Rope tileset, along with their tile numbers:


Creating Custom Tiles for Existing Tilesets
There are 58 tiles in a standard KnotMaker tileset (pictured above). However, you can invent your own customized tiles to do things that the standard tiles don't allow you to do. Here's how:

  1. Let's assume that you want to add some new custom tiles to the Basic Rope tileset. For simplicity, let's assume that KnotMaker.exe is located in the C:\KnotMaker_2.3 folder.

    Go to the C:\KnotMaker_2.3\Tilesets\Basic Rope\Tileset Images folder, which contains the .PNG picture files for all of the tiles in this tileset. Make a copy of a .PNG file so you can modify the picture to customize it into a new type of tile. The filename for the new tile needs to have the number that follows the highest number in the tileset. Since the highest-numbered file in the Basic Rope tileset is 58_Blue.png, your first custom tile needs to be called 59_Blue.png.

  2. Edit your custom tile (59_Blue.png) in any graphics program, such as MS Paint. See the section called Creating Your Own Tileset (above) for some issues to consider when making tiles.

    Create a copy of your new tile for each color in the tileset that you're working with, such as 59_Blue.png and 59_Red.png.

  3. There are no tile numbers hardcoded in the KnotMaker program. All of the logic related to tile numbers is handled through config files, which means that you can alter the behavior of any tileset to customize it in a way that works best for you.

    The C:\KnotMaker_2.3\Tilesets\Basic Rope\Tileset Config folder contains the following files (see the editing instructions at the top of each of these files):

    • BuildInstructions.txt - KnotMaker uses this file for determining how to build the full tileset using the image files in the Base Images folder. You don't need to edit this file if you're adding custom tiles to an existing tileset because KnotMaker won't add any custom tiles when it builds a tileset.
    • CellSizes.txt - KnotMaker uses this file for determining the appropriate size and position when drawing tiles onto the canvas. You don't need to edit this file if you're adding custom tiles to an existing tileset because this file doesn't contain any tile numbers.
    • DrawByBendingRopes.txt - KnotMaker uses this file for determining which tile number to draw when the "Draw By Bending Ropes" feature is used. You don't need to edit this file if you're adding custom tiles to an existing tileset because the "Draw By Bending Ropes" feature ignores custom tiles.
    • DrawBySelectingEndpoints.txt - KnotMaker uses this file for determining which tile number to draw when the "Draw By Selecting Endpoints" feature is used. You don't need to edit this file if you're adding custom tiles to an existing tileset because the "Draw By Selecting Endpoints" feature ignores custom tiles.
    • FlipHorizontal.txt - KnotMaker uses this file for determining how to horizontally flip each tile when you click the "Edit/Tiles within the Selected Cells/Flip Left and Right" menu item.

      If your custom tile is a left and right mirror-image of itself, then add the tile number (59) in the "Custom" section of this file (following the instructions at the top of the file).

      If your custom tile is not a left and right mirror-image of itself, then you'll need to create a .PNG file that's a mirror-image of your 59_Blue.png file. The new file should be named 60_Blue.png. Add all of your new tile numbers (59, 60, and any other new tiles that you make) in the "Custom" section of this file.
    • FlipVertical.txt - KnotMaker uses this file for determining how to vertically flip each tile when you click the "Edit/Tiles within the Selected Cells/Flip Top and Bottom" menu item.

      If your custom tile is a top and bottom mirror-image of itself, then add the tile number (59) in the "Custom" section of this file (following the instructions at the top of the file).

      If your custom tile is not a top and bottom mirror-image of itself, then you'll need to create a .PNG file that's a mirror-image of your 59_Blue.png file. The new file should be named 61_Blue.png (if you've already created the 60_Blue.png file). Add all of your new tile numbers (59, 60, 61, and any other new tiles that you make) in the "Custom" section of this file.
    • FullCell.txt - KnotMaker uses this file for determining which tiles fill up an entire grid cell (such as the gray Pole tile). These tiles need to be treated differently than the other tiles so that they don't overwrite other tiles at the corners.

      Add your new tile numbers to this file if the rope or pole in the tile fills up an entire grid cell. Most ropes and poles won't fill up an entire grid cell.
    • IconMapping.txt - KnotMaker uses this file for determining which Toolbox icon (Tail End, Standing Part, etc.) each tile is associated with.

      Add all of your new tile numbers in the "Custom" section of this file (following the instructions at the top of the file).
    • IndividualRopes.txt - KnotMaker uses this file for building individual rope objects, so that it can distinguish each separate rope in your drawing.

      Add all of your new tile numbers in the "Custom" section of this file (following the instructions at the top of the file).
    • Rotate90Degrees.txt - KnotMaker uses this file for determining how to rotate each tile when you click the "Edit/Tiles within the Selected Cells/Rotate 90 Degrees" menu item.

      You'll need to create .PNG files that are copies of your new tiles but rotated 90 degrees clockwise (and 180 degrees, and 270 degrees).

      Add all of your new tile numbers in the "Custom" section of this file (following the instructions at the top of the file).
    • Spin.txt - When you place a tile onto the canvas, you can right-click the tile to spin it to the desired orientation. In order to do this, KnotMaker uses this file to determine which tile to display each time you right-click.

      Add all of your new tile numbers in the "Custom" section of this file (following the instructions at the top of the file).
    • TileConversions_v1.x.txt - KnotMaker uses this file for converting .KM files from v1.x to v2.1. You don't need to edit this file if you're adding custom tiles to an existing tileset.
    • TileConversions_v2.1.txt - KnotMaker uses this file for converting .KM files from v2.1 to v2.2. You don't need to edit this file if you're adding custom tiles to an existing tileset.
    • Tileset_Config.txt - KnotMaker uses this file for capturing the essential information about a tileset.

      Everything to the left of the equals sign in this file needs to remain unchanged.

      Here are the contents of the Tileset_Config.txt file for the Basic Rope tileset:

      • Menu Display Name=Basic Rope - This line tells KnotMaker to add a menu item called "Basic Rope" under the "View/Tilesets" menu. The name ("Basic Rope") needs to be the same as the folder name for this tileset.
      • Menu Order Number=1 - This line tells KnotMaker that the "Basic Rope" menu item is intended to be the first option under the "View/Tilesets" menu (as long as another tileset doesn't also have Menu Order Number=1).
      • Highest Non-Custom Tile Number=58 - This line tells KnotMaker that there are 58 standard tiles in this tileset (not counting multiple colors and shadowing). Any tile numbers above 58 are therefore custom tiles that a user has invented.
      • Color1=Blue - This line tells KnotMaker that the first radio button in the "Colors" section of the Drawing Options window needs to be labeled "Blue." The color name needs to be spelled the same as in the .PNG filenames (e.g. 25_Blue.png).
      • Color2=Red - This line tells KnotMaker that the second radio button in the "Colors" section of the Drawing Options window needs to be labeled "Red." The color name needs to be spelled the same as in the .PNG filenames (e.g. 25_Red.png).
      • Color3=Green - This line tells KnotMaker that the third radio button in the "Colors" section of the Drawing Options window needs to be labeled "Green." The color name needs to be spelled the same as in the .PNG filenames (e.g. 25_Green.png).
      • Color4=Purple - This line tells KnotMaker that the fourth radio button in the "Colors" section of the Drawing Options window needs to be labeled "Purple." The color name needs to be spelled the same as in the .PNG filenames (e.g. 25_Purple.png).
      • Color5= - There are 5 possible colors in KnotMaker, but the Basic Rope tileset only has 4 colors. Therefore, the fifth color name is blank.
      • Created By=Dave Root - Specifies the author of this tileset. KnotMaker ignores this line.
      • Creation Date=5/19/2012 - Specifies the date when this tileset was created. KnotMaker ignores this line.
      • Comments=This is one of the default tilesets that come with KnotMaker. - Specifies any comments for this tileset. KnotMaker ignores this line.

  4. All of the .PNG files for your custom tiles need to be placed in the C:\KnotMaker_2.3\Tilesets\Basic Rope\Tileset Images folder (assuming that you're adding custom tiles to the Basic Rope tileset). Your tiles should now be available for use. In KnotMaker, click the "View/Tilesets" menu and select the appropriate tileset ("Basic Rope" in this case) to load your new tiles.


Modification History