| KnotMaker 2.3 |
Written by Derek Smith and Dave Root |
| |
|
| A free tool for drawing knots |
Downloads |
Screenshots
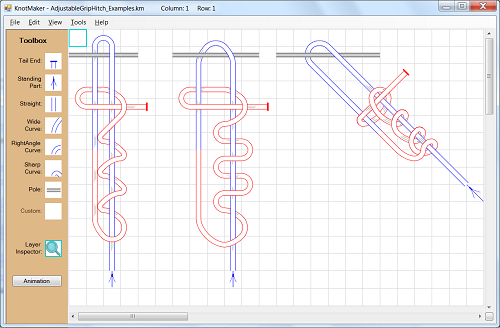
3 Ways to Draw an Adjustable Grip Hitch:
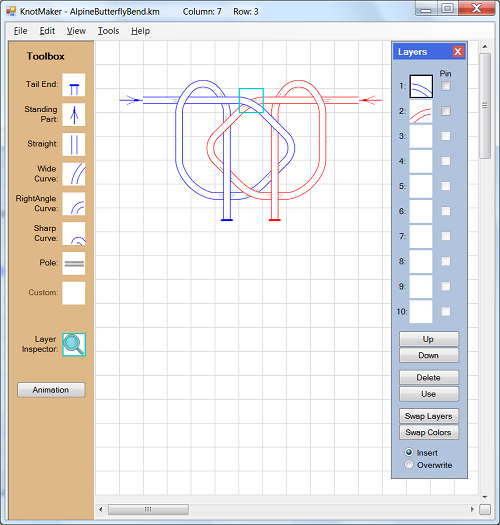
Alpine Butterfly Bend:
Carrick Bend:

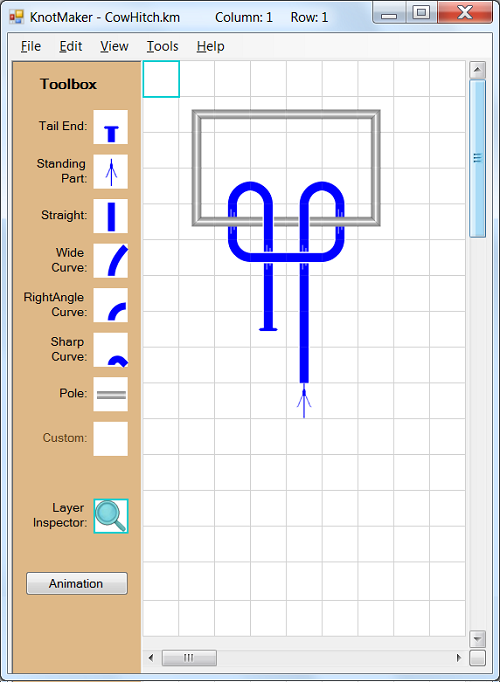
Cow Hitch:
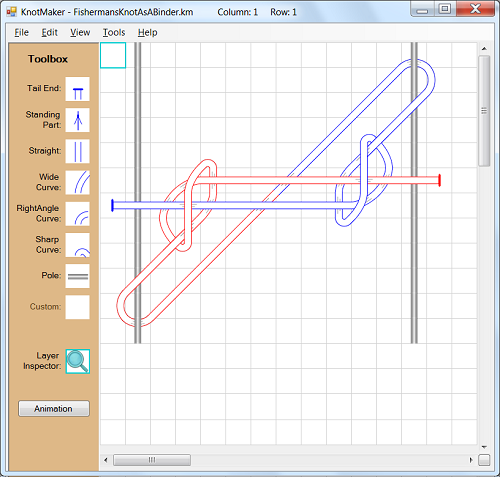
Fisherman's Knot Used As A Binder:
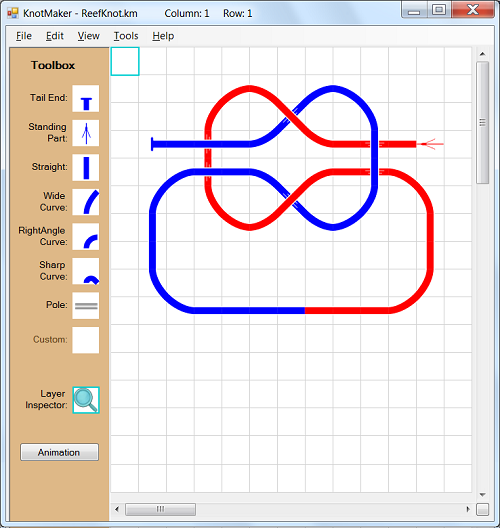
Reef Knot:
Links
These links will open up in a new browser window:
Contact
-
Please email any KnotMaker bugs, issues, or questions to me (Dave) at dave.root@live.com.
-
Post your questions about knots to one of the forums of
the International Guild of Knot Tyers
for some expert advice.
Version History
-
v2.3.2,
released on January 14, 2024
-
Bug Fix
- Saving a new drawing caused an error, which is now fixed (v2.3 - April 03, 2023).
-
Bug Fix
- Opening an existing drawing caused an error for some people, which is now fixed (v2.3.1 - January 7, 2024).
-
Bug Fix
- Double-clicking a .KM file to open KnotMaker caused an error, which is now fixed (v2.3.2 - January 14, 2024).
-
Enhancement
- The Layer Inspector (read only mode) icon is now a toggle (v2.3 - April 03, 2023).
-
v2.2,
released on June 13, 2014
-
Bug Fix
- If you hide the Layers panel, and then you inspect a grid cell, and then you show the Layers panel, the Layers panel will now properly display the tiles in the grid cell.
-
Bug Fix
- If you draw a red selection border around a group of cells, and you drag the selected cells until they're back to their original location, the selected tiles will not be moved or copied.
-
Enhancement
- The tiles have been improved in the Basic Rope tileset, and a new Solid Rope tileset has been added.
-
Enhancement
- In the Toolbox, the "Working End" category has been renamed to "Tail End" and the "Shallow Curve" category has been renamed to "Wide Curve."
-
Enhancement
- In the Toolbox, the positions of the "RightAngle Curve" category and the "Wide Curve" category have been swapped so that the categories now follow a smooth progression from a vertical tile to a sharply curved tile. In addition, the rotation order in some of the categories has been modified so that they now follow a smooth progression around the face of a clock.
-
Enhancement
- In the Layers panel, three new buttons have been added:
-
Use - This button causes the active tile in the Layers panel to become the active tile in the Toolbox. This allows you to use an existing tile on the canvas to quickly and easily change the Toolbox icon to the desired tile and orientation and color. The keyboard shortcut is Ctrl+U.
-
Swap Layers - When you click the "Swap Layers" button, a message will pop up telling you to click a second icon in the Layers panel to swap with. When you click the second icon, the contents of both layers (i.e. the tiles and their colors) will be swapped, making it easy to reverse a rope crossing. The keyboard shortcut is Ctrl+L.
-
Swap Colors - When you click the "Swap Colors" button, a message will pop up telling you to click a second icon in the Layers panel to swap with. When you click the second icon, the colors in both layers will be swapped. The keyboard shortcut is Ctrl+C.
-
Enhancement
- In the Drawing Options panel, the "Draw with Tiles" option has been renamed to "Draw By Placing Tiles." The "Direct Draw" option has been renamed to "Draw By Selecting Endpoints."
When the "Draw By Selecting Endpoints" option is enabled, 9 gray dots will be displayed in the highlighted grid cell to show where you can click. A black dot indicates the first endpoint that you clicked. If the gray dots are too faint on your screen, you can make them darker in the "Tools/Options" window. Click the "Colors" tab, then select "Drawing Methods Zones Color" in the list, then change the Transparency value. The lower the Transparency value, the darker the gray dots will be.
When the "Draw By Selecting Endpoints" option is enabled, all of the Toolbox icons will be disabled except for the Layer Inspector icon.
-
Enhancement
- In the Drawing Options panel, a new drawing method called "Draw By Bending Ropes" has been added.
When you left-click an empty grid cell, 8 gray dots will be displayed to show where you can click (only 2 gray dots will be displayed if you left-click a cell which contains a tile). When you left-click a gray dot, a Straight rope will be placed into that grid cell starting at the spot where you clicked. The endpoint of the rope where you clicked will be fixed and unmoving, and the dot that you clicked will turn black. Right-click the grid cell to bend the rope clockwise so the other endpoint of the rope exits the grid cell at the desired place. Use shift+right-click to bend the rope counter-clockwise.
When the movable endpoint of the rope is pointing in the desired direction, you can press the spacebar to place a Straight rope in the next grid cell. The fixed and unmoving endpoint of the Straight rope is where it connects to the previous tile, and you can bend the new rope to move the other endpoint.
In the Drawing Options panel, the "Draw By Bending Ropes" option has a "counter-clockwise" button and a "clockwise" button for bending the ropes, and a "Next" button for drawing the Straight rope in the next grid cell. The keyboard shortcuts are "<" (i.e. the comma) for counter-clockwise, ">" (i.e. the period) for clockwise, and the spacebar for "Next."
If the gray dots are too faint on your screen, you can make them darker in the "Tools/Options" window. Click the "Colors" tab, then select "Drawing Methods Zones Color" in the list, then change the Transparency value. The lower the Transparency value, the darker the gray dots will be.
All of the tiles can be drawn using the "Draw By Bending Ropes" method except for the Tail End tiles, the Standing Part tiles, the Pole tiles, and any custom tiles.
When the "Draw By Bending Ropes" option is enabled, all of the Toolbox icons will be disabled except for the Layer Inspector icon.
-
Enhancement
- In the Drawing Options panel, a new section called "Selected Cells" has been added. This section contains two radio buttons which determine how the move, copy, and delete functions will act after you draw a red selection border around a group of cells:
-
If the "Move/Copy/Delete All tiles" radio button is selected then
all
of the tiles will be moved or copied or deleted.
-
If the "Move/Copy/Delete Only tiles with the selected color" radio button is selected then
only
the tiles which have the selected color will be moved or copied or deleted. Keep in mind that you should select the desired color
before
you draw the red selection border. If you draw the red selection border first, and then you select a color, this will change the color of the tiles in the selected area.
When you drag the selected area to move or copy the tiles, you're dragging an image of
everything
in the selected area, even if only the selected color will be moved or copied.
-
Enhancement
- The Toolbox has a new "Animation" button which will pop up a blue floating panel called "Animation." This new Animation panel contains the controls for animating a drawing.
-
Enhancement
- If you draw a red selection border around a group of cells, and you drag the selected cells, the image that you're dragging will have a red border around it. When you release the mouse button, the logic for "snapping" the moved/copied cells has been improved.
-
Enhancement
- The red selection border can now be drawn or extended using shift+arrows (these keys can be changed in the "Tools/Options" window).
In previous versions of KnotMaker, the shift+right-arrow and shift+left-arrow keys were used for spinning a tile, and the shift+up-arrow and shift+down-arrow keys were used for moving the current tile up a layer or down a layer.
-
Enhancement
- The scrollwheel on a mouse can now be used for scrolling a drawing up or down. To scroll left or right, use ctrl+scrollwheel.
-
Enhancement
- When you click "File/Save As," the current filename will be displayed so it can be re-used or modified.
-
Enhancement
- A new menu option called "File/Save Animation As" has been added. This will save the current drawing as a .KMA (KnotMaker Animation) file, which is identical to a .KM file. When you load a .KMA file, the drawing will be loaded as usual, and then the Individual Ropes panel will be opened automatically, and the animation will begin running automatically. When you close the Individual Ropes panel, you can modify the drawing as usual.
To convert a KnotMaker Animation file (.KMA) to a regular KnotMaker file (.KM), or vice versa, simply change the file extension.
-
Enhancement
- When you're in "inspect" mode (i.e. the Layer Inspector icon is highlighted in the Toolbox), the Layers panel will automatically highlight the topmost tile when you click on a grid cell. This makes it quicker to modify a tile (especially when there's only one tile in the grid cell) because the layer is automatically selected for you.
-
Enhancement
- Added an "X" icon for closing the Individual Ropes panel. Also replaced the "Show All Ropes" radio button and the "Hide All Ropes" radio buttons with a standard "Select All" checkbox on the Individual Ropes panel.
-
Enhancement
- In the "Tools/Build a Tileset" window, the "Build" button is now disabled while you're typing in a folder name. This button will be enabled when a valid folder name is detected.
-
Enhancement
- Deleted the "View/Tilesets/Reload the Tileset Config Files" menu option because the config files are now loaded automatically when you change to a different tileset.
-
v2.1,
released on January 09, 2013
-
Bug Fix
- The corner crossings work properly in KnotTyer3D now.
-
Bug Fix
- The "Tuck a Corner Under" checkboxes are now properly updated when you select a group of cells and flip them horizontally or vertically.
-
Bug Fix
- If you place a tile into the top left corner of the canvas (for example), and select the NW "Tuck a Corner Under" checkbox in the Layers panel, then v2.0 displayed an error message. This has been fixed.
-
Bug Fix
- In v2.0, the Alt key stopped activating the File menu under certain circumstances. This has been fixed.
-
Enhancement
- New color scheme.
-
Enhancement
- The existing drawings have all been modified to reflect the new design philosophy in which the Standing Part arrows show the direction of travel
into
the knot (rather than the direction of travel away from the knot as in earlier versions of KnotMaker).
-
Enhancement
- Added a new floating panel called "Drawing Options." It contains the Drawing Method radio buttons and the Color radio buttons which used to be in the Toolbox, plus the "Tuck a Corner Under" checkboxes which used to be in the Layers panel.
The Layers panel and the Drawing Options panel can be moved by dragging their title bars, just like any other window.
New keyboard shortcuts: Alt+L will show or hide the Layers panel, and Alt+D will show or hide the Drawing Options panel.
-
Enhancement
- The "Draw By Clicking the endpoints" feature now displays the zones which can be clicked. When you click somewhere on the canvas then a black circle will appear where you clicked (to show the first endpoint of the tile to be drawn), and 8 gray circles will be displayed to show the zones which you can click to complete the tile. The color and transparency of the zones can be changed in the "Tools/Options" window.
In addition, there are now 9 buttons under the "Draw By Clicking the endpoints" radio button so you can use the "Draw By Clicking the endpoints" feature by clicking the buttons instead of clicking the gray circles on the canvas. You can also use the keyboard by pressing the keys which are shown on the "Draw By Clicking the endpoints" buttons. The numeric keypad is the obvious choice to use for the keys for the "Draw By Clicking the endpoints" option, but not everyone has a numeric keypad. Also, the digits from 0 to 9 are currently used for selecting specific layers in the Layers panel. All of the keyboard mappings can be modified in the "Tools/Options" window.
-
Enhancement
- There's a new "Layer Inspector" icon in the Toolbox. When this icon is highlighted, you can click anywhere on the canvas without placing a tile. This allows you to inspect the layers in any grid cell, leaving the drawing unchanged.
When the Layer Inspector icon is active it will display a turquoise magnifying glass, and the cell border will become turquoise. These are visual clues to let you know that you're in "inspect" mode. If you click an icon in the Toolbox then you'll no longer be in "inspect" mode, in which case the magnifying glass will disappear and the cell border will change to black.
When you open a drawing, you'll automatically be in "inspect" mode so that you don't accidentally modify the drawing.
New keyboard shortcuts: Ctrl + I will turn on "inspect" mode, and Ctrl + LeftClick will inspect a single grid cell when "inspect" mode is off.
-
Enhancement
- The maximum number of layers has been increased from 5 to 15. To improve performance on slower machines, the number of layers can be reduced in the "Tools/Options" window.
Added a scrollbar on the Layers panel so that people with smaller screens will be able to access all 15 layers. The scrollbar is only visible when it's needed.
-
Enhancement
- To remove one or more identical tiles in the same grid cell, first drag a red selection border around the cell(s), then click the "Edit/Selected/Remove Duplicate Tiles" menu item. Keep in mind that if a grid cell contains two tiles which are identical except for their color, then these are not considered to be duplicates of each other. This gives you control over which tiles are removed.
-
Enhancement
- Now you can pin a tile to a specific layer using the "Pin" checkbox located to the right of each icon in the Layers panel.
One purpose for pinning tiles is to prevent them from being pushed to a different layer when another tile is inserted into the same grid cell as the pinned tile. For example, if you place a row of Pole tiles in layer 3 and pin them, then you can place rope tiles above or below the Pole tiles and the Pole tiles will always remain in layer 3.
Another purpose for pinning tiles is that moving a pinned tile up a layer or down a layer will cause
all
of the pinned tiles to move to the new layer. This enables you to move all of your pinned Pole tiles (for example) up or down in the Layers panel simply by moving any one of the pinned tiles.
Some considerations and new functionality relating to the pin feature:
-
If the pinned tiles don't move when you click the Up or Down button in the Layers panel, it means that at least one pinned tile is already at the top or bottom layer.
-
When the pinned tiles are moved up or down in the Layers panel, this can cause pinned tiles to cross
over
other tiles when previously the pinned tiles crossed
under
the other tiles (and vice versa). Check your drawing carefully if you move the pinned tiles up or down in the Layers panel.
-
If you drag a red selection border around a group of cells and then move or copy the selected tiles on top of some existing tiles, then the existing tiles will all be pushed down as many layers as necessary to make room for the tiles being moved or copied (even if the existing tiles are pinned). This is necessary in order to preserve the integrity of the drawing, but check your drawing carefully to ensure that all of the pinned tiles are in the desired layers.
-
You won't be able to place a tile into a pinned layer of a grid cell, even if the Overwrite option is selected in the Layers panel. Pinned tiles are protected from being overwritten.
-
The "Edit/Selected Cells" menu has two new options:
-
"Pin All Tiles": Allows you to pin every tile in the selected area.
-
"Unpin All Tiles": Allows you to unpin every tile in the selected area.
-
The View menu has two new options:
-
"Show the Pinned Tiles": Allows you to show or hide all of the pinned tiles.
-
"Show the Unpinned Tiles": Allows you to show or hide all of the unpinned tiles.
-
The "Reverse the Layers" option (under the "Edit/Selected Cells" menu) can cause pinned tiles in the selected area to move to a different layer. This is necessary in order to reverse the rope crossings, but check your drawing carefully to ensure that all of the pinned tiles are in the desired layers.
-
The "Remove Gaps in Layers" option (under the "Edit/Selected Cells" menu) will not move any tiles which are pinned.
-
The "Remove Duplicate Tiles" option (under the "Edit/Selected Cells" menu) will not remove any tiles which are pinned.
-
To pin or unpin a group of cells, drag a red selection border around the cells and then click the Pin checkbox in the appropriate layer. All of the selected tiles
in that layer
will be pinned or unpinned based on whether or not there's a checkmark in the Pin checkbox for that layer. To pin or unpin
all
layers within the selection border, use the "Pin All Tiles" or "Unpin All Tiles" menu items under the "Edit/Selected Cells" menu.
-
Enhancement
- There are now 7 different cell sizes (under the "View/Cell Size" menu), each of which essentially doubles the area of the next-smaller cell size.
-
Enhancement
- Added a "View/Canvas Size" menu which allows you to select the size of the canvas (from 25x25 up to 100x100). Using a smaller canvas size will improve performance on slower machines.
-
Enhancement
- The "Tools/Individual Ropes" panel has some new features:
-
Each Tail End tile now shows a number in the top left corner, corresponding to the rope number checkboxes.
-
The Pin and Unpin buttons will pin or unpin every tile in the displayed ropes and Poles.
-
The Animate button will animate the displayed ropes. The backward, pause, forward, and speed controls should work intuitively.
-
Added a Help button.
-
Enhancement
- You can now drag a red selection border around some grid cells and change the color of the selected tiles by using the color options in the Toolbox. Only the tiles in the current layer will be changed (i.e. the layer which is highlighted in the Layers panel).
-
Enhancement
- When you scroll the canvas using the keyboard, the cell border will now move with the drawing so it always stays on the same grid cell. If the cell border reaches the edge of the canvas then it will remain at the edge.
When you scroll the canvas using the scrollbars, the cell border won't move with the drawing. This gives you two different options for scrolling the canvas.
-
Enhancement
- The KnotMaker title bar now displays the column and row of the active grid cell (i.e. the grid cell which has a border around it). In earlier versions of KnotMaker, the title bar displayed the column and row that the mouse was pointing to.
-
Enhancement
- A new Pole tile has been added, which is brown and fills up an entire grid cell. This tile can create Poles which span multiple grid cells, for handling situations such as this:

The new Pole tile is flat (not 3D like the other Pole tiles), which is necessary in order to give the appearance of a single Pole across multiple cells. This tile looks fine when the cell size is at its largest setting (under the "View/Cell Size" menu). But unfortunately when the image size is reduced for smaller cell sizes, it creates faint lines between each Pole tile.
-
Enhancement
- KnotMaker can now load tiles in the form of BMP, GIF, PNG, TIF, or TIFF files (it's no longer limited to just BMP files). In addition, the "Tools/Build a Tileset" menu item gives you the option of saving tilesets in the form of BMP, GIF, PNG, or TIFF files. JPG files are compressed in a way which affects the transparency in KnotMaker, so JPG files can't be used.
-
Enhancement
- In earlier versions of KnotMaker, if you drew a red selection border around a group of cells then you couldn't move the cell border. Now you can use the arrow keys to move the cell border when there's a red selection border around a group of cells.
-
Enhancement
- When viewing a drawing in KnotTyer3D, some machines render the 3D images more accurately than others. Therefore, the "Tools/View in KnotTyer3D" window contains a new checkbox:
-
"Remove All Gaps in Layers": If this checkbox is selected then KnotMaker will move every tile (including pinned tiles) up as many layers as possible in order to remove all of the empty layers between tiles. This happens "behind the scenes" and won't affect your drawing. This usually produces the best 3D images in KnotTyer3D. If this checkbox is not selected then your drawing will be displayed in KnotTyer3D without any modifications.
-
Enhancement
- The "File/Save As BMP" menu item has been renamed to "File/Save Picture As." You can now use this menu option to save a picture of the current drawing as a BMP, GIF, JPG, PNG, or TIFF file.
-
v2.0,
released on May 23, 2012
-
This is a complete re-write of the KnotMaker program in C#, with several new features.
-
v1.4,
released on December 27, 2010
-
Enhancement:
When you highlight a section of your drawing by dragging a red rectangle around it, the KnotMaker title bar will now display the dimensions of the red rectangle. This makes it easy to determine whether or not the red rectangle is a perfect square (because the Rotate function requires the highlighted section to be a perfect square).
-
Enhancement:
In earlier versions of KnotMaker, the "Reverse All Rope Crossings" feature didn't reverse any rope crossings on Pole tiles because I couldn't come up with a way for the program to know which Pole tile to use. Now the Pole tiles will properly reverse all rope crossings, but only if the rope contains a Tail End tile.
-
Enhancement:
When you highlight a tile in the Toolbox, the "Draw By Clicking the endpoints" checkbox will now be unchecked automatically. This saves you some time, and it avoids confusion when you left-click in the drawing grid.
-
Bug Fix:
On my Windows 7 machine, there was a noticeable delay when dragging the mouse to highlight some cells with a red rectangle. This has been fixed.
-
Bug Fix:
In earlier versions of KnotMaker, ropes which crossed diagonally over a Pole tile were not always drawn very "cleanly." This has been improved, but it's likely that there will still be situations when diagonal ropes crossing over/under a Pole tile will not be drawn as cleanly as I would like.
-
v1.3,
released on July 23, 2010
-
Enhancement:
When you open or insert or save a KnotMaker drawing (.KM), the folder which you select will now be written to the INI file so that it will be the default folder the next time you open or insert or save a KnotMaker drawing. This should make these file functions more convenient.
-
Enhancement:
When you save a .BMP picture of a drawing, the folder which you select will now be written to the INI file so that it will be the default folder the next time you save a .BMP picture of a drawing. This should make the .BMP save function more convenient.
-
Enhancement:
When you view a KnotMaker drawing using the KnotTyer3D program, a .KT3 file is generated. The folder which you select for this file will now be written to the INI file so that it will be the default folder the next time you view a KnotMaker drawing using the KnotTyer3D program. Also, if the KnotMaker drawing doesn't have a filename then the KnotTyer3D file will now default to temp.kt3 (you won't be prompted to over-write this file). These things should make the KnotTyer3D function more convenient.
-
Enhancement:
The File menu contains the nine most recent filenames which you have opened or saved, and these filenames are written to the INI file so that they will be displayed in the File menu the next time you run KnotMaker. Before displaying the filenames under the File menu, the program will now remove any filenames which point to files that can't be accessed. This will prevent "File not found" messages.
-
Bug fix:
The "View With KnotTyer3D" window had two controls with Alt+R as their shortcut keys. This has been fixed.
-
Bug fix:
Fixed a broken link to the KnotTyer3D website.
-
Bug fix:
The Cancel button on the "Individual Ropes" panel was causing the Toolbox icons to disappear. This has been fixed.
-
v1.2,
released on May 31, 2009
-
New feature:
Scrollbars.
-
Enhancement:
The "Draw By Clicking the endpoints" feature will now anticipate your next click, making it easy to draw a continuous rope using single clicks.
-
Bug fix:
The "File/Save As BMP" menu item will now prompt you to overwrite the file if it already exists.
-
Bug fix:
When you click "File/New" followed by "File/Insert," then the "File/Save As BMP" and "Edit/Copy To Clipboard" and "Tools" menu items will now be enabled.
-
v1.1,
released on April 26, 2009
-
New feature:
When you hold down the Alt key and right-click a "crossing" tile in the drawing grid, then that tile's "Main" and "Behind" colors will now be swapped.
-
New feature:
The "Individual Ropes" panel (under the "Tools" menu) has a new checkbox called "Show All Poles." Selecting this checkbox will show all of the Pole tiles, and unselecting this checkbox will remove all of the Pole tiles.
-
New feature:
Under the "Tools" menu there's a new menu item called "View With KnotTyer3D."
-
New feature:
In the Toolbox there's a new checkbox called "Draw By Clicking the endpoints."
-
v1.0,
released on April 18, 2009
Dave Root
|