Perfect Hard-Boiled Eggs
(Almost) Every Time
Recently I went on a quest to find the best way to make hard-boiled eggs because I was tired of ripping the eggs to shreds trying to get the shells off. I tried all kinds of methods that I found online, but then I had one of those happy accidents which did the trick (see Method 2 below).
When to Boil Eggs
What I discovered in my research is that fresh eggs tend to be more difficult to peel, no matter how they're cooked. Eggs which are more than a week old are more likely to peel easily, possibly because they're more alkaline. Some people recommend adding about a teaspoon of baking soda into the water when you boil eggs to make them more alkaline, but I haven't noticed any difference with or without baking soda.
To test the age of the eggs before you boil them, place them into a pot of cold or room-temperature water so that the water is an inch or so above the eggs. If the eggs sink to the bottom and lie on their sides then they're very fresh, because they haven't had much time to absorb air through their shells. If they sink to the bottom but stand up on one end then they're more than a week old, so they're perfect for boiling and should be easy to peel. If they float to the surface of the water then they're no longer fresh enough to eat.
Step-By-Step Instructions
Update on 1/19/2024:
We received a
DASH Deluxe Egg Cooker  for Christmas, and it makes up to 12 hard-boiled eggs quickly and easily. They're always cooked just right and are easy to peel. All you do is poke a hole in the large end of the eggs (with the provided poker), put the appropriate amount of water in the unit (using the provided clearly-marked measuring cup), and press the ON button (which is the only control on the unit). After 15 to 20 minutes you have perfectly cooked hard-boiled eggs. It also makes soft boiled eggs, poached eggs, scrambled eggs, and omelets, although we haven't tried those yet. Highly recommended. But to make hard-boiled eggs with your own pot on your own stove, read on.
Method 1
My original method (now called Method 2) worked well with the equipment that I was using, but I discovered that it didn't do such a good job when I used a different pot and a different stove. After doing more research I found a steaming method which works very well. I've used it with dozens of eggs including small eggs, large eggs, white eggs, brown eggs, the least expensive eggs, and the vegetarian-fed, cage-free type of eggs, and I've only had one egg which didn't peel easily. This method uses a lot less water than Method 2, so it takes a lot less time for the water to boil. Also, the cooking time with this method is roughly half the cooking time of Method 2.
-
Put a steamer insert into a pot, then pour in enough water to almost reach the bottom of the steamer insert. This ensures that you have enough water so it doesn't all boil away while the eggs are cooking, plus it prevents the eggs from sitting in the boiling water if the water level reaches above the bottom of the steamer insert.

-
Remove the steamer insert and bring the water to a boil.

-
Place some eggs (either room temperature or straight from the fridge) into the steamer insert, then place it into the pot.

-
Cover the pot and let the eggs steam for 13 minutes on the highest heat setting. This is a gentler method of cooking than Method 2, and you're likely to have fewer broken eggs with this method. 13 minutes is just the right cooking time when I steam eggs, but you might need to experiment a bit to find the best cooking time with your equipment.

-
If I'm not going to eat an egg right away then I place the steamed eggs into an empty carton and let them sit on the counter for about 30 minutes until they've cooled off enough to go into the refrigerator.

-
If I want to eat an egg fairly soon then I place one of the freshly-steamed eggs into a large mixing bowl and cover it with cold water.

-
Then I put a freezer pack on top of the egg to rapidly chill it, and let it sit for 15 minutes. Now the egg is ready to eat.

-
To remove the shell, gently crack the shell all the way around, then gently squeeze the ends of the egg and around the sides of the egg.

Usually most of the shell will want to slide right off, although occasionally you might get a finicky egg which won't cooperate.

-
When eggs are over-cooked they get a fairly thick gray-green layer around the yolks due to a reaction between the traces of iron found in the yolks and the sulfur found in the whites. In addition, the yolks will become dry and crumbly, and the whites will become rubbery, and sometimes they'll have an odor of sulfur. If any of these things happen to your eggs then reduce the cooking time.
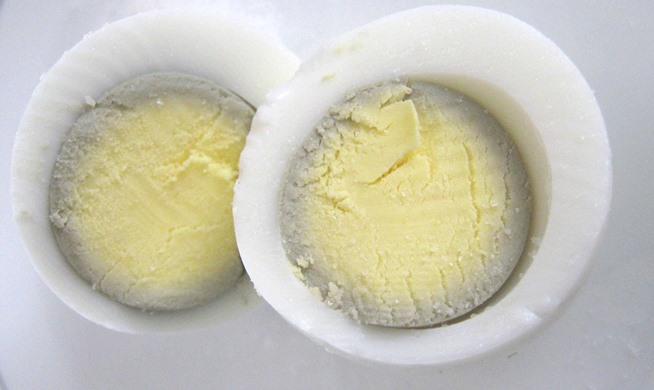
When eggs are cooked just right, they'll look something like this (sometimes with just a slight change in color around the yolks).

Method 2
I've used this method on many dozens of eggs, and almost every egg is cooked well and peels easily.
-
Put the eggs (either room temperature or straight from the fridge) into a pot and fill the pot with water until the eggs are covered. The eggs should be in a single layer with enough room for them to move around a bit so they can heat more evenly. Don't put the eggs into boiling water because the eggs might cook too rapidly, which causes the air inside the shells to expand quickly and possibly crack open the shells. Again, if any eggs float to the surface of the water then they're no longer fresh enough to eat.

-
Put the burner on HI and leave the pot uncovered. This allows the eggs to heat up gradually so there's less chance that the shells will break.

-
When you're sure that the water has started to boil (this part is a bit subjective), set a timer so the water boils for 2 minutes. This was my "happy accident," because on one of my attempts I accidentally allowed the water to boil longer than I intended.

-
After the water boils for 2 minutes, turn the burner off (for gas or induction stoves) or move the pot to an unheated burner (for electric stoves). Put the lid on the pot, and set the timer for 20 minutes. These times work well for me, but you might need to adjust them if the eggs aren't cooking just right for you.

-
Some people say that adding salt before boiling the water will prevent any cracked eggs from making a big mess in the pot. However, I don't add salt and I don't usually have a big mess from cracked eggs.

-
After the 20 minutes are up, transfer the eggs to a bowl and let them sit on the counter for awhile to cool. When they're warm to the touch but not painfully hot, they're ready to go into the fridge. Eggs are easier to peel after they have thoroughly chilled, such as being in the fridge for a couple of hours. If you want to eat an egg soon after cooking it then put it into an ice bath for 10 or 15 minutes to chill it.

-
To remove the shell, gently crack the shell all the way around, then gently squeeze the ends of the egg and around the sides of the egg.
Usually most of the shell will want to slide right off, although occasionally you might get a finicky egg which won't cooperate.
-
When eggs are over-cooked they get a fairly thick gray-green layer around the yolks due to a reaction between the traces of iron found in the yolks and the sulfur found in the whites. In addition, the yolks will become dry and crumbly, and the whites will become rubbery, and sometimes they'll have an odor of sulfur. If any of these things happen to your eggs then reduce the cooking time.
When eggs are cooked just right, they'll look something like this (sometimes with just a slight change in color around the yolks).
"Perfect Hard-Boiled Eggs (Almost) Every Time"
URL: http://daveroot.neocities.org/hardboiledeggs
Modification History
-
January 19, 2024 - Added an update about the DASH Deluxe Egg Cooker.
-
November 26, 2017 - Added Method 1.
-
May 06, 2016 - New website.
Dave Root
|
|